Contents
- 13.Troubleshooting
- 14.Glossary
Chapter 1 · Getting started
Getting started
What PharmaDesk is, how to sign in, what is where on the screen, switching language and branch, and which menus each role sees
PharmaDesk keeps your whole pharmacy in one place: sales (POS), stock and expiry, purchases, customer dues, expenses, accounts and reports. This chapter covers the first-day basics so anyone on the team can start with confidence.
Signing in
PharmaDesk runs in a web browser (Chrome or Edge work best). The owner creates an account for you; you sign in with your Mobile number and Password.
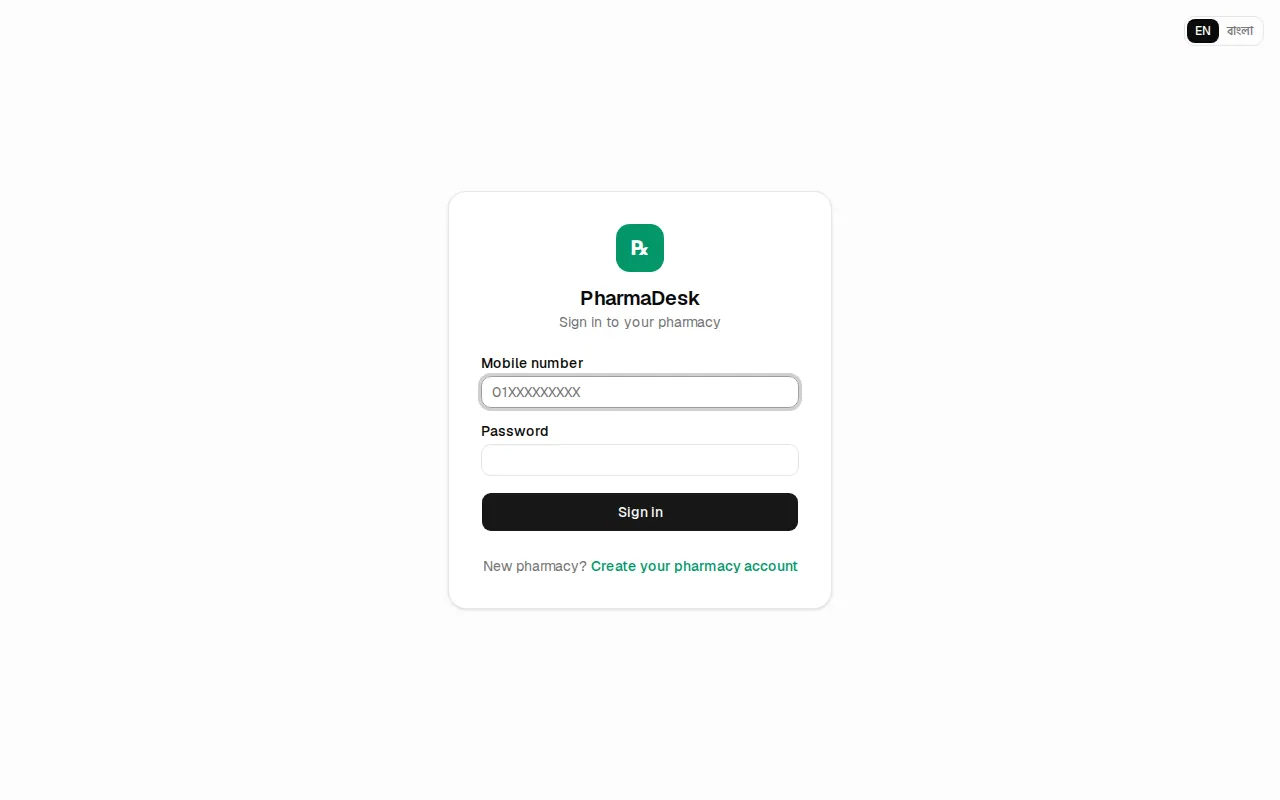
- Open your pharmacy's PharmaDesk address in the browser. The page says "Sign in to your pharmacy".
- Type your 11-digit number in Mobile number (for example
01XXXXXXXXX). - Type your Password.
- Press Sign in.
Most roles land on the Dashboard after signing in. Cashiers go straight to POS / New sale so they can start selling at once.
The sign-in page has an EN / বাংলা switch at the top right, so you can pick the language before signing in.
The screen layout
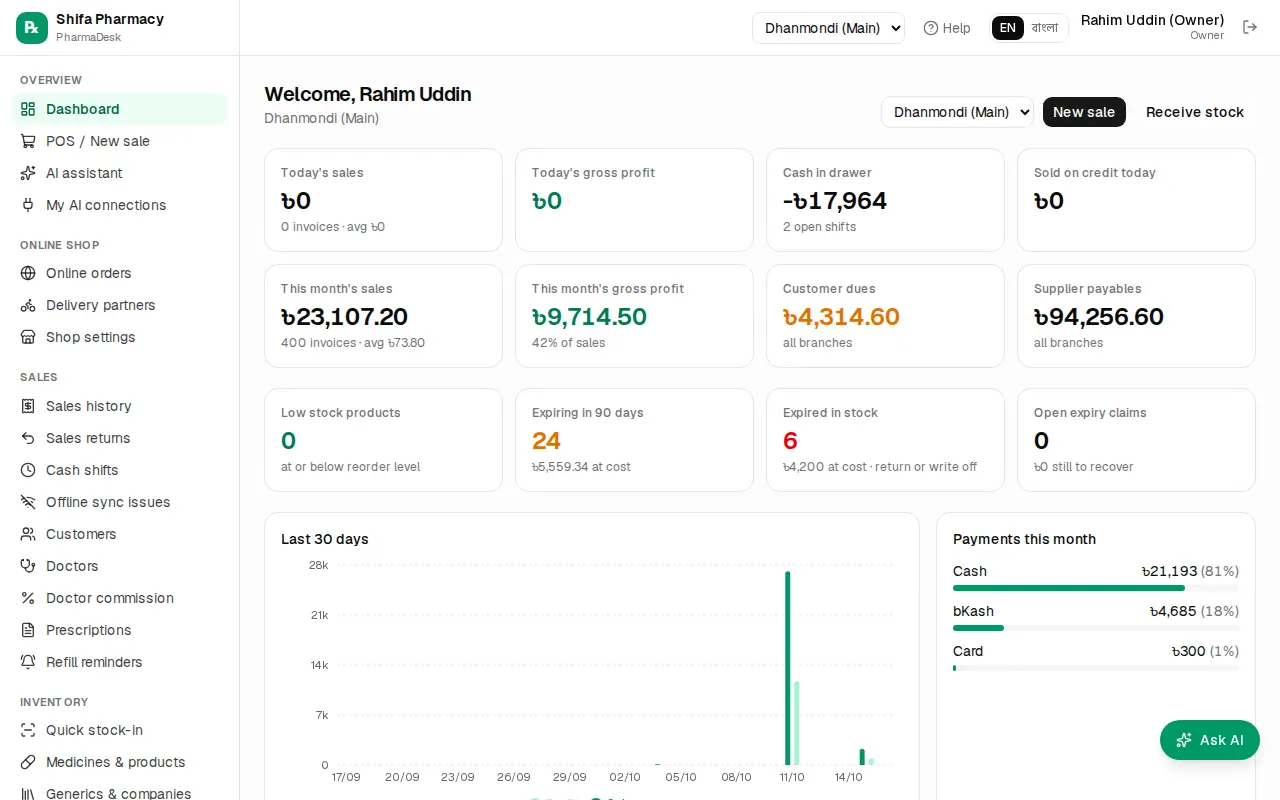
Left menu (sidebar): the pharmacy name at the top, then the menu in sections — Overview, Online shop, Sales, Inventory, Purchasing, Finance, Accounting, Reports, HR, Admin. The page you are on is highlighted in green. Menus your role is not allowed to use are not shown at all.
Top bar (header), from right to left:
- Sign out — the door-shaped icon. Use it when you finish or leave the computer.
- Your name and role (for example "Cashier").
- EN / বাংলা — the language switch.
- The branch name, or a drop-down to pick the branch.
- Help (?) — opens the guide chapter for the page you are on.
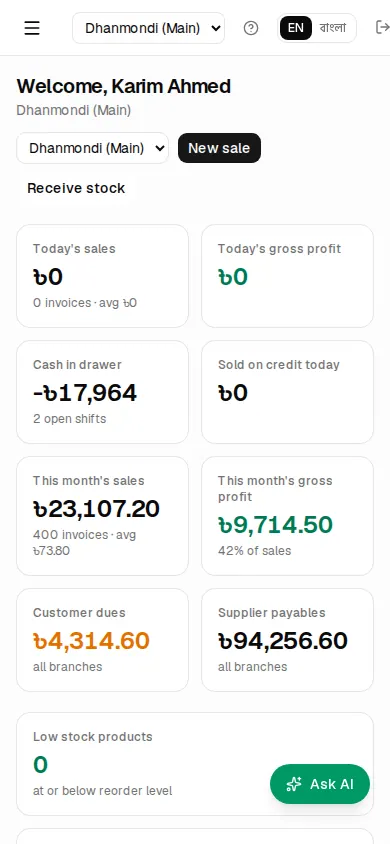
On a phone: the sidebar is hidden. Tap the three-line (☰) button at the top left to open the menu; it closes by itself when you pick a page.
Coloured banner at the top: when the free trial or subscription has 7 days or fewer left, it shows "Free trial: N days left." or "Subscription: N days left." with a Subscribe link. If your licence has expired but is in its grace days, a yellow banner appears. Details: Payments, licence & AI.
Switching language
- Find the EN / বাংলা switch in the header.
- Press বাংলা for Bangla or EN for English.
The whole app changes at once. Your choice is saved on your account. Staff who have never picked a language see the owner's Default language (Admin › Settings › Receipts). A few texts without a Bangla translation yet still show in English.
Switching branches
If the pharmacy has more than one branch, each branch has its own stock, cash drawer, sales and purchases.
- Open the branch drop-down in the header.
- Choose the branch you are working in.
The page reloads with that branch's data, and the choice is remembered next time you sign in. With only one branch you just see its name instead of a drop-down. If the owner has tied a staff member to one branch, that person only sees that branch.
Changing your password
PharmaDesk has no page for changing your own password yet. To change a password, or if you forgot it:
- Staff: ask the owner. They open Admin › Users & roles, press the key icon next to your name and set a new password.
- Owner: on the same page, press the key icon on your own row (marked "You") to change your own password.
A new password needs at least 6 characters. Changing it signs that user out on every device; they sign in again with the new password. Details: Owner setup.
Which menus each role sees
Every user has one role. The menu follows the role:
| Role | Sees |
|---|---|
| Owner | Everything, including all Admin settings |
| Manager | Sales, Inventory, Purchasing, Finance, Accounting, Reports, HR, Online orders; in Admin only Import data and Audit log |
| Pharmacist | Dashboard, POS, Sales (not commission), Customers, Doctors, Prescriptions, Medicines & products, Stock, Expiry, Reorder |
| Cashier | Dashboard (own sales today), POS, Sales history, Returns, Cash shifts, Customers, Prescriptions, Medicines & products |
| Store keeper | Dashboard, all of Inventory (stock-in, adjustments, transfers, stock count) and all of Purchasing |
| Accountant | Dashboard, Sales history, Doctor commission, stock views, Purchasing, Finance, Accounting, Reports |
The AI assistant is available to owners, managers, pharmacists, store keepers and accountants (not cashiers). My AI connections only appears when your plan includes the AI connector. Modules that are not in your plan (for example HR) are hidden from the menu.
Opening a page your role can't use shows a "No access" page. If you need it, ask the owner; they can change your role.
The Help button
Stuck on a page? Press Help (?) in the header. It opens the guide chapter written for that page — on the POS, for example, the Daily sales chapter. For problems see Troubleshooting, and for unfamiliar words the Glossary.
Practising on the demo
You can practise on a demo before touching real data. Opening the /demo page on the PharmaDesk website builds a sample pharmacy just for you, with medicines, stock and a month of sales, and signs you in automatically. Nothing in it is real, and it is deleted after 24 hours.
- In the yellow banner at the top, use the View as drop-down to switch between Owner, Manager, Cashier and the other roles and see what each one sees.
- When the demo ends, press Start a new demo, or Start your own free trial to open your own pharmacy.
- On a public demo server, the sign-in page also lists the staff of the sample pharmacy "Shifa Pharmacy" with a one-click button each:
01700000001(Owner) to01700000006(Accountant), password123456. These work on the demo only.
Common mistakes
- Working in the wrong branch. Check the branch in the header before a sale or stock-in.
- Leaving the computer without signing out. On a shared counter someone else could sell under your name.
- Sharing one account between staff. Give everyone their own login so the audit log shows who did what.
- Guessing a forgotten password again and again. Ten wrong tries lock you out for 15 minutes; ask the owner for a new password instead.
Chapter 2 · Owner & setup
Owner setup
Pharmacy profile and settings, staff and roles, branches, receipts and printers, labels, importing data, backup and the audit log
Before the first sale, the owner sets up the pharmacy details, staff accounts, branches and printers, and brings in old data. This chapter covers each step.
Pharmacy profile and settings
Open Admin › Settings. The top shows your Subscription (plan, expiry, branches and users).
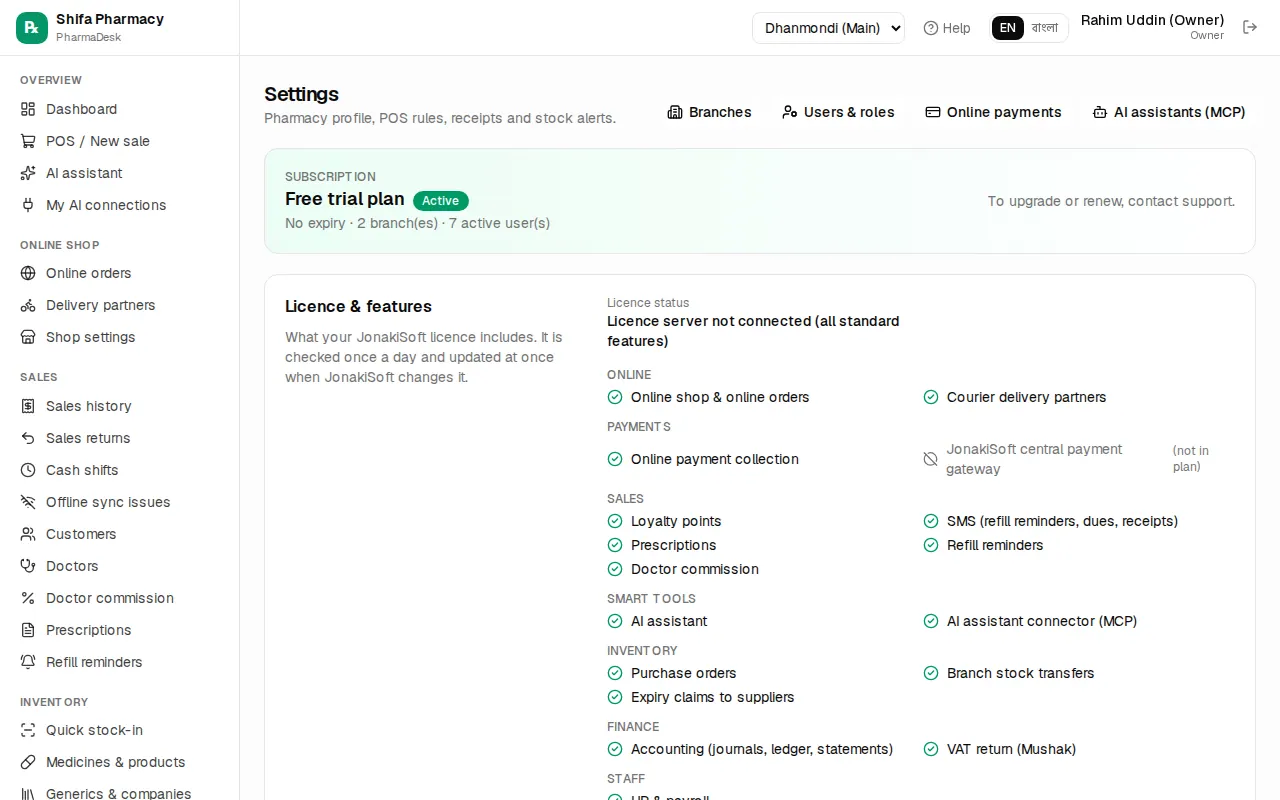
Pharmacy profile — printed on receipts, invoices and reports:
- Fill in Pharmacy name, Phone, Email, Address.
- Add Drug licence no., Trade licence, VAT registration (BIN).
- If you have a logo online, paste its web link into Logo URL.
- Press Save profile.
The sections below are saved together with the Save settings button:
- Sales & POS: VAT on taxable items (%) (only for products marked VAT applicable), Default discount (%), Cashier discount cap (%) (managers can go above it), Return window (days), and Round bills to whole Taka.
- Loyalty: Enable loyalty points, points per ৳100 spent, and the value of one point in Taka.
- Receipts: Paper size (80 mm thermal, 58 mm thermal or A4 invoice), the staff Default language, a Header line and Footer note (for example "Medicines can be returned within 7 days").
- Stock alerts & reminders: how many days before expiry to warn, refill reminders, the invoice-scanning mode for stock-in, the AI assistant on/off switch, and Send SMS.
- Staff leave: casual, sick and annual leave days per year.
Staff and roles
Admin › Users & roles lists everyone who can sign in. Each user has one role and, optionally, one branch.
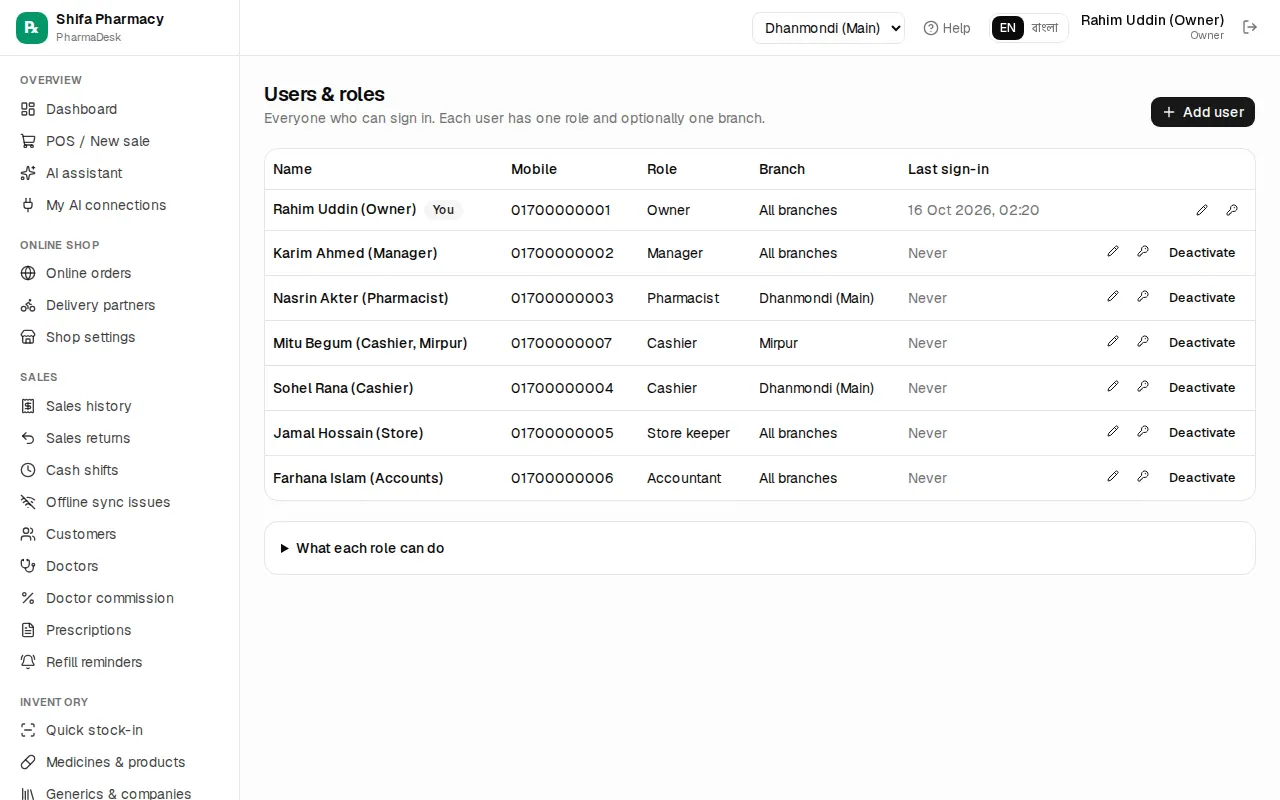
Adding a staff member:
- Press Add user.
- Enter Full name and Mobile (login) — they sign in with this number. Email is optional.
- Choose the Role.
- Choose the Branch. Leave it on "All branches" to let them switch between all branches; pick one to keep them in that branch.
- Set a Password of at least 6 characters.
- Press Save, then give the password to the staff member privately.
What the roles mean:
| Role | Can do |
|---|---|
| Owner | Everything, including settings and users |
| Manager | Almost everything except settings: void sales, larger discounts, change prices, stock, purchases, accounts, reports, HR, import, audit log |
| Pharmacist | Sales, returns, customers, doctors, prescriptions, the medicine list |
| Cashier | Sell at the POS, customers; discounts up to the cap |
| Store keeper | Stock-in, purchases, adjustments, transfers, stock counts |
| Accountant | Payments, expenses, accounting, reports, doctor commission |
For the full list, open What each role can do at the bottom of the page.
Editing, passwords and deactivating — at the right of each row:
- Pencil icon: change name, number, role or branch.
- Key icon: type a new password and press Set password. The user is signed out everywhere.
- Deactivate: use it when someone leaves. They are signed out at once and cannot sign in. Their past sales and records stay. Press Activate to bring them back.
Branches
Admin › Branches lists each branch with its number of users and batches in stock. Each branch has its own stock, cash drawer, sales and purchases.
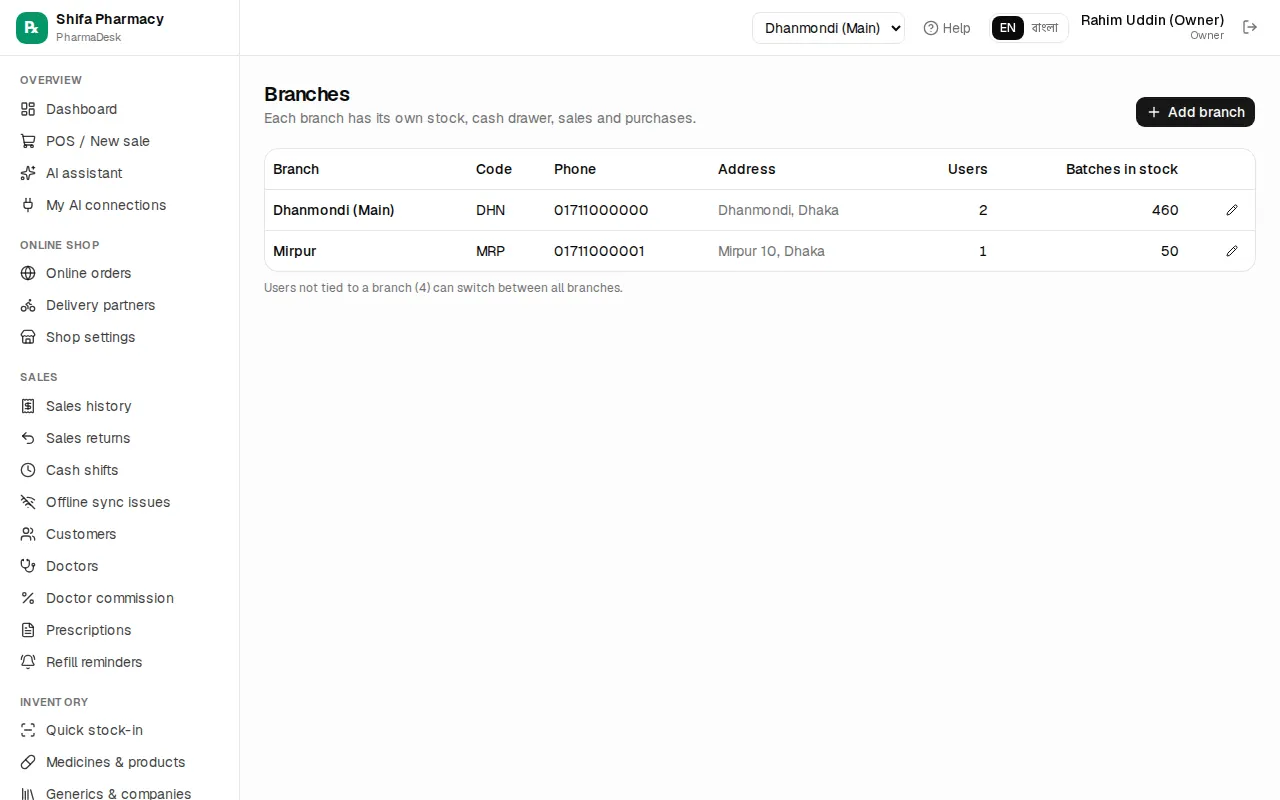
- Press Add branch.
- Enter the Branch name and a short Code (for example
DHN) — it appears on document numbers. - Add Phone and Address, then press Save.
To close a branch, open it with the pencil icon and untick Active; closed branches disappear from the branch switcher in the header.
Receipts and printers
Open Admin › Printers & labels.
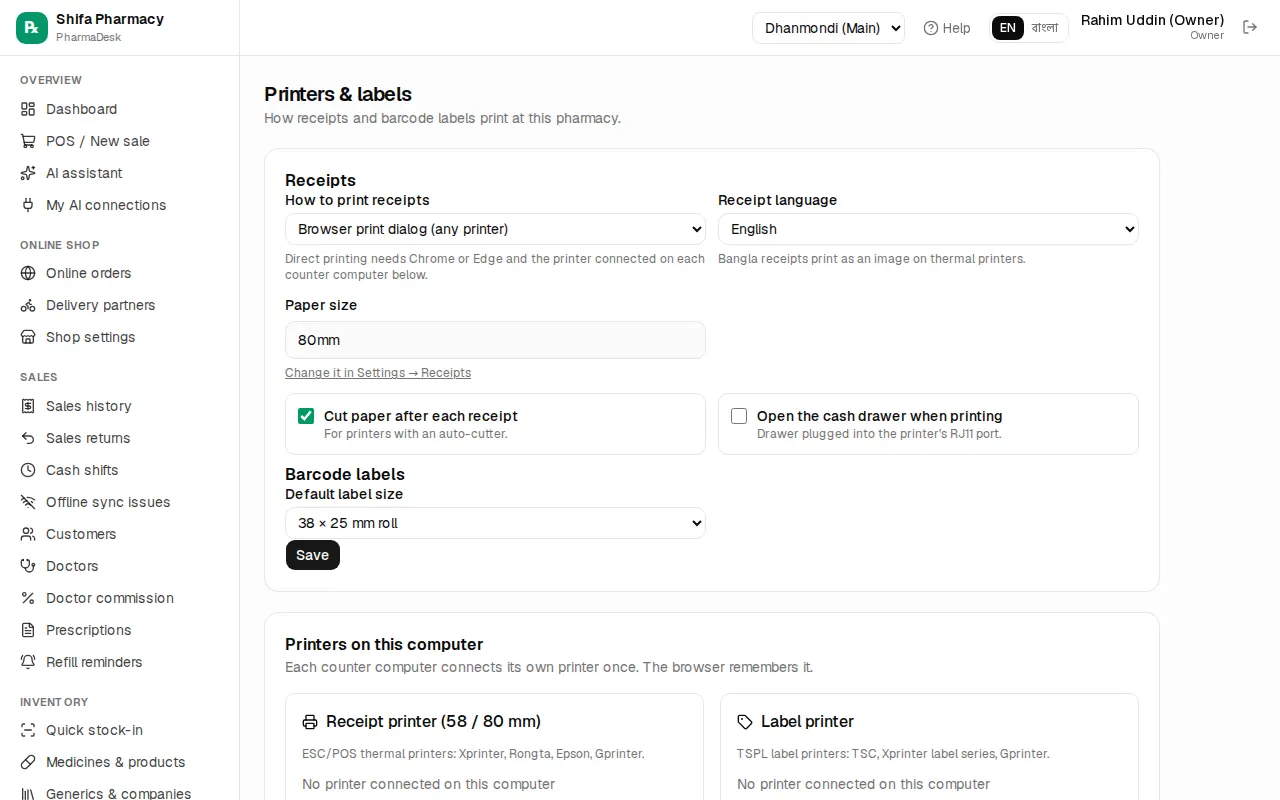
How to print receipts:
- Browser print dialog (any printer) — the simplest; shows the print box every time.
- Direct to thermal printer (no dialog) — faster; needs Chrome or Edge, and the printer connected once on each counter computer.
Also choose the Receipt language (Bangla receipts print as an image on thermal printers), Cut paper after each receipt, Open the cash drawer when printing, and the Default label size, then press Save. The paper size is changed in Settings › Receipts.
Connecting the printer on each counter (the Printers on this computer section):
- Open this page on the computer that will print.
- On the Receipt printer (58 / 80 mm) card press Connect USB printer or Connect serial / Bluetooth and pick the printer from the list.
- Press Test print; if you have a cash drawer, try Open drawer.
- For a label printer, connect it the same way on the Label printer card and press Test label.
Supported: ESC/POS receipt printers (Xprinter, Rongta, Epson, Gprinter) and TSPL label printers (TSC, Xprinter label series). The browser remembers the printer.
Shelf and barcode labels
On Inventory › Medicines & products press Labels (or Print labels on a purchase, which brings in every batch from that delivery).
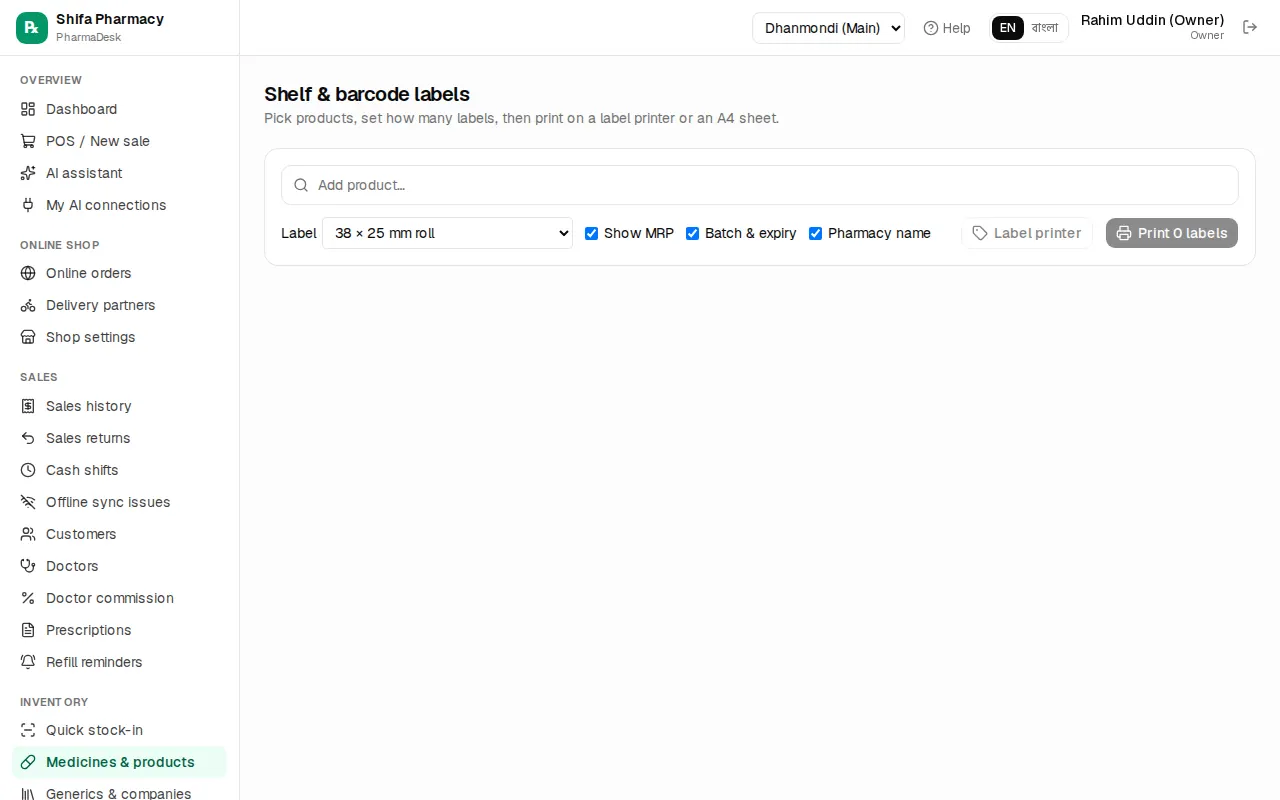
- Find medicines with Add product… and set the Copies for each.
- Pick the size under Label (roll or A4 sheet).
- Tick Show MRP, Batch & expiry and Pharmacy name as needed.
- If some products have no barcode, press Create barcodes for N.
- Press Label printer for roll labels, or Print N labels to print through the browser.
Importing old data
Admin › Import data brings medicines, stock, customers, suppliers and doctors in from an Excel or CSV file. Import in the numbered order: Medicines & products first, then Opening stock, then Customers & dues, Suppliers & payables, Doctors.
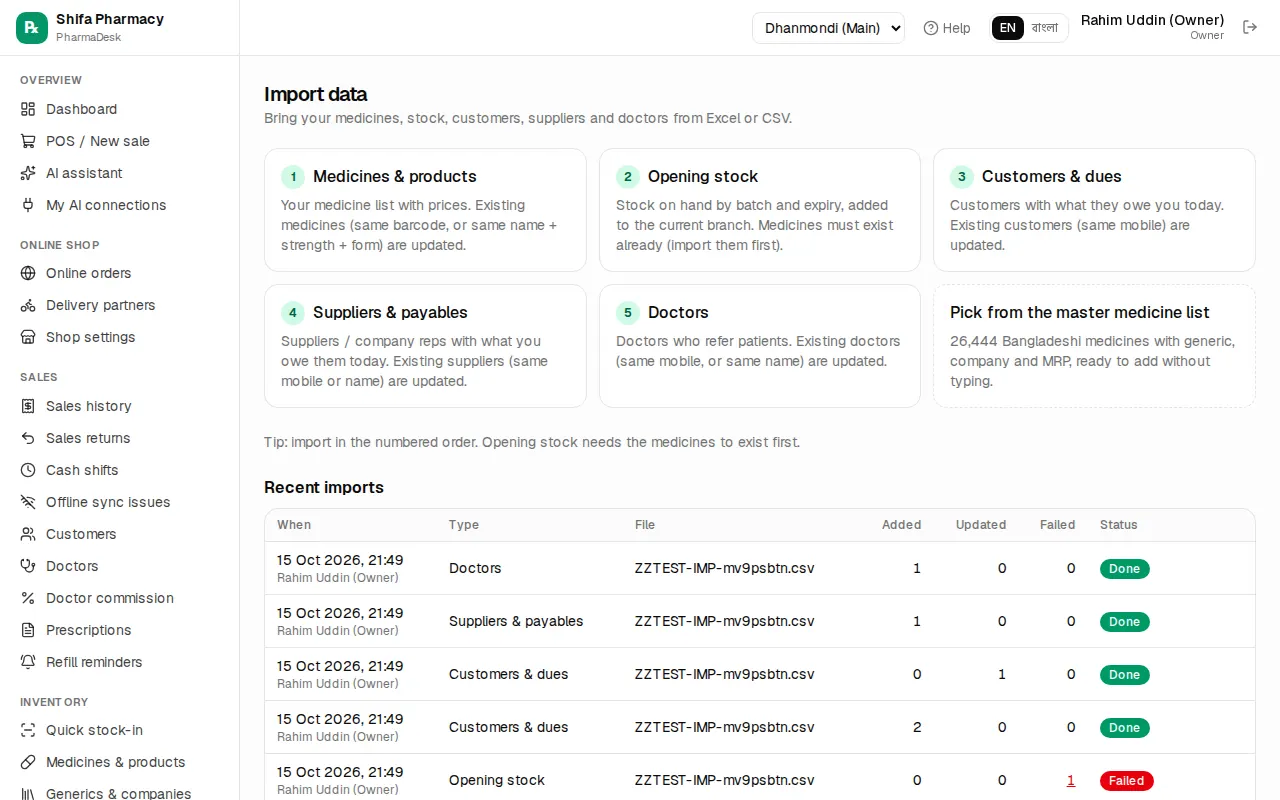
- Pick a type.
- Press Download sample file to see which columns are expected.
- Press Choose Excel or CSV file and pick your file.
- Under Match your columns, check each field is matched to the right column; set it to "Not in file" if you don't have it.
- Review the problems under Check before importing (Show only problems). Rows with errors are skipped.
- Press Import N rows. At the end you see how many were added, updated and failed; if any failed, use Download failed rows, fix them and import again.
Opening stock goes into the branch selected in the header, in units (tablets, bottles), not strips. The Pick from the master medicine list card adds medicines without typing.
Backup
The Backup & restore page exists only in the installed (on-prem) edition of PharmaDesk, and only the owner can open it, from the button at the top of Settings. The online (cloud) edition has no such page.
- Backups are made by the desktop app. First open the desktop app on the main computer and choose a backup folder.
- Back up now makes a backup within a minute. Use Download latest backup to keep a copy on a USB drive or in the cloud.
- To restore, close the app on all counters, then run Restore from the desktop app's menu on the main computer. Restoring replaces all current data with the backup.
- Export key records gives medicines, batches, customers and suppliers as a JSON file — it is not a full backup.
Audit log
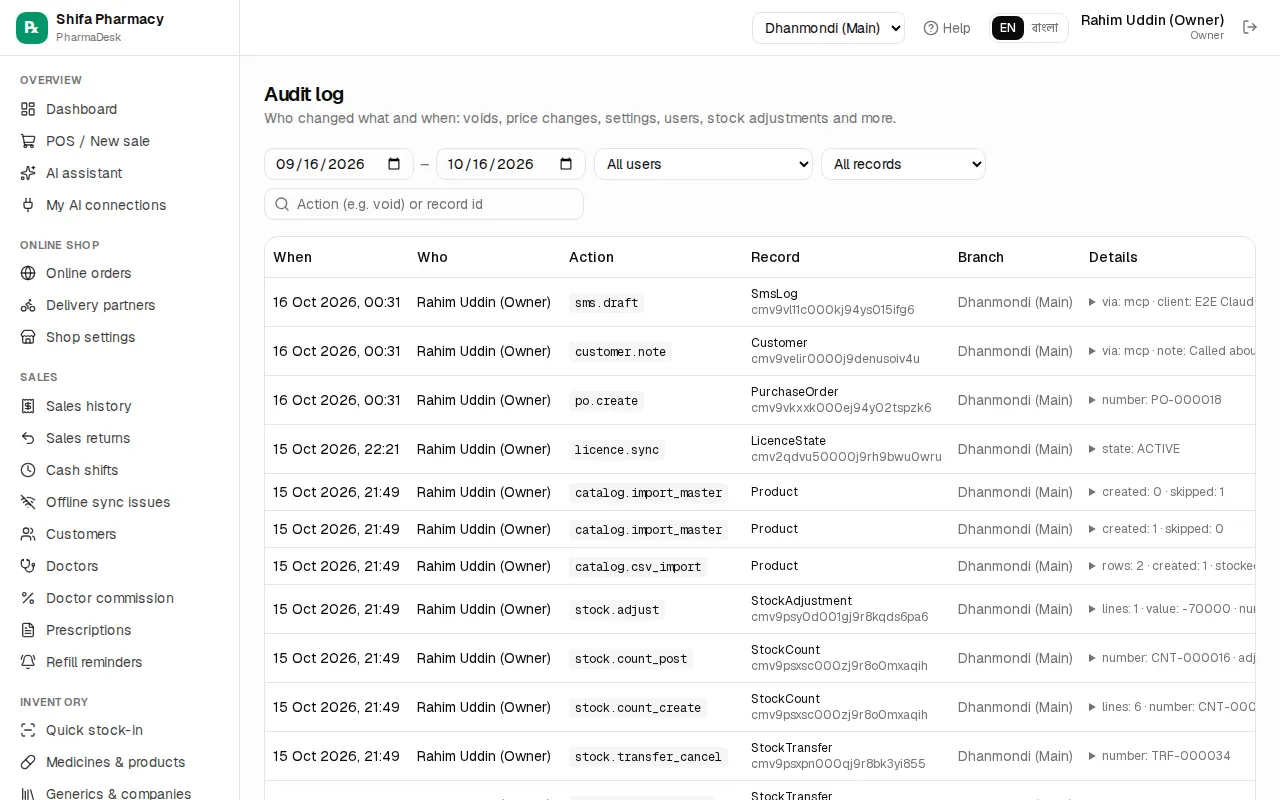
Admin › Audit log shows who changed what and when: voided sales, price changes, settings, users, stock adjustments and more. Filter by date range, All users, All records and the search box (for example void). The Details column shows the before and after values.
Common mistakes
- Making everyone an owner or manager. Give each person only the role they need.
- Not deactivating staff who leave. Do it the same day.
- Importing opening stock before medicines. Stock rows fail when the medicine doesn't exist yet.
- Entering stock in strips. Import quantities in units.
- Not connecting the printer on every counter. In direct-print mode each computer connects its own printer.
Chapter 3 · Owner & setup
Payments, licence & AI
Online payment gateways, your licence and subscription, the AI assistant, connecting Claude/ChatGPT, and the clinic link
This chapter is for the owner: taking bKash, Nagad or card payments in the online shop, understanding your licence and subscription, turning on AI, and linking with a ClinicDesk hospital. Only the owner can change these settings.
Online payments
Admin › Online payments connects your own SSLCommerz, bKash and Nagad merchant accounts. Online-shop customers pay on the gateway's page and the order is marked paid automatically.
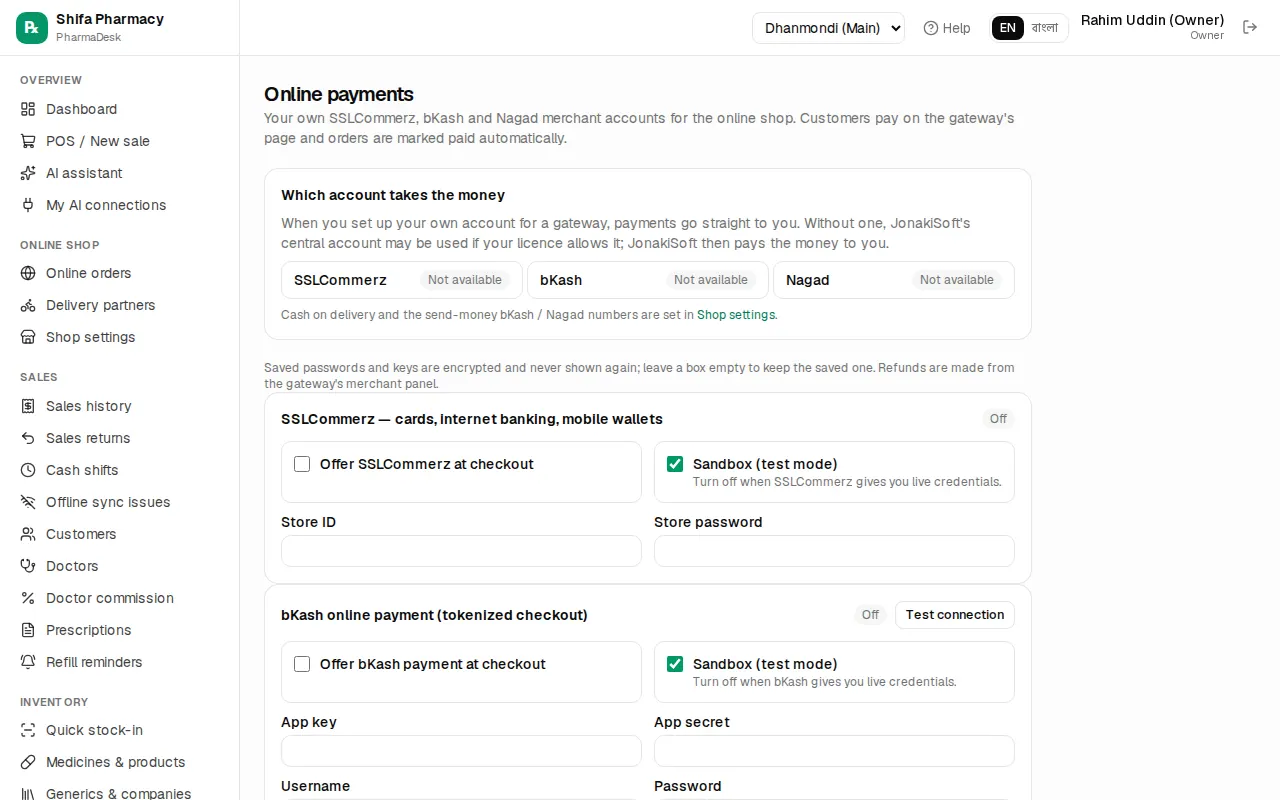
Which account takes the money shows one of these next to each gateway:
- Your account — your own merchant account is set up; the money goes straight to you.
- JonakiSoft central — you have no own account, but your licence allows JonakiSoft's account to be used; JonakiSoft then pays the money to you.
- Not available — this gateway can't be used right now.
Connecting your own gateway (example: bKash):
- Enter the App key, App secret, Username and Password you got from bKash.
- Tick Offer bKash payment at checkout.
- Keep Sandbox (test mode) ticked while testing; untick it when bKash gives you live credentials.
- Press Save payment settings.
- Press Test connection to check the details work.
Nagad needs the Merchant ID, Merchant number, Merchant private key and Nagad public key; SSLCommerz (cards, internet banking, mobile wallets) needs the Store ID and Store password. SSLCommerz has no test button. A badge next to each gateway shows Off, Credentials missing, On · sandbox or Live.
Cash on delivery and the send-money bKash / Nagad numbers are not set here but in Online shop › Shop settings (see Online shop). Money taken through JonakiSoft's central account — collected, fees, settled — is listed at the bottom under Payments collected by JonakiSoft.
If online payments are not in your plan, a yellow message appears at the top; contact JonakiSoft to turn them on.
Licence and subscription
Online (cloud) PharmaDesk: on Admin › Settings, the Licence & features card shows the Licence status (ACTIVE, GRACE and so on), the plan, Valid until, Last synced, and which modules your plan includes. Modules outside your plan are marked "not in plan". The licence is checked once a day and updated at once when JonakiSoft changes it. If JonakiSoft has switched something on and you don't see it yet, press Sync licence now.
- Modules not in your plan are hidden from the menu. Opening such a page shows "… is not part of your plan"; everything else keeps working.
- Grace days: the licence has expired but a few days of grace remain — a yellow banner appears on every page: "Your licence has expired. PharmaDesk keeps working until {date}; please renew." Press Details for a page with contact details.
- Licence locked (expired, suspended or revoked): every page goes to the licence page. All your medicines, sales, stock and accounts are saved and open again as soon as the licence is active. The online shop is paused until then. The page shows the phone, WhatsApp and email of JonakiSoft (or whoever set PharmaDesk up for you).
Free trial and subscription: from 7 days before the end, a banner shows "N days left". When it ends, the subscription page appears; contact the listed support to renew. Sales made offline on this device are kept and sync automatically after renewal.
Installed (on-prem) PharmaDesk: here the licence is a file. The Licence button at the top of Settings shows the licence number, plan, branches and users in use, and expiry. To install a new or renewed licence:
- Paste the licence text into the box, or press Open licence file and choose the file.
- Press Install licence.
You can't have more active users than the licence allows. Without a valid licence every page goes to this licence page; the data stays on the computer.
AI assistant
Overview › AI assistant answers questions in Bangla or English from your pharmacy's data: sales, stock, expiry, reorders, dues and profit. Owners, managers, pharmacists, store keepers and accountants can use it.
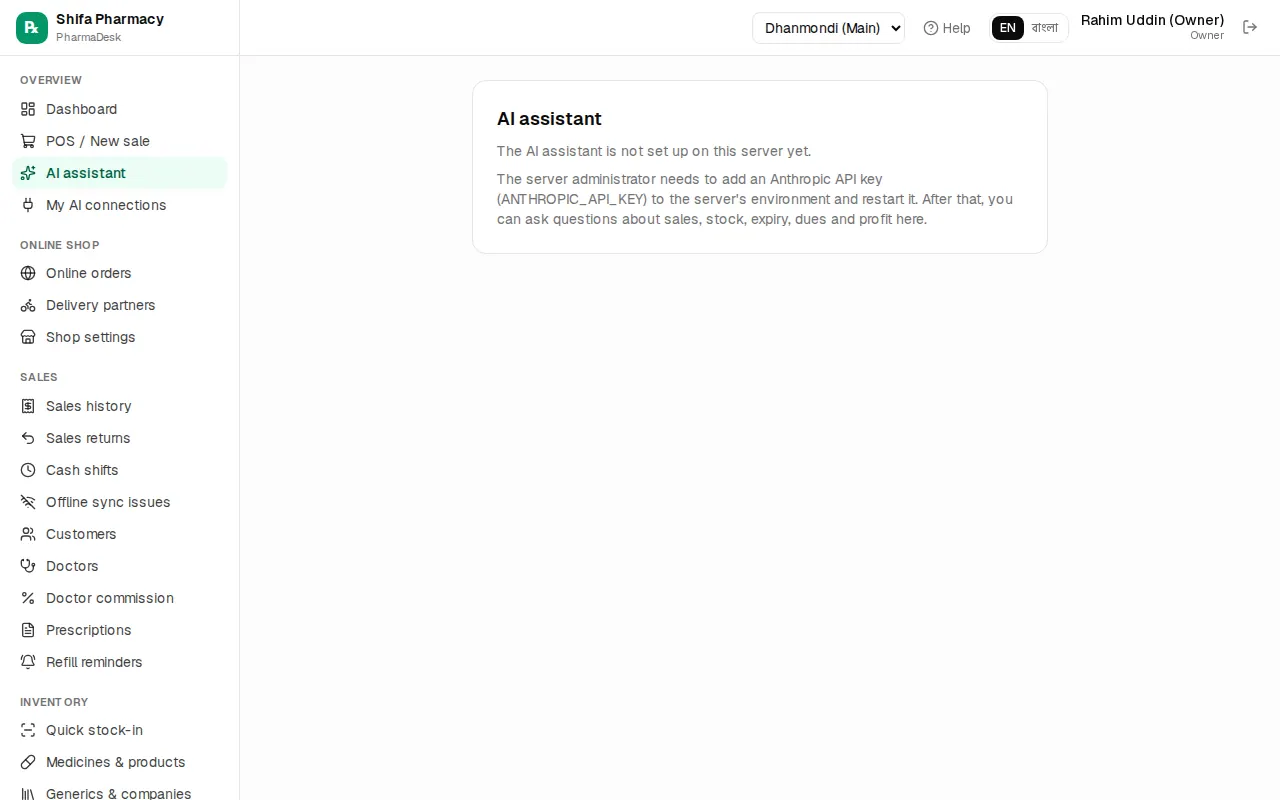
Turning it on: in Settings › Stock alerts & reminders tick AI assistant and press Save settings. If the server has no API key, the page says the assistant is not set up yet — ask the server administrator.
Using it:
- Type a question in the box at the bottom, such as "Who owes me the most?" or "আজকের বিক্রি কত?", or press one of the example questions.
- Press
Enterto send (Shift+Enterfor a new line). - Under each answer, "Used: …" shows which data was looked up.
- Press New chat for a new topic. Earlier conversations stay in the list on the left (shown on wider screens, not on phones).
Connecting Claude and ChatGPT (MCP)
Your staff can also ask about the pharmacy from their own Claude, ChatGPT or Claude Code. This is a separate feature that must be in your plan. Open Admin › AI assistants (MCP).
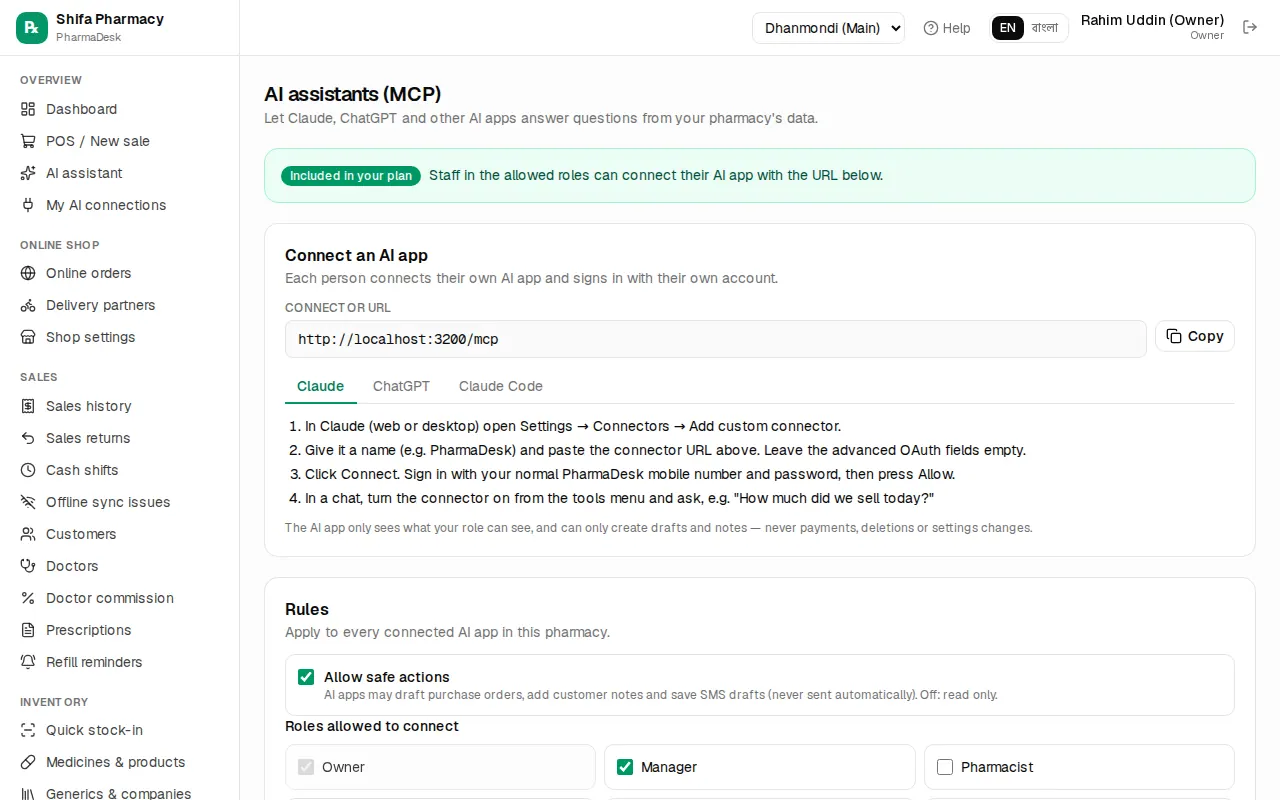
- Check the badge at the top says Included in your plan.
- Under Connect an AI app, press Copy next to the Connector URL.
- Pick the Claude, ChatGPT or Claude Code tab and follow its steps. In Claude, for example: Settings → Connectors → Add custom connector, paste the URL, Connect, then sign in with your PharmaDesk mobile number and password and press Allow.
- Under Rules, decide on Allow safe actions. On: AI apps may draft purchase orders, add customer notes and save SMS drafts (never sent automatically). Off: read only.
- Under Roles allowed to connect, tick the roles (the owner always can; at first only owner and manager), then press Save.
Each person connects with their own account and only sees what their role can see. AI apps can never make payments, delete things or change settings. Use Revoke in Connected apps to cut any connection; Recent activity shows the last 50 requests. Staff see their own connections under Overview › My AI connections.
Clinic link
Linking with a hospital or clinic that runs ClinicDesk sends its prescriptions straight to you and lets you charge admitted patients' medicines to their hospital bill. Open Admin › Clinic link.
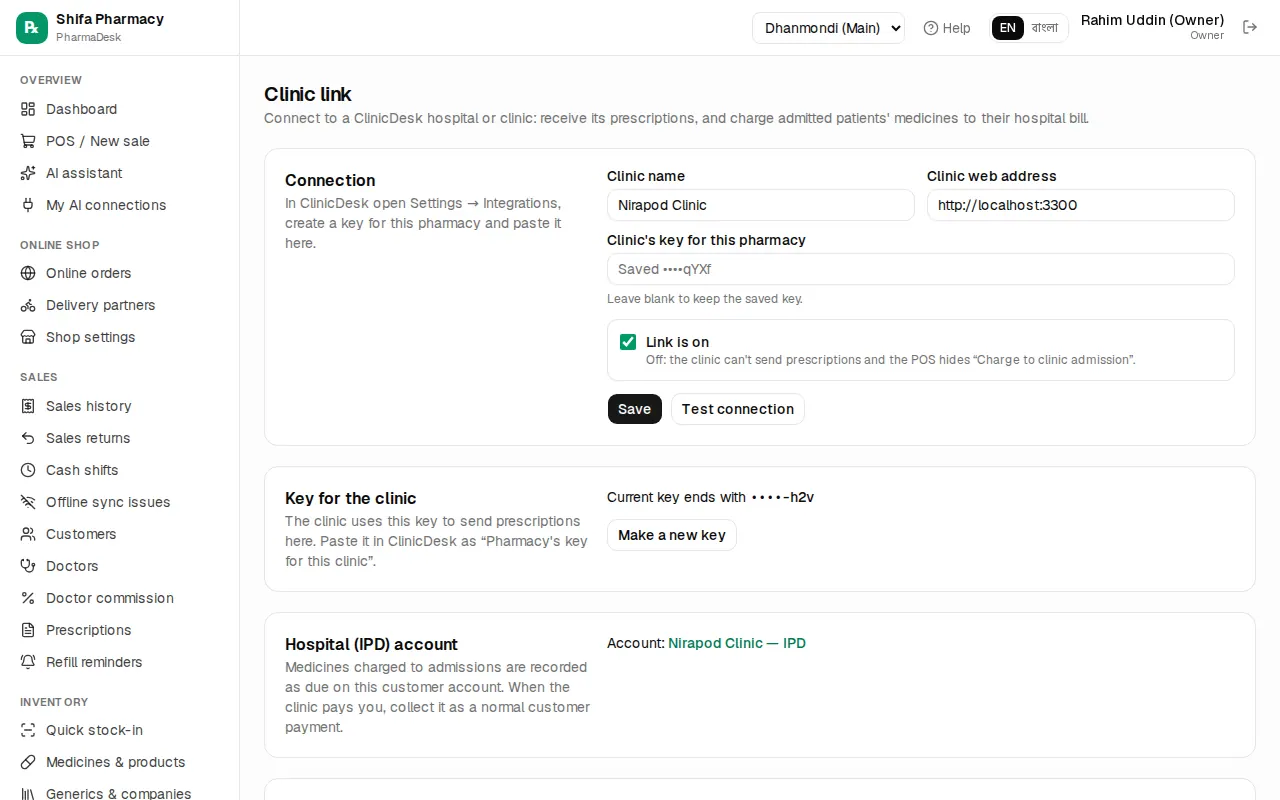
- In ClinicDesk, create a key for your pharmacy under Settings → Integrations.
- Here, enter the Clinic name, Clinic web address and Clinic's key for this pharmacy. Keep Link is on ticked and press Save.
- Press Test connection; if it works it shows how many patients are admitted right now.
- Under Key for the clinic, press Generate key, copy it immediately (it won't be shown again) and paste it into ClinicDesk.
- Under Hospital (IPD) account, press Create IPD account. Medicines charged to admissions are recorded as due on this customer; when the clinic pays, take it as a normal customer payment.
The POS then offers "Charge to clinic admission". The Clinic charges list shows each charge's status; use Send waiting now for waiting ones, Retry now for failed ones, and Mark resolved when it was settled by hand at the clinic.
Common mistakes
- Leaving Sandbox on after getting live credentials. No real money comes in.
- Promising online payment when no gateway is available. Check that the badge doesn't say Not available.
- Ignoring the grace banner. When grace ends the app locks for everyone; renew in time.
- Leaving the page without copying the clinic key. You then need Make a new key, and the old one stops working.
Chapter 4 · Owner & setup
Staff, attendance and salaries
Add employees, mark daily attendance, handle leave requests and salary advances, and pay salaries from the monthly salary sheet
Staff records, daily attendance, leave, advances and monthly salaries all live in the HR menu. At month end the software works out absent days and advance instalments for you, and every salary you pay is posted to the books as an expense automatically.
Adding employees
- Open HR › Employees.
- Click Add employee.
- Enter Full name, Designation (for example Salesman, Pharmacist), Mobile, NID and Joining date.
- Enter the Monthly salary (৳) (required).
- Choose the Branch where they work, or leave Any / head office.
- If the person logs into the software, pick their user under Login account; otherwise leave No login.
- Click Save.
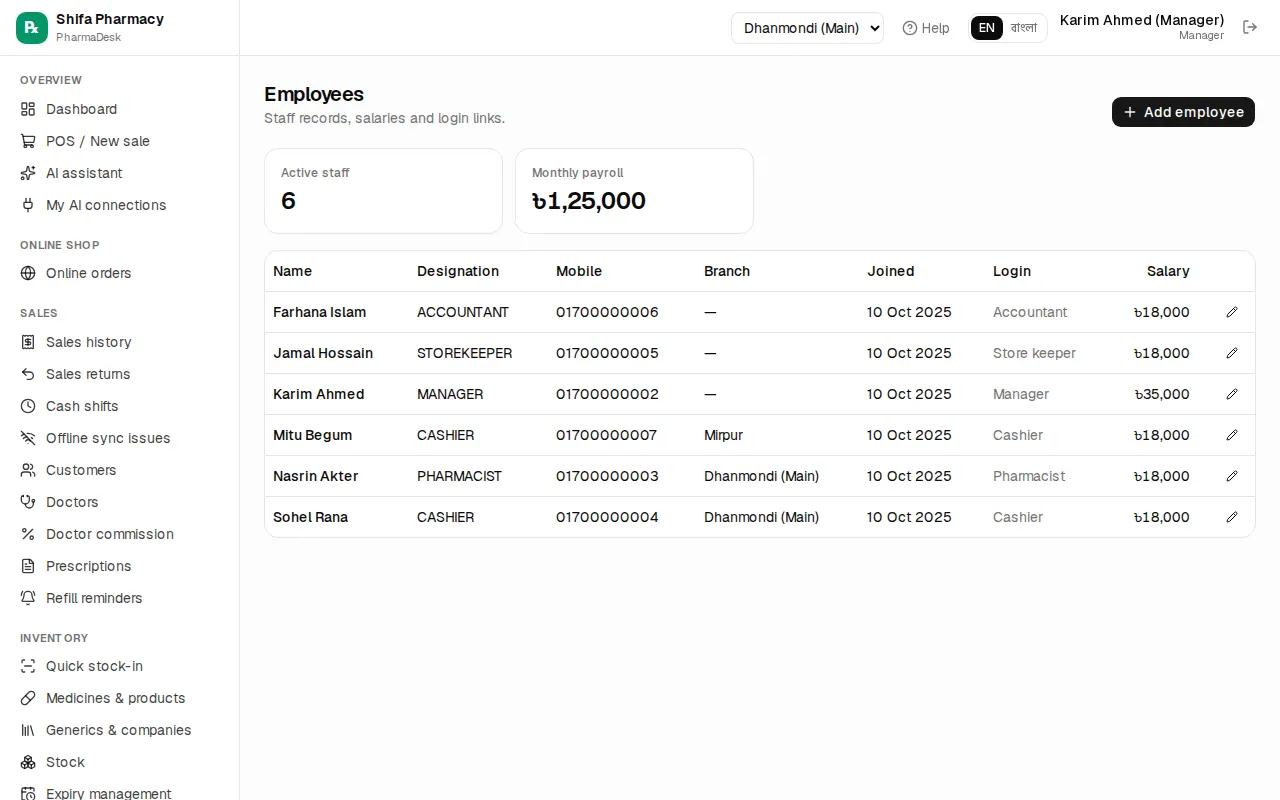
The top shows Active staff and Monthly payroll. Click an employee's name to open their page: attendance this month, leave balance, advances and salary history. You can Print ID card from there.
When someone leaves, don't delete them. Click the pencil icon and untick Currently employed. The list then shows Left next to their name and their salary history is kept.
Daily attendance
- Open HR › Attendance. The Daily sheet tab is open.
- Check the date box at the top (it starts on today).
- Next to each employee, click one button: Present, Late, Absent, Leave or Holiday.
- Optionally enter Check-in and Check-out times and a Note.
- When everyone is marked, click Save attendance at the bottom.
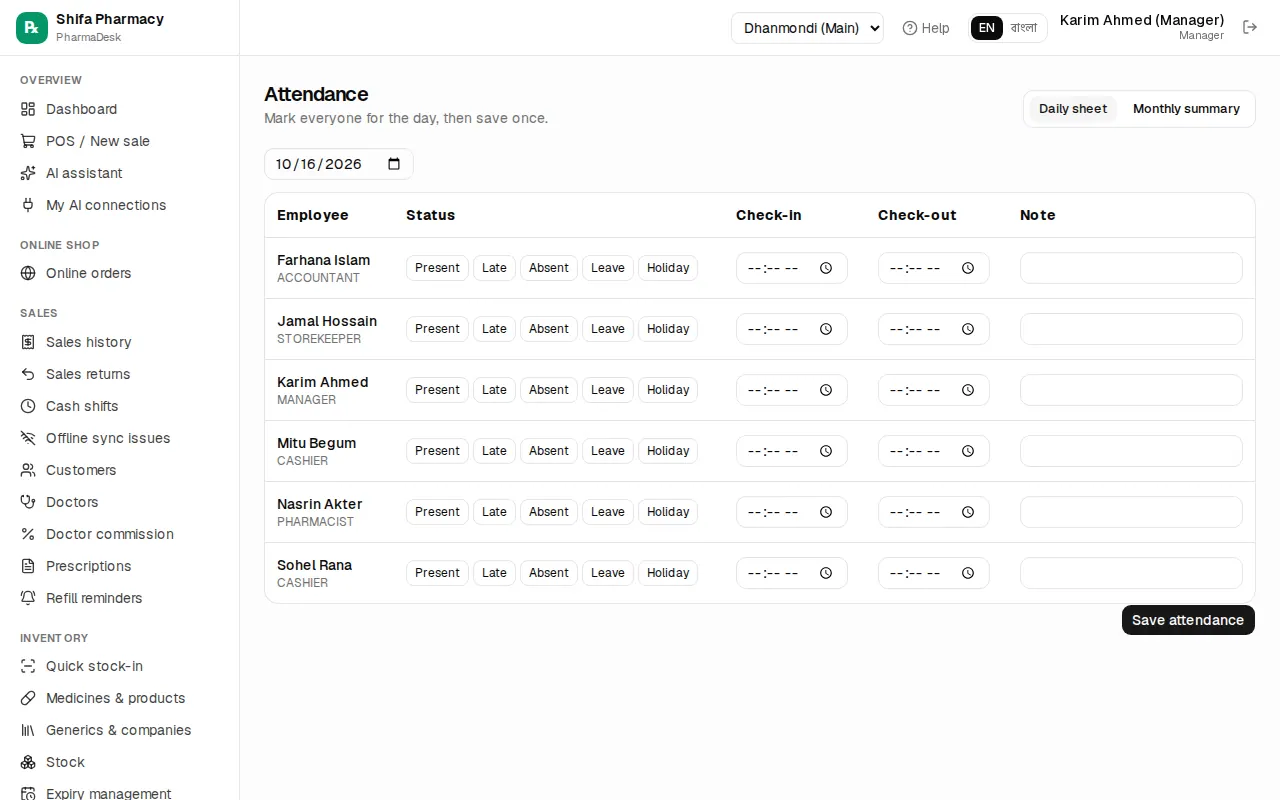
For the whole month, click the Monthly summary tab and choose the month. Each day shows a short letter (P present, L late, A absent, Lv leave, H holiday) with totals on the right.
Leave
- Open HR › Leave.
- Click New leave request.
- Choose the Employee and the Type: Casual, Sick, Annual or Unpaid leave.
- Enter the From date and To date, and a Reason.
- Click Save. The request appears in the list as Pending.
Then click one of the three buttons next to the request:
- Approve: paid leave.
- As unpaid: leave is granted, but these days count as absent days on the salary sheet.
- Reject: the request is refused.
The Balance table below shows each person's leave left this year (days left / entitled). Entitlements follow the Bangladesh Labour Act defaults: casual 10, sick 14, annual 10 days.
Salary advances
When a staff member asks for money before payday:
- Open HR › Salary advances.
- Click Give advance.
- Choose the Employee and enter the Amount (৳).
- In Recover per month (৳), enter the monthly instalment. Leave it blank to recover all of it from next month's salary.
- Under Paid from, choose the account the money left, and set the date.
- Click Save.
The top shows Outstanding advances and the total Recovered. Once fully recovered, the row shows Cleared.
Paying salaries at month end
- Open HR › Salaries. Choose the month at the top right.
- The list shows each person's Basic, Absent days, Advance due and the suggested Net salary.
- On the row of the person you are paying, click Pay.
- Check the form:
- Basic (৳): filled in with the monthly salary.
- Bonus / overtime (৳): enter if any.
- Other deduction (৳): fines, cash shortages and so on.
- Advance recovery (৳): this month's instalment is filled in.
- If there are absent days, a box like Deduct 2 absent day(s) is ticked. The formula is basic ÷ days in the month × absent days. Untick it to forgive the absence.
- Under Pay from, choose the account (usually the shop cash).
- Click Pay salary.
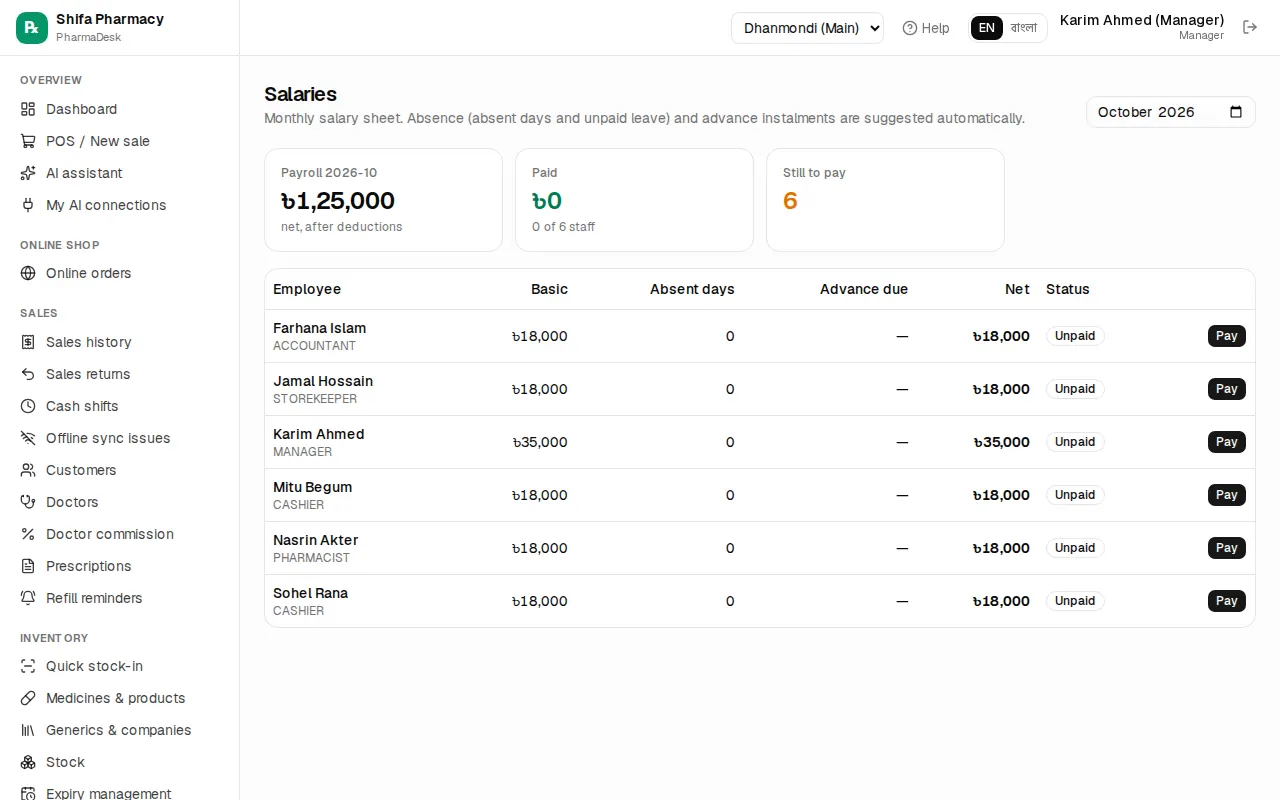
The row turns Paid and a Payslip link appears. Open the payslip, Print it and have the employee sign. If you made a mistake, click the undo-arrow icon next to it to cancel the payment; the money goes back to the account and you can pay again correctly.
The cards at the top show the Payroll for the month, how many staff are Paid and how many are Still to pay.
Common mistakes
Chapter 5 · Daily selling
Daily selling (POS)
Make a sale at the counter, take cash, bKash or due, print the receipt, sell without internet, and take returns.
The POS screen is where you sell at the counter. This chapter goes through one sale from start to finish, then covers held bills, printing, selling without internet and returns.
Open the POS
Go to Overview › POS / New sale. You can't sell without an open cash shift. If you don't have one, the screen shows Open cash shift: count the drawer cash, type it in Opening cash (৳) and click Open shift. See Cash shifts and closing.
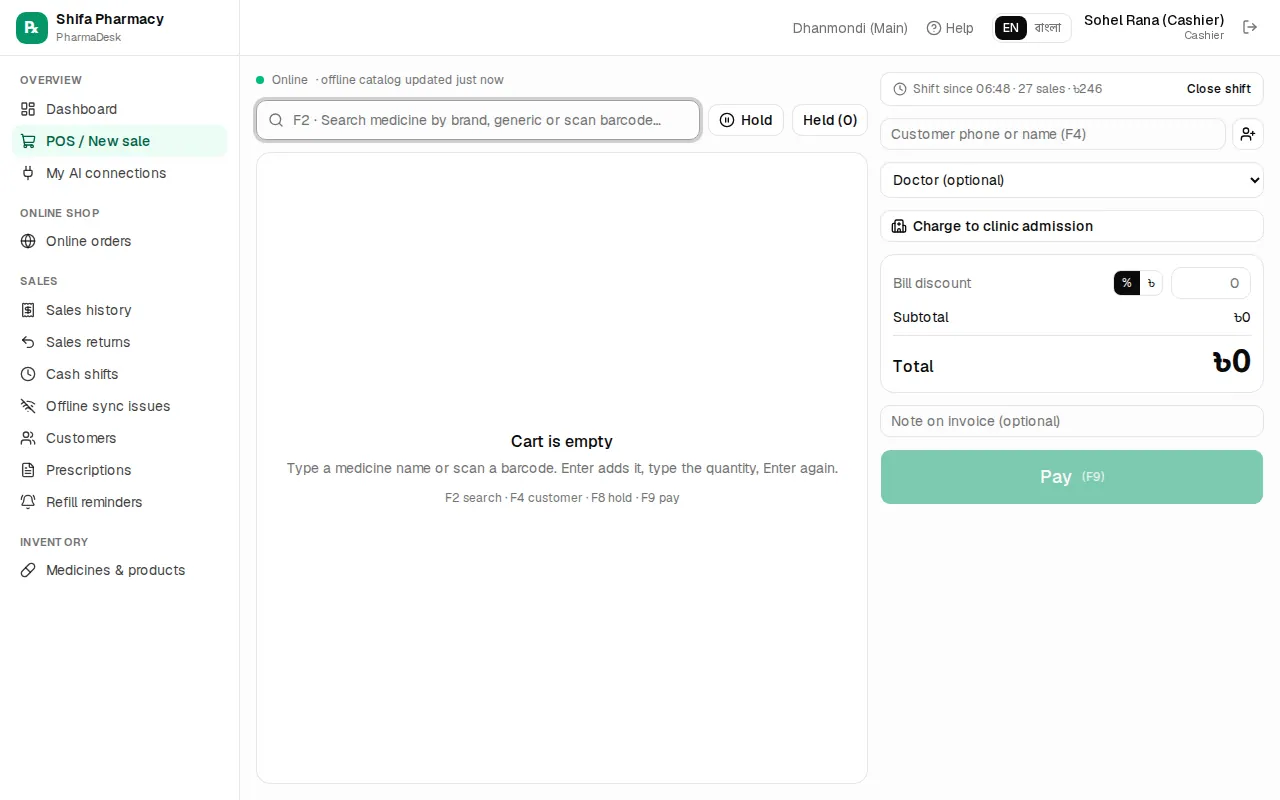
The left side has the search and the cart. The right side has the shift info, the customer, the doctor, the discount, the total and the green Pay button.
Make a sale step by step
- Press
F2or click the search box. Type the brand or generic name, for example napa or paracetamol. - Pick the right strength with the arrow keys and press
Enter. You can also scan the box with a barcode scanner, which adds the medicine straight away. - The cursor moves to the quantity. Type it and press
Enterto go back to the search. - Repeat for each medicine.
- If you need a customer, type their phone or name in Customer phone or name (F4).
- Click Pay or press
F9. - Check Cash received and click Complete sale (Enter).
- Sale complete shows Change to give. Press
Enterto print the receipt orEscto start the next sale.
Quantity: strips and loose units
Strip medicines have two boxes, strip and loose units. For example, with 10 tablets per strip, 1 strip + 4 = 14 tablets. Syrups and similar items have one box. Under each name you'll see the generic, the rack and the stock left. If there isn't enough stock, the line turns red.
Batch and expiry (FEFO)
The Batch column starts at Auto (FEFO), so the batch that expires first sells first. Badges under it show the batch and expiry that will be used. You can pick a batch from the list. Expired batches are blocked unless Allow selling expired batches is on in settings, and it should stay off.
Price and discounts
- Price: only the manager and the owner can edit it. Others see the MRP as fixed.
- Disc ৳: a taka discount on one line.
- Bill discount: on the whole bill, as % or ৳.
- Redeem points (of N): shown when loyalty is on and the customer has points.
If the total discount goes over the Cashier discount cap (%) in settings, a red note says A manager must sell this and Pay stays disabled. Only a manager or the owner can go above the cap.
Customer and selling on due
Type a phone number or name and pick from the list. If the person isn't there, click the person-with-plus button. In New customer, fill in Name, Mobile and Allergies (optional), then click Add customer. The customer box shows their Due, Credit limit and allergies (in yellow).
To leave a due (baki), lower Cash received. The Due box shows what is left and the button changes to Complete with due (Enter).
- A due needs a customer.
- A due can't push the customer over their credit limit. A limit of 0 means no due at all.
- A manager or the owner can tick Manager override: allow this due.
Collecting dues is in Customers and dues.
Split payment: cash + bKash
Under Cash received are boxes for bKash, Nagad, Rocket and Card, each with an amount and a TrxID (for a card, Last 4). Example: the bill is ৳850 and ৳500 comes by bKash.
- In the bKash box, type
500and the TrxID. - Change Cash received to
350. - Check that Paid is ৳850 and Due is 0, then click Complete sale (Enter).
Hold and recall
If the patient steps away, click Hold (F8). The cart is saved and the screen clears. To bring it back, click Held (N) and then Recall. The bin icon deletes a held cart. Held carts are still there after you close the shift.
Keyboard shortcuts
| Key | What it does |
|---|---|
F2 | Medicine search |
F4 | Customer box |
F8 | Hold the cart |
F9 or Ctrl+Enter | Payment window |
Enter (after a sale) | Print the receipt |
Esc (after a sale) | New sale |
Printing the receipt
Print receipt (Enter) opens the receipt in a small window with the print dialog. At the top you can choose 80mm, 58mm or A4. If the owner has set up direct printing to a thermal printer, it prints on its own. If nothing opens, allow pop-ups in the browser. To reprint, open the sale from Sales › Sales history and click Print receipt.
Prescriptions and doctors
When an Rx medicine is in the cart, a blue note asks you to check the prescription and select the doctor. Pick one from Doctor (optional). If that doctor gets commission, it is added automatically.
After you choose a customer, Prescription (optional) lists their saved prescriptions. Upload new saves a new photo. Sales › Prescriptions has the full list, and Add prescription takes a photo or PDF there (on a phone it opens the camera).
CD marks a controlled drug. The payment window then requires the patient name and the prescribing doctor.
Selling without internet
The status at the top of the POS turns yellow and says Offline when the internet drops. You can keep selling from the list saved on the device. Each sale gets a temporary number and the receipt still prints. When the internet is back, the sales sync by themselves, or you can click Sync now. Details shows the sales still waiting.
- Open the POS once while online on this device, and open the shift while online.
- Offline, you can't hold a cart, close the shift, add a customer, take Rocket, or use the due override.
Sales that synced with a problem (stock below zero, an old price, over a limit) appear in Sales › Offline sync issues. A manager checks each one and clicks Mark resolved.
Sales history
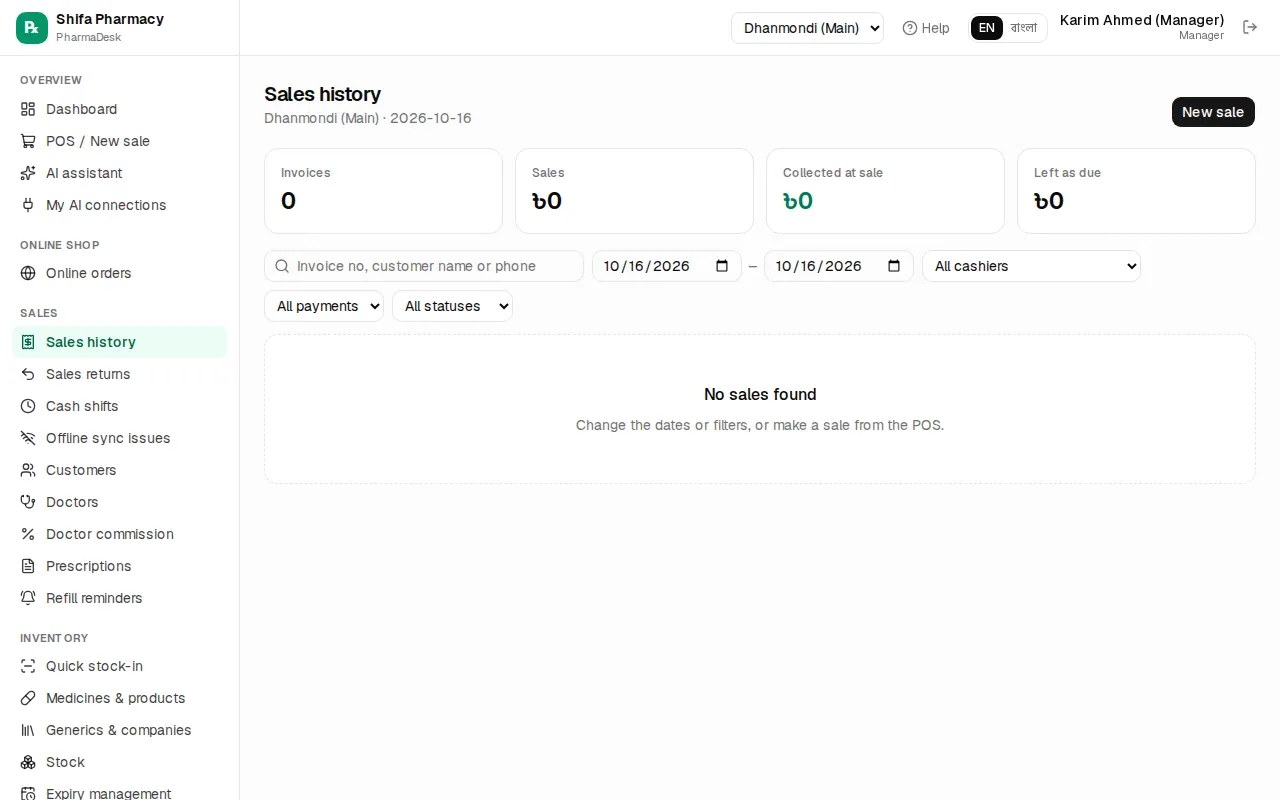
Sales › Sales history shows today's invoices. You can change the dates and filter by invoice number, name, phone, cashier, payment or status. Open an invoice to reprint it or get Mushak 6.3. Only a manager or the owner can cancel a sale with Void, and they must give a reason. The stock and the payment go back.
Returns and refunds
A pharmacist, manager or owner can take returns. Cashiers can't.
- Open the invoice and click Return items.
- Type the Return qty for each item.
- Leave Back to stock ticked if the medicine is fine. Untick it for damaged or expired medicine.
- Under Give back as, choose Reduce the customer's due or Refund money and pick the method.
- Check Total to give back and click Save return.
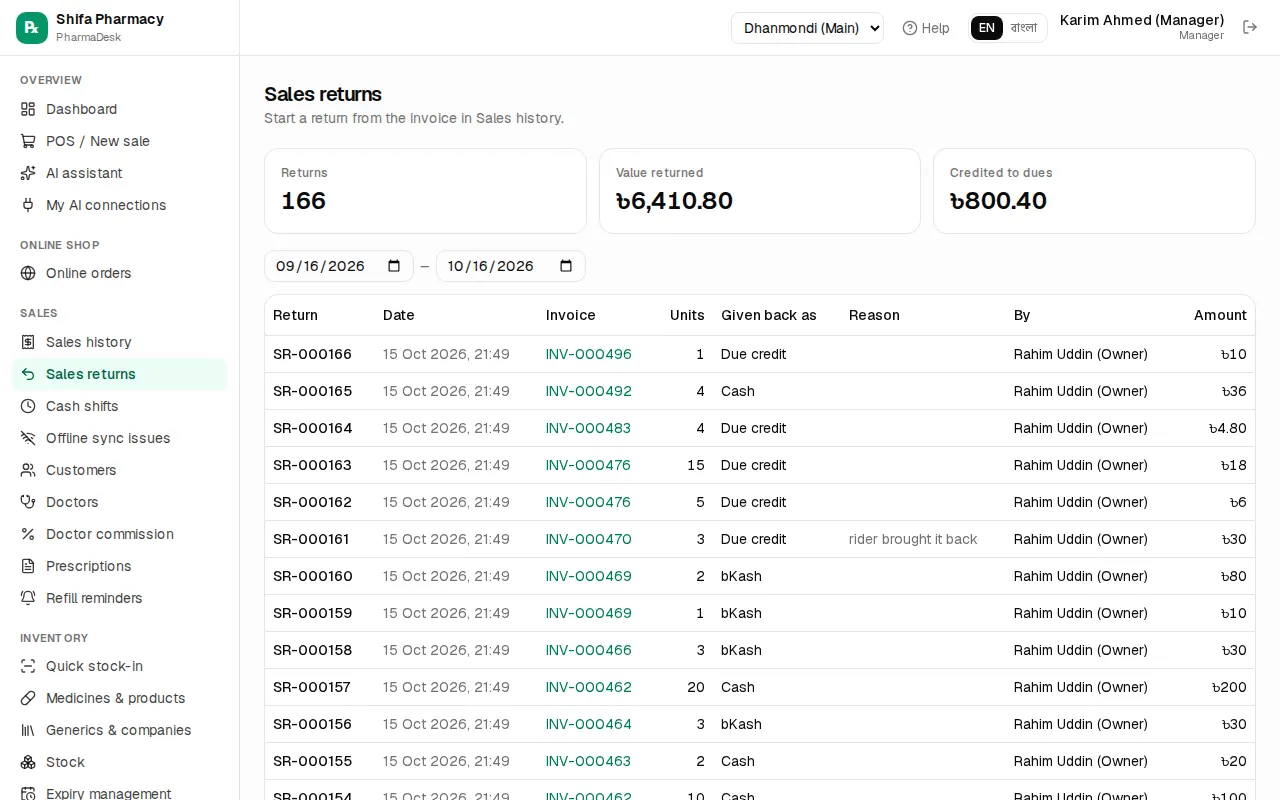
Once the return window set in settings has passed, only a manager can take the return. A cash refund lowers the cash expected in your drawer. All returns are listed in Sales › Sales returns.
Selling from a phone
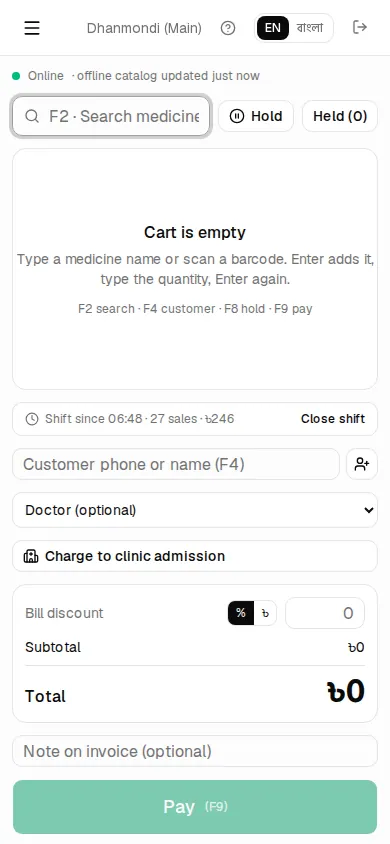
On a phone, the search and the cart are at the top. Scroll down for the customer, total and Pay. There are no F keys, so tap the buttons. A Bluetooth barcode scanner works too.
Common mistakes
- Taking bKash without lowering Cash received.
- Trying to leave a due without a customer.
- Clearing browser data while offline sales are waiting.
- Asking a cashier to take a return.
Chapter 6 · Daily selling
Cash shifts and closing
Open a shift with the drawer cash, close it with a count, deal with short or over cash, and check the day-end closing.
A cash shift is how you account for the money in your cash drawer. You open it with the cash already in the drawer and close it by counting the drawer. PharmaDesk works out what should be there, so a short or over amount shows up at once.
How shifts work
- Every person who sells has their own shift, separate in each branch. Two cashiers at two counters each run their own.
- The POS won't sell until you open a shift.
- Only the person who opened a shift can close it. A manager can't close someone else's shift.
- One person can have only one open shift at a time.
Open a shift
- Go to Overview › POS / New sale.
- The Open cash shift card appears. Count the notes and coins in the drawer.
- Type the amount in Opening cash (৳). If the drawer is empty, type
0. - Click Open shift. The sale screen opens.
While you sell, a line at the top of the right side of the POS shows Shift since 09:00 · 25 sales · ৳12,400.
Close a shift
Close your shift at the end of your duty, or when you hand over the counter.
- On the POS, click Close shift, next to the shift line on the right.
- The window shows Sales (N) split by payment method, On credit (due), then Opening cash, + Cash sales, + Due collected (cash), − Cash refunds and, at the bottom, Expected in drawer. That's the amount that should be in the drawer.
- Count the drawer cash and type it in Cash counted (৳). As you type, it tells you Matches, Over by or Short by.
- If anything is off, write the reason in Note (optional).
- Click Close shift.
- The result shows. Click Print Z report to print the shift report, then Done.
Held carts don't block closing. They stay for your next shift.
How the expected cash is worked out
| Item | Effect |
|---|---|
| Opening cash | + |
| Cash taken in sales (after change) | + |
| Dues you collected in cash during the shift | + |
| Cash refunds on returns | − |
| Expected in drawer | = |
bKash, Nagad, Rocket and card payments aren't in the drawer, so they aren't in this sum. Due sales aren't either. Don't count bKash money as drawer cash.
When the cash is short or over
- Short: check whether a bKash sale was entered as cash, or whether change was given wrongly. Look at the payment column in Sales › Sales history for your cashier name and today's date.
- Over: a cash payment may have been typed as bKash, or a refund wasn't given.
- Type the real counted amount. Don't change it to make it match. Write what happened in the note so the manager can follow it up.
Reading the shift list
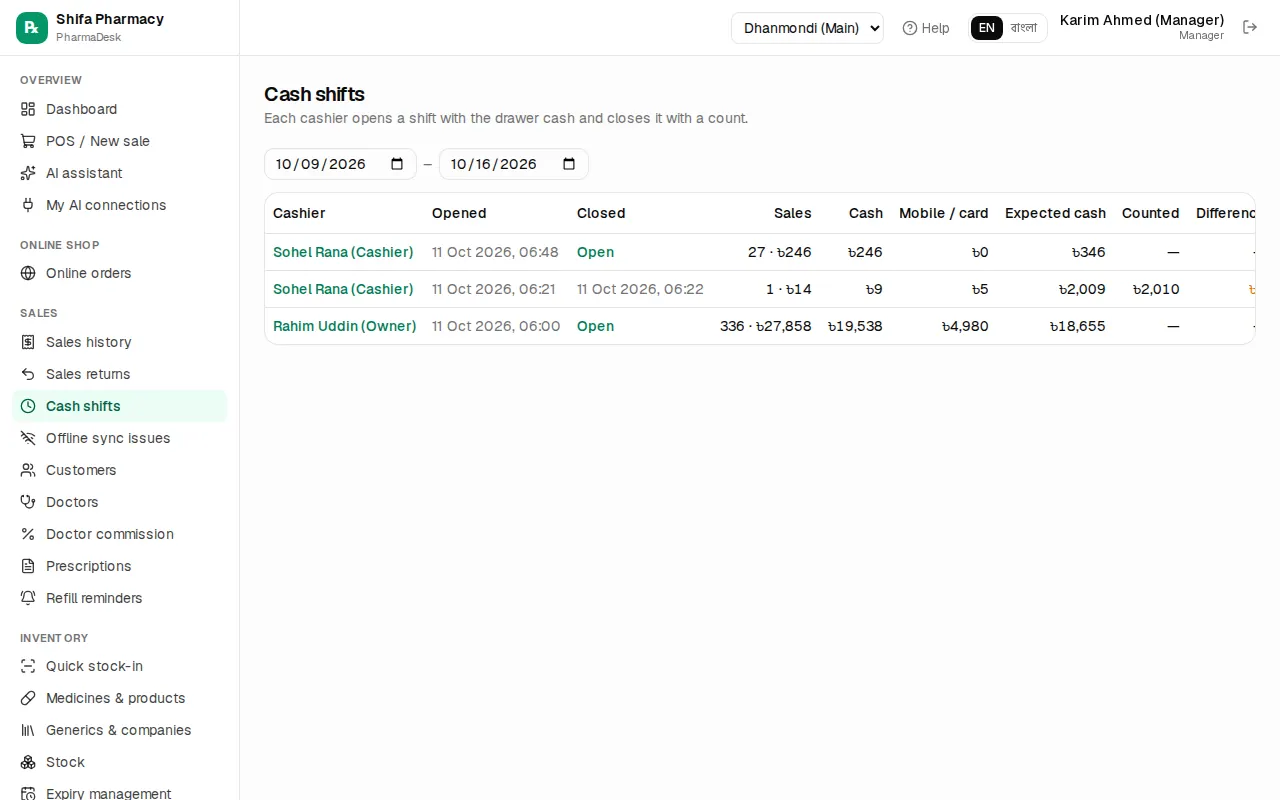
Sales › Cash shifts shows the shifts for the last 7 days. You can change the dates. Cashiers and pharmacists see only their own shifts. Managers, accountants and the owner see everyone's.
The columns are Cashier, Opened, Closed (an open shift says Open), Sales, Cash, Mobile / card, Expected cash, Counted and Difference. In the difference column OK means it matched, red means short and amber means over.
Click the cashier's name to open that shift's report. An open shift shows the X REPORT (shift open) with running totals. A closed one shows the Z REPORT (shift closed). It also shows returns and voided sales, and has signature lines for the cashier and the manager. The Print button prints it on 80mm paper.
What the manager checks
At the end of each day:
- Open Sales › Cash shifts and make sure no shift from today is still Open. If one is, ask that person to log in and close it.
- Look for red or amber in the Difference column and read the note in the Z report.
- Collect the counted cash along with the signed Z report.
- Look at Sales › Offline sync issues for sales that synced late.
Day-end closing
Day-end closing is separate from the shifts. It shows every money account in one place, including cash, bKash and the bank. Managers, accountants and the owner can open it.
- Go to Finance › Cash & bank and click Day-end closing.
- Pick a date. If you have more than one branch, pick the branch.
- The table shows Opening, In, Out and Closing for each account.
- Where the money came from / went breaks it down into sales received, dues collected, refunds, supplier payments, expenses and so on.
- Underneath is the day's Cash shifts table, with each cashier's expected, counted and difference. A shift still open says Still open.
- Click Print. The printed copy has Prepared by and Checked by lines for signatures.
Check the closing balance of the cash account against the cash you actually have. More about accounts is in Accounting.
Common mistakes
- Going home without closing the shift. The next day the old shift is still open and the totals get mixed.
- Counting bKash or Nagad money in Cash counted (৳).
- Changing the counted amount to make it match. Put the real figure and a note.
- A manager trying to close a cashier's shift. The cashier has to log in and close it.
Chapter 7 · Daily selling
Online shop & online orders
Turn on your own online shop, see what customers see, confirm-pack-deliver online orders and connect couriers
Every pharmacy on PharmaDesk has its own online shop link. Customers order medicines or send a prescription photo there, and the order lands straight on your Online orders page. This chapter covers everything from switching the shop on to delivery.
Turning on the shop and sharing the link
Online shop › Shop settings shows Your shop link at the top.
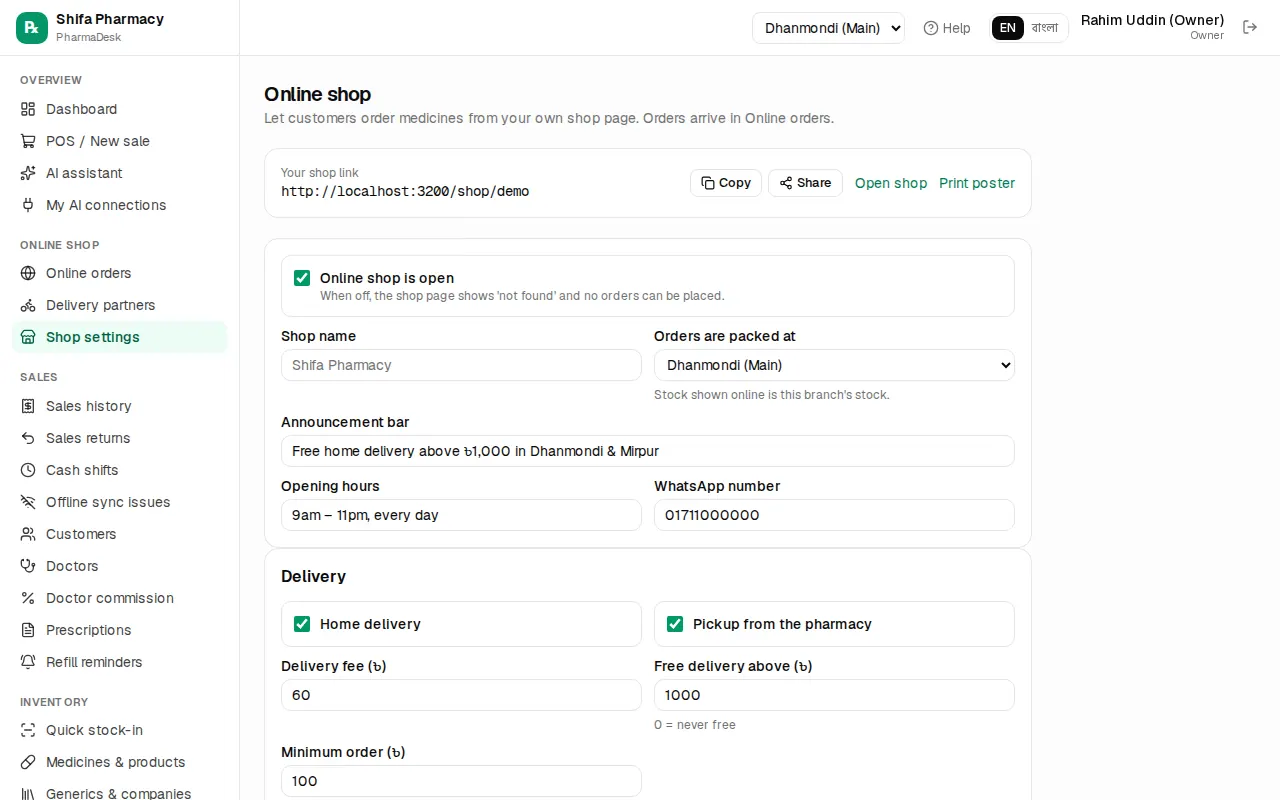
- Tick Online shop is open. When it is off, the shop page shows "Shop not found" and nobody can order.
- Fill Shop name, Opening hours and WhatsApp number. Use the Announcement bar for something like "Free delivery in Dhanmondi today".
- In Orders are packed at, pick the branch that handles orders. The shop shows that branch's stock.
- Under Delivery, tick Home delivery and/or Pickup from the pharmacy. Set Delivery fee (৳), Free delivery above (৳) and Minimum order (৳) (0 means not used).
- For a different fee per area, use Add area and enter the area name and fee. Other areas pay the default fee.
- Under Payment, tick Cash on delivery / pay at pickup. To accept bKash or Nagad send-money, enter the numbers; leave them empty to hide that option.
- Press Save shop settings.
Then spread the link:
- Copy the link for your Facebook page or WhatsApp, or press Share.
- Open shop to check it yourself once.
- Print poster opens an A4 poster with the shop link in large type. Put it on the counter.
To take card or bKash/Nagad payments online, follow Set up SSLCommerz, bKash and Nagad in the Online payment gateways box. Details are in Online payments.
What customers see
When a customer opens the link on a phone they see your shop name, delivery fee and payment options. There is a Bangla/English switch at the top.
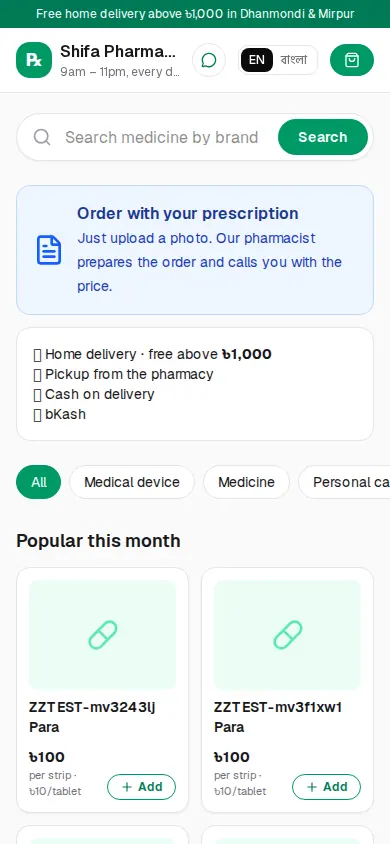
- They search by brand or generic name, browse categories and see "Popular this month".
- On a medicine's page they choose strip or single unit and press Add to cart. If it is out of stock, alternatives with the same generic are shown.
- In the cart they choose delivery or pickup, area, address and payment, then press Place order. If the cart has prescription-only medicines, a prescription photo is required.
- They can also order with just a photo: Order with your prescription › add photos › Send prescription. Your pharmacist prepares the order and calls with the price.
- After ordering, the customer gets a tracking page (the link is also sent by SMS) showing the status, rider name and courier tracking. Until you confirm it, the customer can Cancel order themselves.
Handling online orders
Keep Online shop › Online orders open: it checks for new orders every 20 seconds, beeps twice and shows a banner when one arrives.
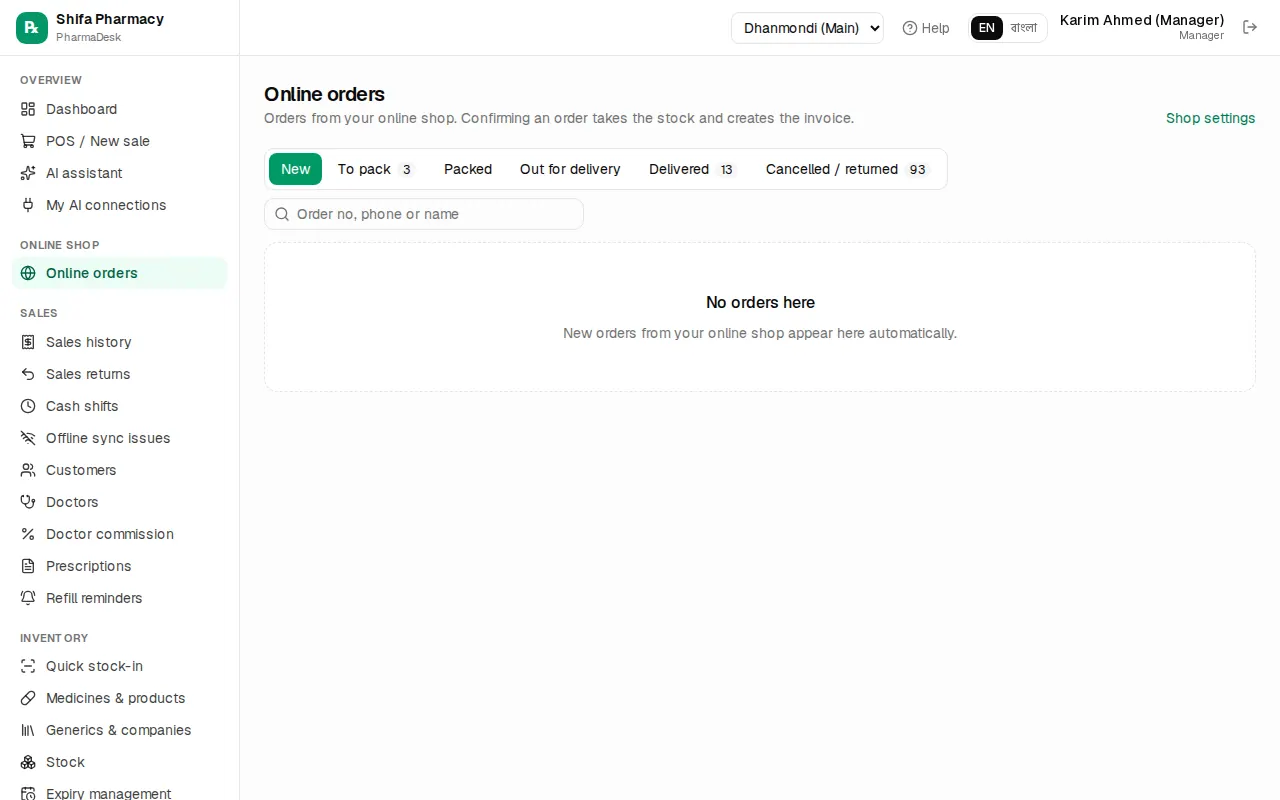
The tabs follow the work: New, To pack, Packed, Out for delivery, Delivered, Cancelled / returned. Search by order no, phone or name. Click the order number to open it.
One order, step by step
- Check and fix: If there are prescription photos, open them on the right to zoom and rotate. Optionally press Start review; the status becomes "Pharmacist review".
- Change items: Change quantities, press ⇄ (Substitute with another brand) for an out-of-stock item, or add medicines. For a prescription-only order, this is where you add the medicines. Add a Discount (৳) if needed, then press Save items.
- Check payment: For bKash/Nagad send-money, match the customer's transaction ID in your merchant app and press Mark verified. If they never sent money, press Switch to COD.
- Confirm: Press Confirm order. Stock is taken and the invoice is created at this moment; the customer gets an SMS.
- Pack: Print the Invoice / packing slip, put it with the goods and press Mark packed (for pickup orders, Ready for pickup).
- Dispatch: Enter Rider name and Rider phone and press Send out for delivery. With a courier connected, use Book courier instead (see below).
- Finish: When the rider brings the cash back, pick the cash account and press Delivered. For pickup orders press Customer collected when they take it.
Cancelling and returns
- Cancel order: a reason is required and the customer sees it. Anyone can cancel before confirmation; after confirmation only a manager or the owner can, and the invoice is voided and stock comes back.
- Returned by customer: if the customer refuses an order that is out for delivery, a manager presses this; the invoice is voided and stock comes back.
- Whether the delivery charge is refunded when a whole order comes back is set by the owner in Admin › Settings › Sales & POS with "Refund the delivery charge when an online order comes back in full". When it is off, the customer still pays the delivery charge.
Delivery partners (couriers)
If you have a Pathao, Steadfast or RedX merchant account, connect it in Online shop › Delivery partners (owner only).
- On the courier's card, enter the keys or login from their merchant panel.
- Tick Use this courier. With more than one, make one the Default courier. You can start in Sandbox (test mode).
- Save, then press Test connection.
- Copy the Status webhook URL into the courier's panel so delivery updates arrive instantly.
Now, on a confirmed or packed home-delivery order, the Courier box shows Book courier; check the address and press Book. When the courier picks up, the order moves to "Out for delivery" by itself, and to "Delivered" when it arrives.
Cash on delivery collected by a courier is shown under Cash held by couriers until they pay you. When the courier sends the money, enter the amount and the account it came into, then press Record payout.
Common mistakes
Chapter 8 · Stock & purchasing
Products, purchases & suppliers
Add medicines to your list, receive supplier goods into stock (including invoice scan), purchase orders, returns and paying supplier dues
Entering supplier goods correctly keeps stock, expiry dates and supplier dues right automatically. This chapter covers adding medicines, receiving goods, orders, returns and paying suppliers.
Adding medicines and products
Inventory › Medicines & products lists your medicines with stock and MRP. There are three ways to add medicines.
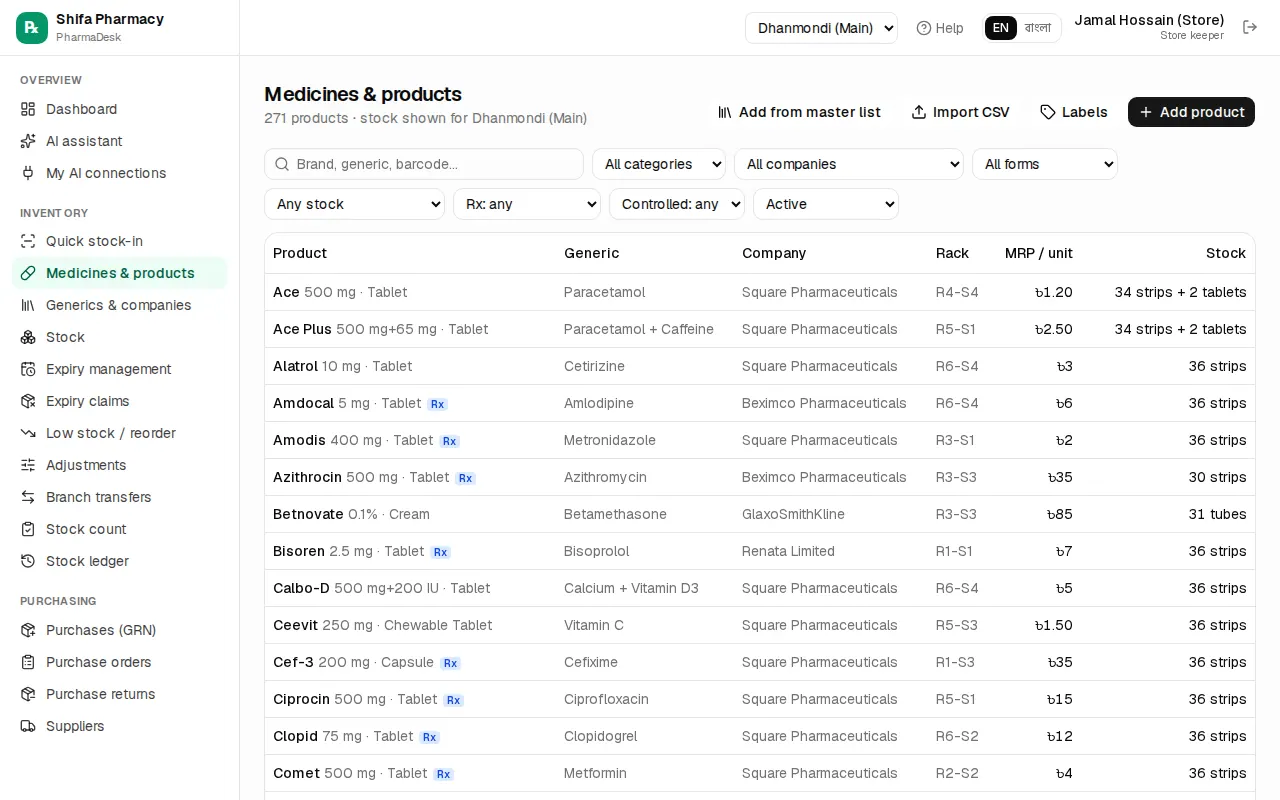
1. From the master list (fastest)
- Press Add from master list (or Inventory › Generics & companies › Master medicine list tab).
- Type at least 2 letters of a brand, generic or company.
- Tick the ones you need and choose the category.
- Press Add … selected (e.g. "Add 3 selected").
MRP is copied and cost is set to 88% of MRP; edit it later to the real cost.
2. One by one
- Press Add product.
- Enter the brand name, generic, strength and company. New generics and companies are created automatically.
- Under Pack & price, set the base unit (e.g. tablet), units per strip and strips per box.
- Enter MRP and cost per base unit (one tablet). If you know the strip price, type it in Set from strip MRP (৳) and the per-tablet price is worked out for you.
- Under Stock control, add the barcode, Rack / shelf and Reorder level. Tick Prescription required, Controlled drug or VAT applicable where they apply.
- Press Add product.
3. Many at once with CSV
- Press Import CSV, then Download template.
- Fill one row per product (or per batch). Prices are per base unit, expiry as
YYYY-MM. Batch, expiry and qty add opening stock too. - Press Choose CSV file. A preview appears first; problem rows are shown in red.
- When everything is fine, press Import … rows.
Quick stock-in (with invoice scan)
The easiest daily way to receive goods is Inventory › Quick stock-in. It has two cards: Scan supplier invoice and Quick entry. Work saves itself as a draft; resume it with Continue under Unfinished stock-ins.
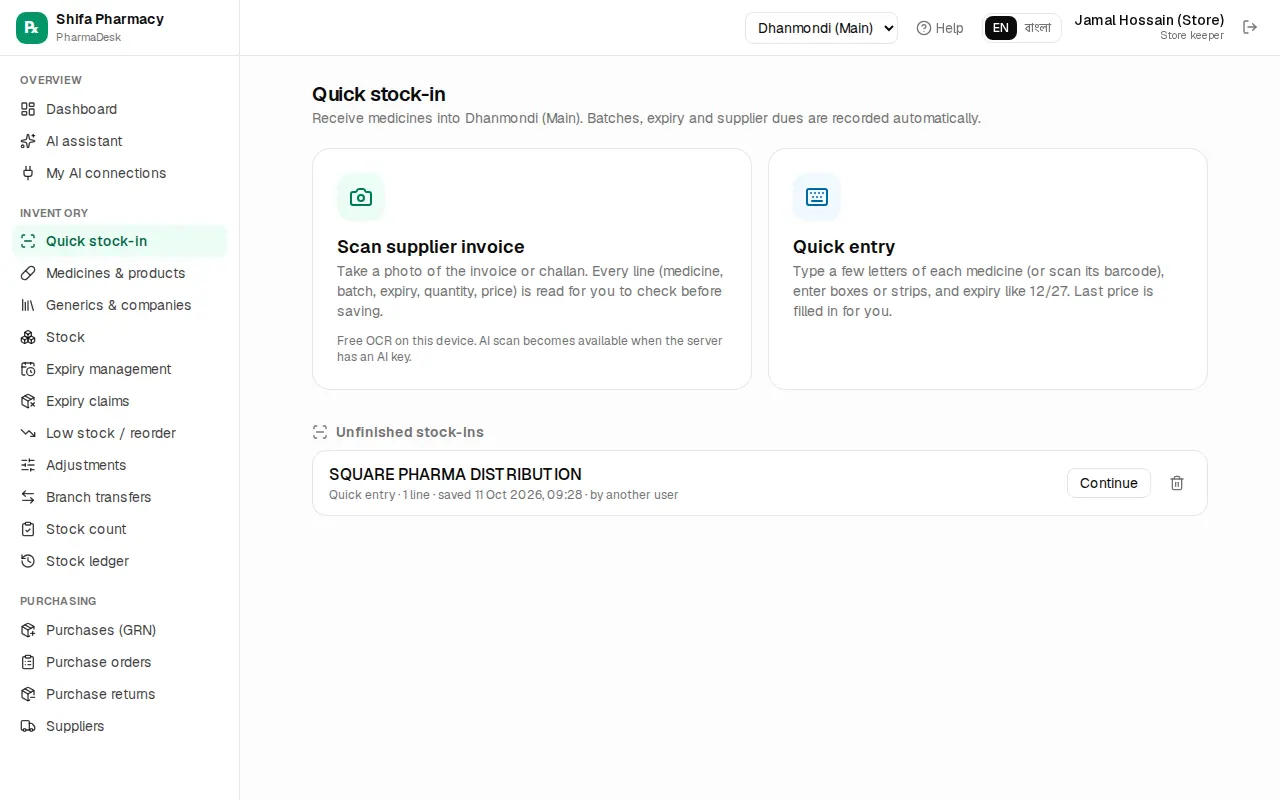
By photographing the invoice
- Press Scan supplier invoice.
- Pick how to read it: Free OCR (on this device) for clear printed invoices, at no cost. AI scan (more accurate) also reads handwriting and messy layouts (when AI is set up on the server).
- Press Take photo (on a phone) or Choose photos. For long invoices use Add page, up to 6 pages.
- Press Read … page(s). The Check scanned invoice page opens with the photo beside the lines.
- Compare every line with the photo. If a medicine was not recognised, search it in Find the right medicine… and pick it. Doubtful cells are highlighted.
- The rest is the same as Quick entry below.
By typing (Quick entry)
- Press Quick entry.
- Choose the Supplier. If it is not listed, press New, enter the name and phone and press Add.
- Enter the Invoice / challan no and date.
- Type a few letters of the medicine or scan its barcode. If it is missing, use Add new medicine.
- Enter the batch and expiry. Expiry can be typed like
12/27. - Enter the quantity and pick box / strip / unit next to it. Bonus goods go in Free.
- Check Cost and MRP; the last price is filled in for you.
- At the bottom, enter any Bill discount, VAT and Other charges. When the Invoice total matches you see a green ✓.
- In Payment now, enter what you paid (or press Paid in full) and pick the method. Anything unpaid is added to the supplier's due.
- Press Save & add to stock (or
Ctrl+Enter).
After saving you can Print shelf labels or start a New stock-in.
Purchases (GRN) with the full form
The classic full form is Purchasing › Purchases (GRN) › New purchase. It also records the manufacturing date (Mfg).
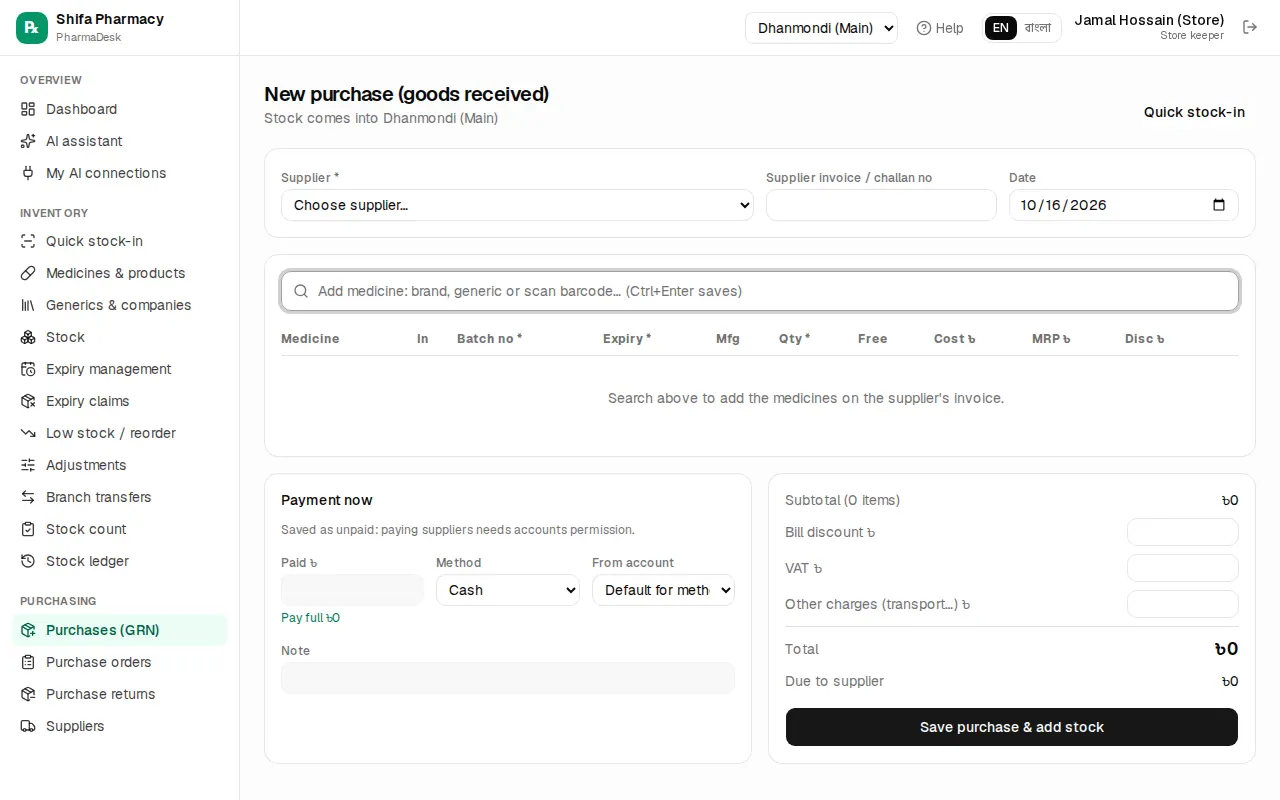
- Choose the Supplier, enter the Supplier invoice / challan no and date.
- Search and add medicines in the box at the top.
- On each line choose strip or unit under In, then enter Batch no, Expiry (MM/YYYY), Qty, Free (bonus), Cost ৳, MRP ৳ and Disc ৳.
- Watch the yellow warnings: "Expires within 6 months", "MRP below cost" or "MRP differs from current".
- On the right, fill Paid ৳, Method and From account. Due to supplier shows what is left.
- Press Save purchase & add stock.
A purchase page has Print, Print labels and Return items. A manager or the owner can Cancel purchase with a reason, unless some of its stock was already sold or returned.
Purchase orders and WhatsApp
- Go to Purchasing › Purchase orders › New order.
- Choose the supplier and Expected delivery date, add medicines and quantities.
- Press Save as draft.
- On the order page press Send on WhatsApp. The order text appears; edit if needed and press Open WhatsApp. A draft order is marked as sent automatically.
- When the goods arrive, press Receive goods on the order. A new purchase opens pre-filled with the outstanding quantities; add batch and expiry and save.
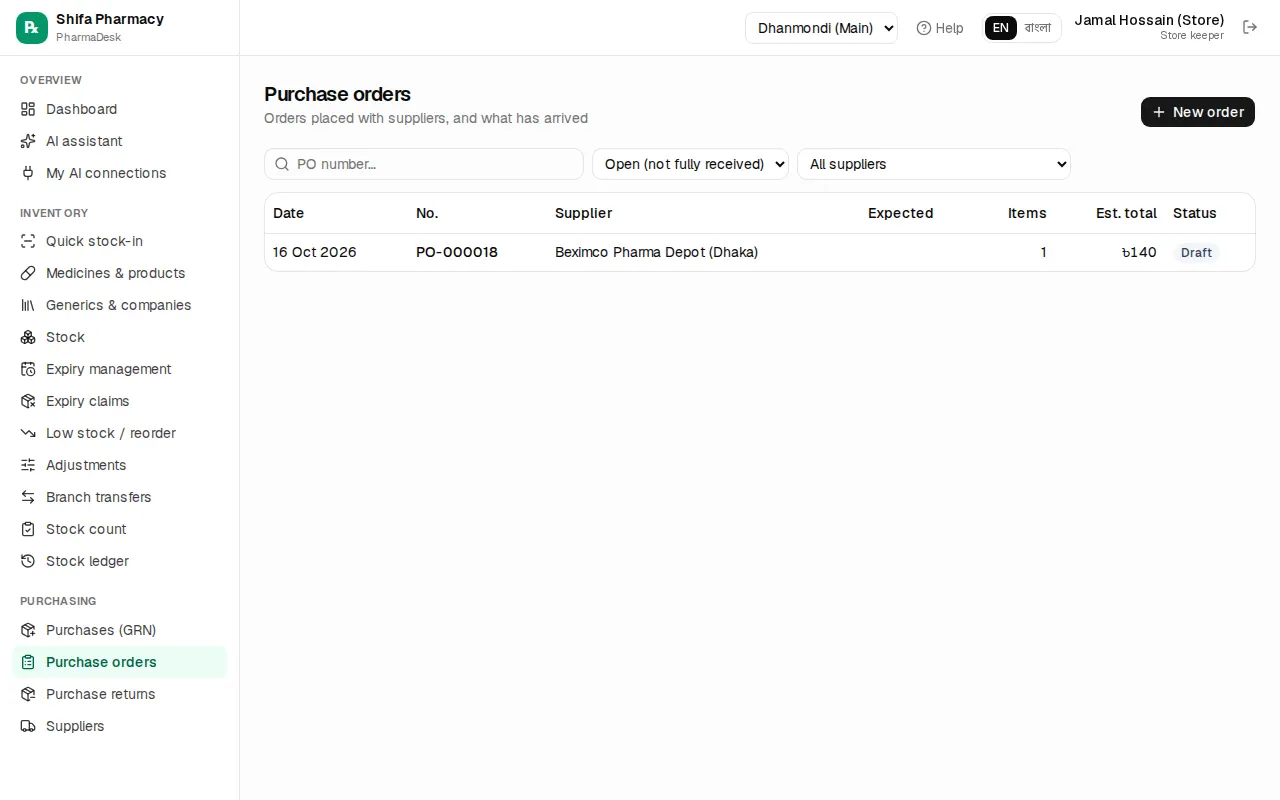
Order statuses: Draft, Sent, Partial, Received, Cancelled. If the rest of a partial order will not come, press Close order.
Returning goods to a supplier
Returning damaged, wrong or short-dated goods reduces your stock and what you owe the supplier.
- Go to Purchasing › Purchase returns › New return (or Return items from a purchase).
- Choose the supplier and type the Reason.
- Search in Find the medicine to return… and pick the batch.
- Enter the quantity (no more than Can return). The value is taken at purchase cost.
- Press Save return & remove stock.
Expiry claims to companies are separate; see Expiry claims.
Suppliers and paying dues
Purchasing › Suppliers shows every supplier with phone and Payable (what you owe them).
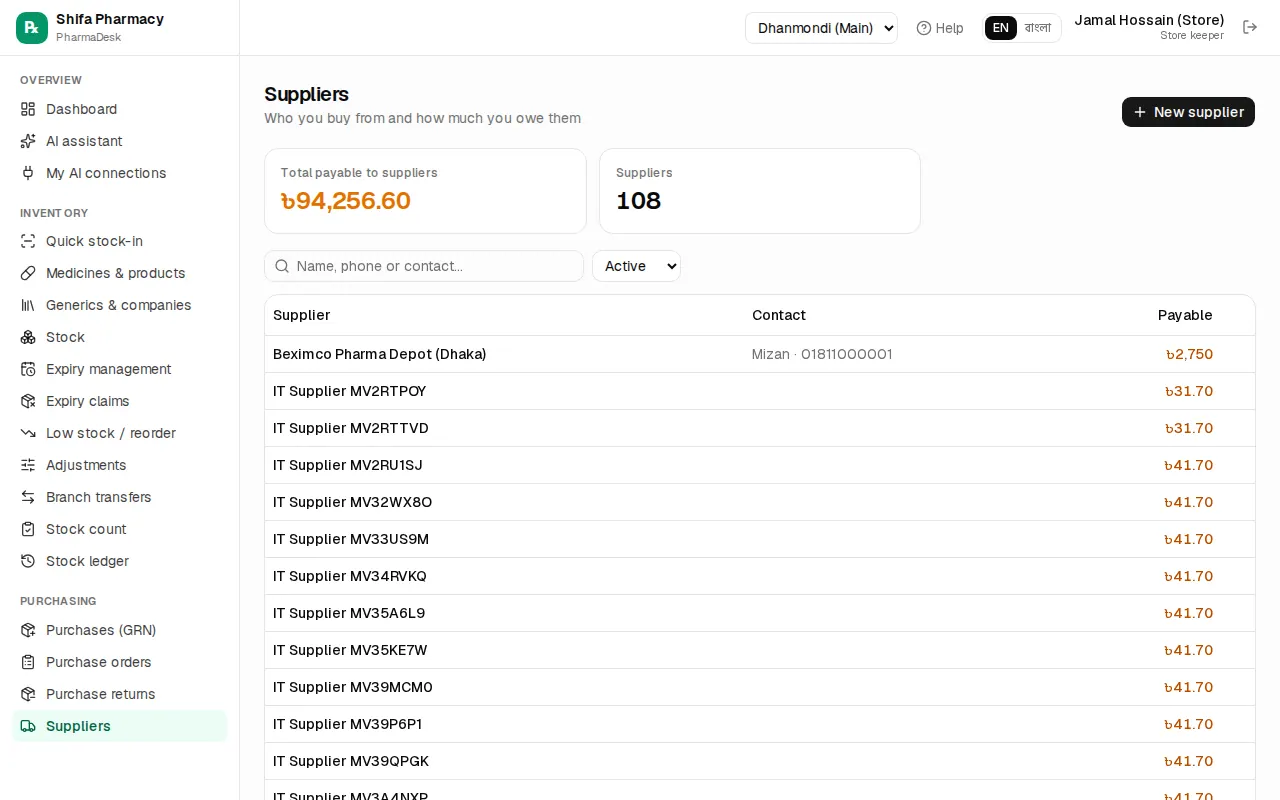
Adding a supplier:
- Press New supplier.
- Enter the name, Contact person (sales rep), phone and WhatsApp.
- If you already owed them money at the start, enter it in Opening balance (a negative amount for an advance). Only a manager or accountant can change this.
- Press Save supplier.
Click a supplier to open the Supplier statement (purchases, payments, returns, balance); Print statement to reconcile.
Paying a due:
- Press Pay next to the supplier, or go to Finance › Supplier payments › Pay supplier.
- After you pick the supplier, "You owe …" appears. Press Pay all … to pay everything, or type an amount.
- Choose the Method (cash, bKash, bank, cheque…) and Paid from account.
- For bKash or cheque, fill Reference (trx id / cheque no).
- Press Save payment. On the next page, Print voucher and get it signed.
If you pay more than you owe, the extra is kept as an advance.
Common mistakes
Chapter 9 · Stock & purchasing
Stock control & expiry
Viewing stock, handling expired goods and expiry claims, reordering, damage and loss adjustments, branch transfers, stock counts and the stock ledger
A pharmacy's money sits on its shelves. This chapter shows how to keep stock accurate, sell or claim short-dated goods in time, and order before you run out. All pages are under the Inventory menu, and every figure is for the Branch chosen in the top bar.
Stock list
Inventory › Stock shows four figures at the top: products in stock, stock value at cost and at MRP, and the value of expired stock.
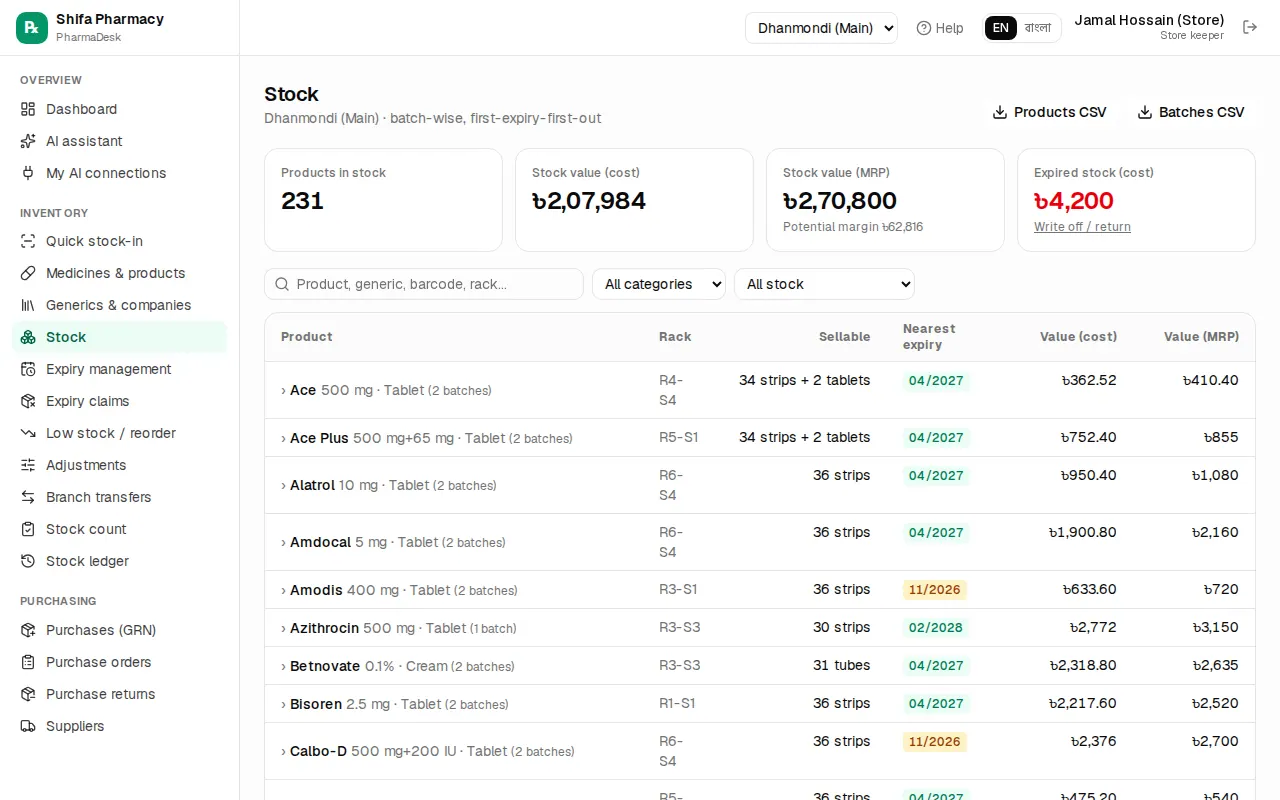
- Search by product, generic, barcode or rack.
- Filters: At/below reorder level, Has expired stock, Negative batches.
- Click a product name to open all its batches with expiry, quantity, cost and MRP.
- Sellable is what you can actually sell, expired stock excluded.
- Use Products CSV or Batches CSV to download for Excel.
Expiry management
Inventory › Expiry management shows how much stock has expired and how much expires within 30, 60 and 90 days. Below is the Expiry calendar · next 12 months; click a month to see its batches.
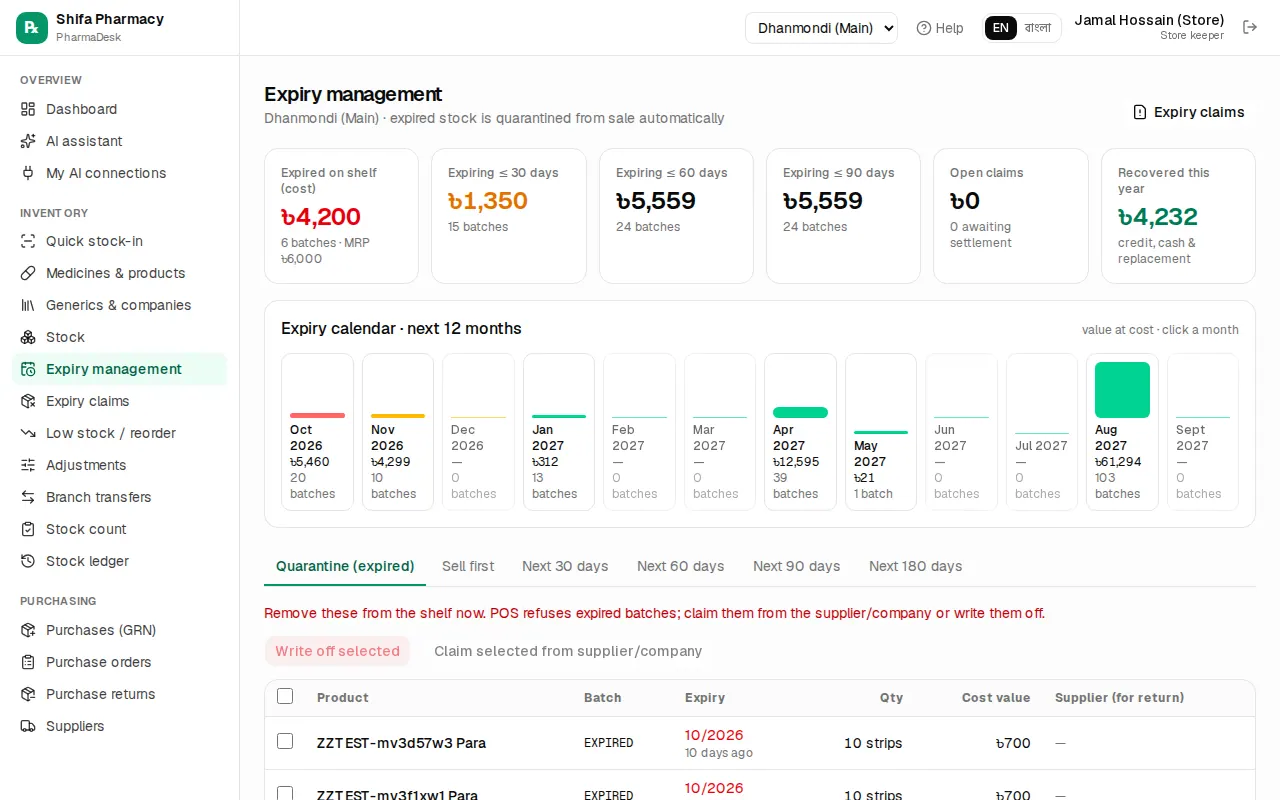
The tabs:
- Quarantine (expired): batches already past expiry. POS will not sell them. Take them off the shelf now.
- Sell first: stock expiring within 90 days, with a suggested markdown (15% at ≤30 days, 10% at ≤60, 5% at ≤90). Give that discount on the POS line.
- Next 30 days, Next 90 days and so on: what expires within that window, with the supplier name so you know whom to return it to.
Expired stock has two exits: a claim to the supplier or company, or a write-off.
To write off:
- On the Quarantine (expired) tab, tick the batches.
- Press Write off … selected and confirm.
Stock goes to zero and is recorded as an expiry loss. Write off only when there is no chance of getting anything back.
Expiry claims
Many companies take back expired medicine and give credit, cash or replacement goods. Record it as a claim in PharmaDesk so you can see what you got back and what is still pending.
- On the expiry page, tick batches and press Claim … selected from supplier/company. Or go to Inventory › Expiry claims › New claim.
- Under Claim from, choose Supplier or Company, then pick the supplier or company.
- PharmaDesk suggests that party's expired (or, if you choose, near-expiry) batches. Press Add next to the ones you want. Other batches can be added with the search box below.
- Set the Claim qty and fill Note / reference, e.g. "Given to MR Rafiq on visit".
- Press Save draft if you are not sending it yet. When you hand over the goods, press Save & send claim. The stock leaves your inventory at that moment.
- Print claim letter and send it with the goods.
When money or goods come back (settle):
- On the claim page press Settle.
- Enter what you received: Credit note (৳) (lowers what you owe the supplier), Cash received (৳) with Into account, or Replacement goods value (৳).
- If nothing more is expected, tick "Nothing more expected: close the claim"; the rest is counted as a loss.
- Press Record settlement. If the company refused the whole claim, press the red Reject button; the claim is marked Rejected.
If a claim was sent by mistake, press Cancel claim; with a reason, the stock comes back into inventory.
Low stock and reorder
Inventory › Low stock / reorder lists medicines at or below their reorder level, or out of stock but sold in the last 30 days. Each row shows Sold 30d, Days left and a suggested Order qty.
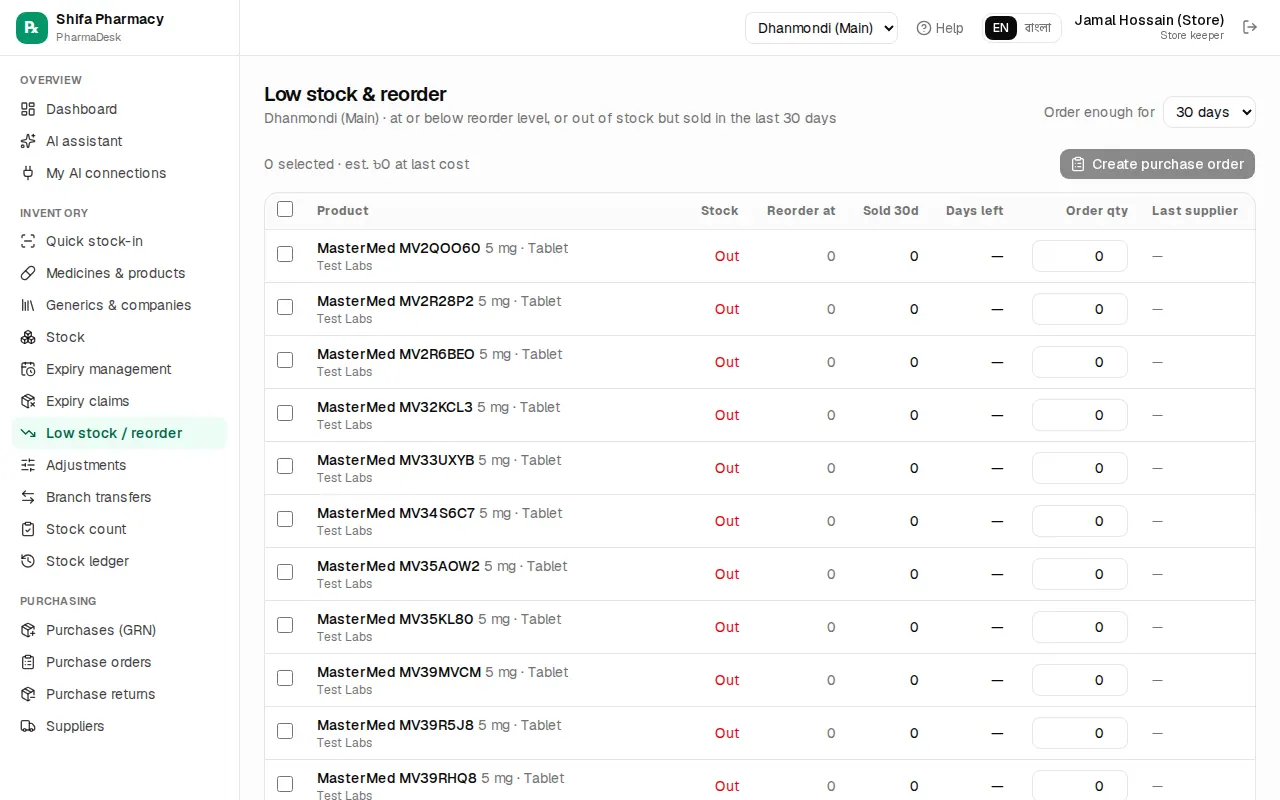
- At the top, choose Order enough for (15, 30, 45 or 60 days).
- Filter by supplier if you like.
- Tick what you want to order and adjust quantities.
- Press Create purchase order to open a pre-filled order. Or pick a supplier in WhatsApp to… and send the order straight on WhatsApp.
Sending orders and receiving goods are covered in Purchase orders.
Stock adjustments (damage, loss, correction)
When a strip is torn, a bottle breaks or something cannot be found, post an adjustment.
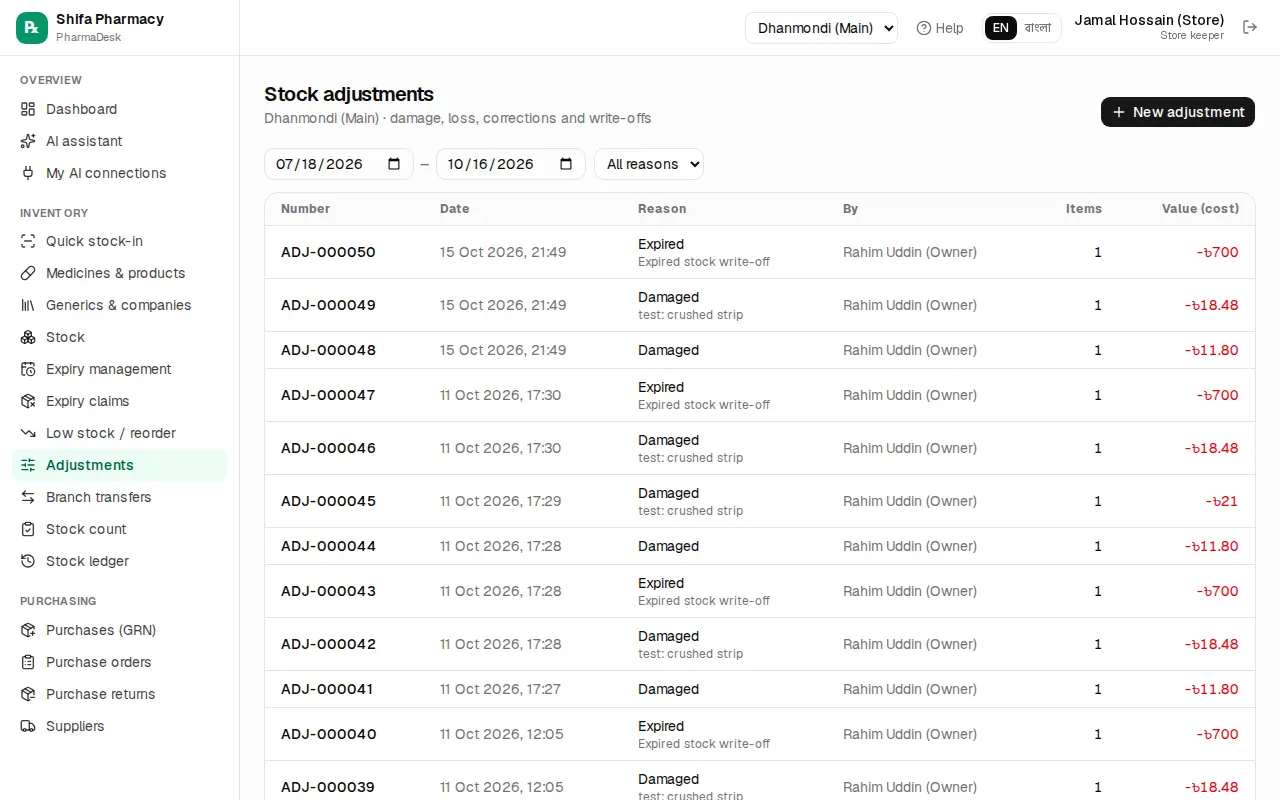
- Go to Inventory › Adjustments › New adjustment.
- Choose the Reason: Damaged, Expired, Lost and Theft remove stock; Found adds stock; Correction and Other work both ways.
- Write a short Note about what happened.
- Search the product, pick the batch and enter the quantity (for Correction, + adds and − removes).
- Check the value change at the bottom and press Post adjustment.
Sending and receiving branch transfers
With more than one branch, move stock with Inventory › Branch transfers.
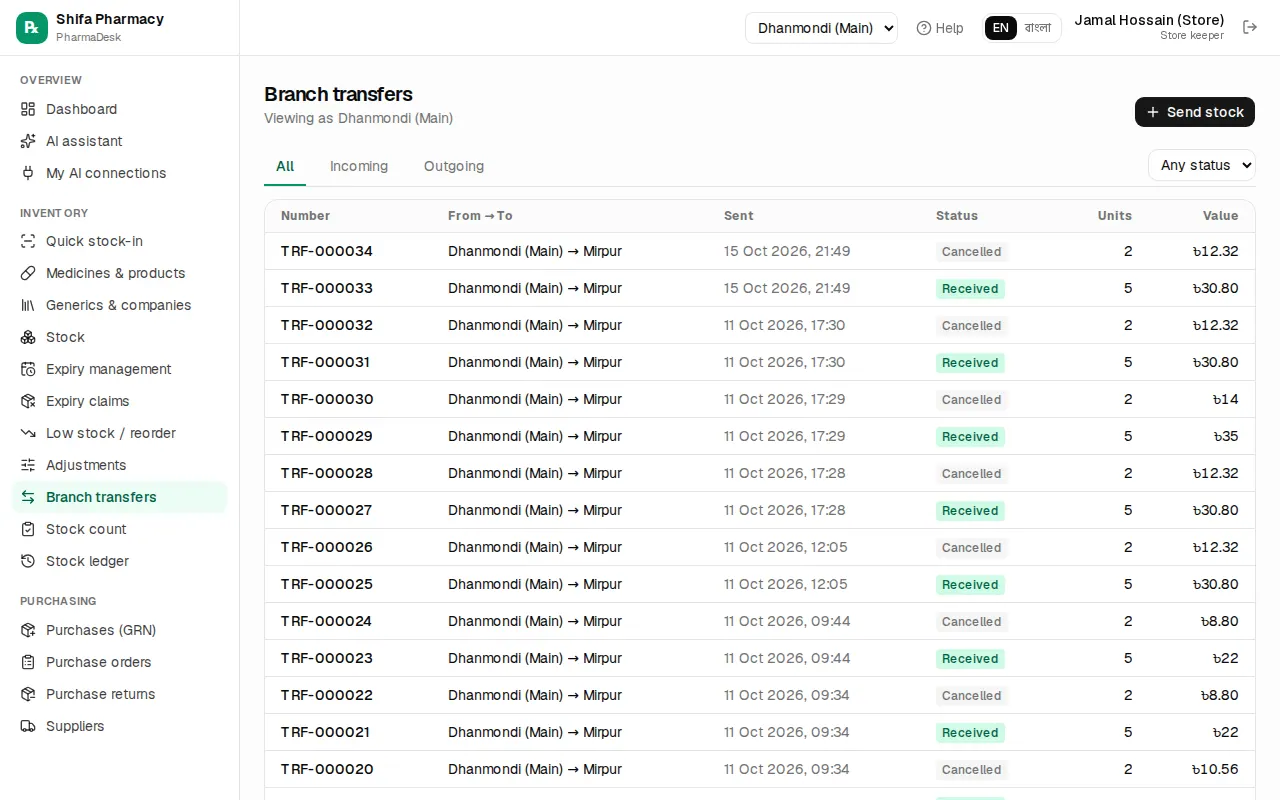
Sending (the branch the goods leave):
- Press Send stock.
- Choose To branch and add a note, e.g. "Sent with Rafiq, bag #3".
- Search products and enter batch and quantity.
- Press Send transfer. Stock leaves this branch now and the status becomes "In transit". Print challan and send it with the goods.
Receiving (the branch the goods arrive at):
- Pick your branch in Branch in the top bar.
- The transfers page shows a yellow note with how many are waiting. Open the transfer.
- Count and check the goods, then press Receive stock.
If something is wrong, either branch can press Cancel transfer; the stock goes back to the sending branch.
Stock count
Count now and then to match what is on the shelf with what the system shows. One rack at a time is easiest.
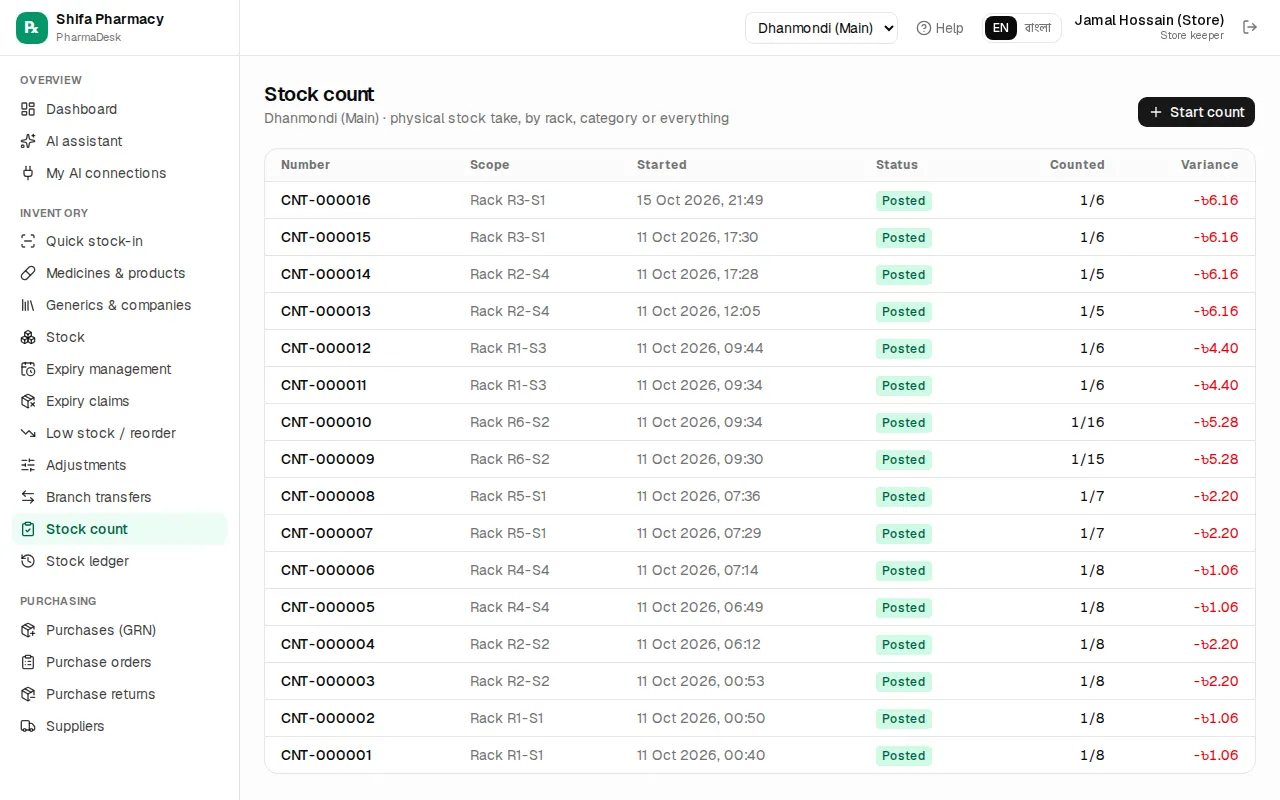
- Go to Inventory › Stock count › Start count.
- Choose Everything, One rack or One category. For a rack, type its start in Rack (starts with), e.g.
R1. - Press Start. System quantities are frozen now; sales during the count are fine.
- Count each batch on a phone or on a printed Print count sheet, and type the number in Counted (in base units, e.g. tablets).
- Press Save progress from time to time.
- Tick Only differences to recheck the shortages and overs.
- Press Post count. The differences are applied to stock; this cannot be undone.
Lines you did not count stay unchanged. To abandon a count, press Cancel count; nothing changes in stock.
Stock ledger
Inventory › Stock ledger lists every stock movement, newest first: purchases, sales, returns, adjustments, transfers, counts. Use Filter by product… and the type filter. When a medicine's stock looks odd, this is where you see who changed it, when and why. A product page also links here with Full ledger.
Common mistakes
Chapter 10 · Money & accounts
Customers and dues
Keep customer records, sell on due within a credit limit, collect dues with a money receipt, send SMS reminders, and track refills and doctor commission.
When you save your regular patients as customers, you can see their purchases, allergies and dues in one place. This chapter covers customers, selling on due (baki), collecting dues, reminders and doctor commission.
The customer list
Go to Sales › Customers. Cashiers, pharmacists, managers and the owner can open it. Search by name or phone, and filter by type (Retail, Wholesale, Institution) or status. The Due column shows how much each person owes.
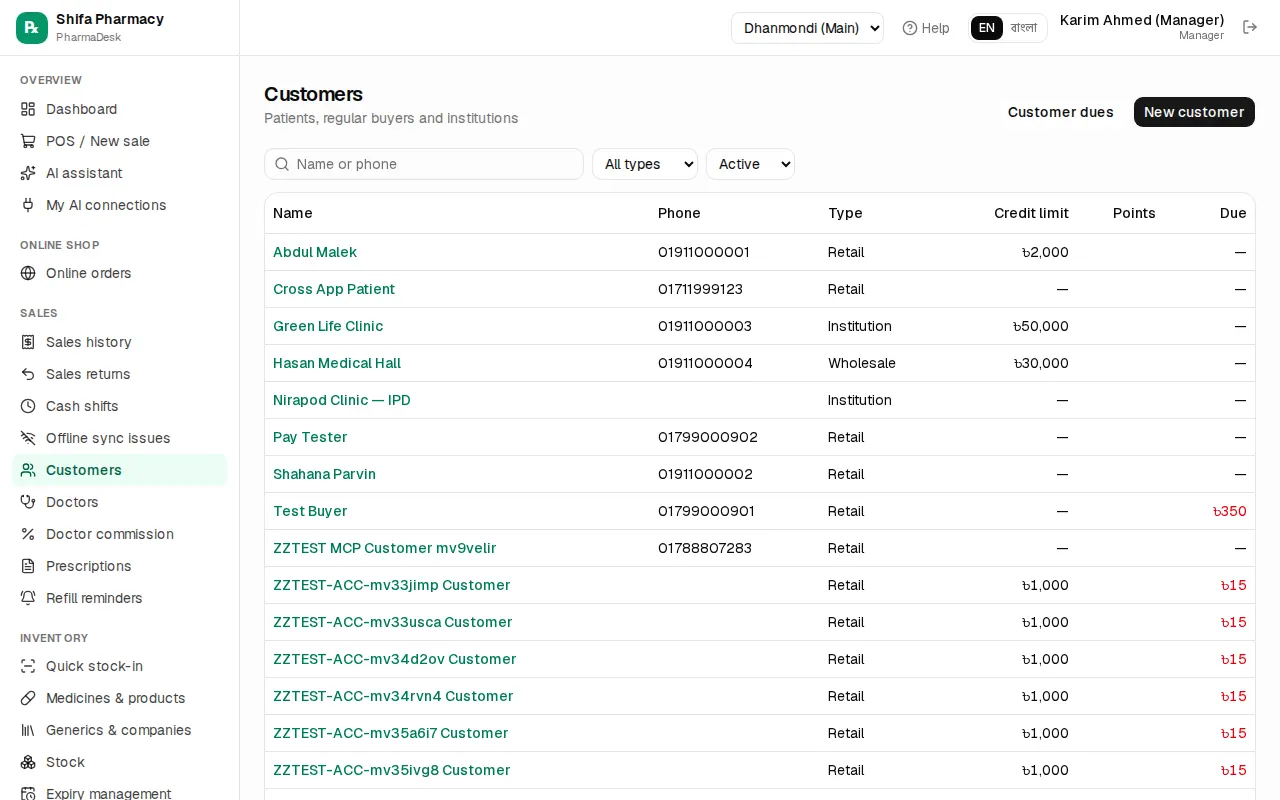
Add or edit a customer
- Click New customer.
- Fill in Name and Mobile. You need the mobile number for SMS and refill reminders.
- Choose the Type: Retail, Wholesale (pharmacy / shop) or Institution (clinic / hospital).
- If you know them, add Allergies and Chronic conditions. The allergies show in yellow at the POS.
- Credit limit (৳): the most this customer can owe. 0 means they must always pay in full.
- Opening due (৳): what they already owed before you started using PharmaDesk.
- Click Add customer.
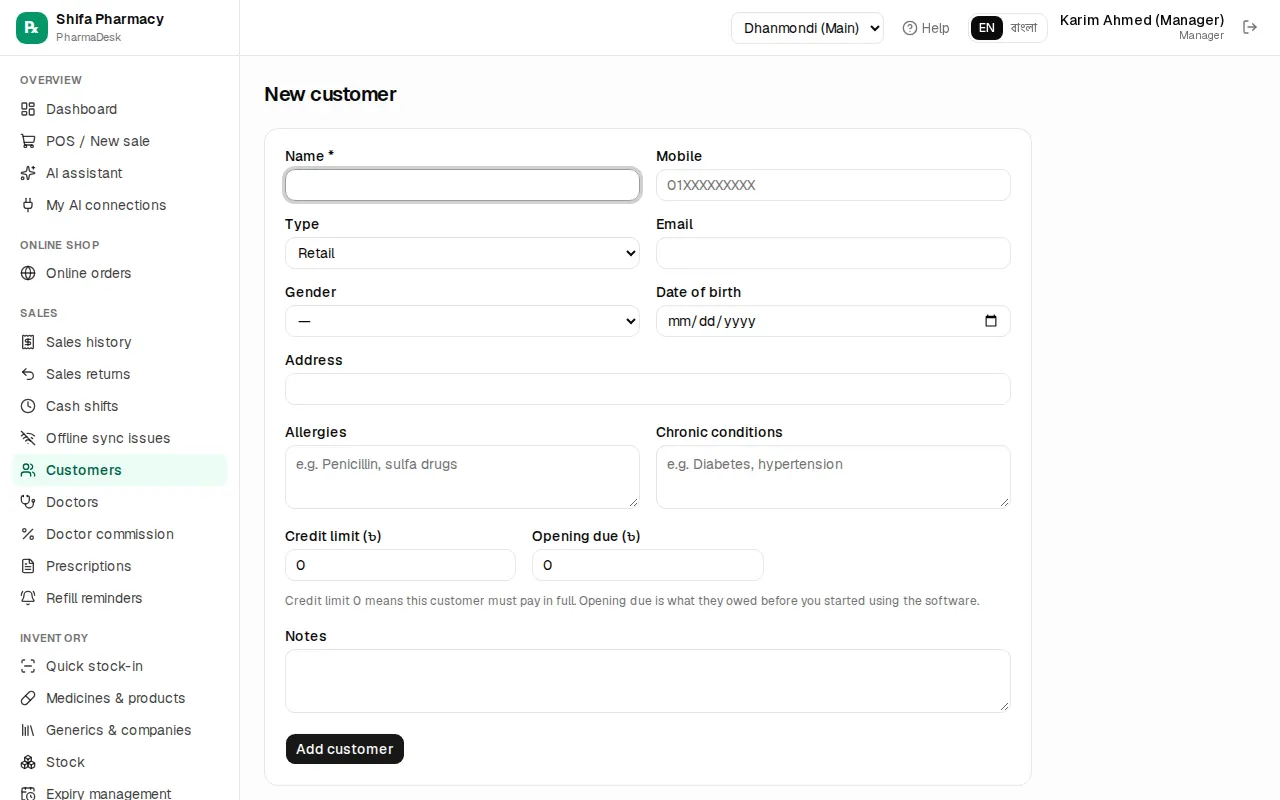
You can also add a customer at the POS with just a name and phone (F4). See Daily selling.
To change details, open the customer and click Edit. If someone no longer buys from you, click Deactivate. Their history is kept.
The customer page
Click a name to see Current due (with the limit), Purchases, Last visit and Loyalty points. There are four tabs:
- Purchases: the last 50 invoices.
- Ledger: every sale, payment and return, with the running Balance.
- Prescriptions: saved prescriptions. Add prescription adds a new one.
- Refill reminders: this customer's reminders. Add refill reminder adds a new one.
If an AI assistant has drafted an SMS for this customer, it appears under SMS drafts (not sent). It is only sent when you click Send. Discard throws it away.
Selling on due (baki)
At the POS, choose the customer and lower Cash received. The rest becomes due. The rules:
- A due can't be left without choosing a customer.
- The customer's total due after the sale can't go over their credit limit.
- A manager or the owner can allow a bigger due with Manager override: allow this due.
Every due sale goes into the customer's Ledger and into Customer dues.
Collecting dues
A manager, accountant or the owner can collect dues. A cashier can't, so if a customer comes to pay, call the manager.
- Go to Finance › Customer dues.
- At the top you'll see Total receivable and the age groups (0–30 days, 31–60, 61–90, 90+). The table shows each customer's Oldest unpaid date and Total due. If a customer is past their limit, over limit shows in red.
- Search by name or phone, and click Collect on that customer's row.
- Check the Amount (৳). It starts at the full due, so lower it for a part payment.
- Choose the Method (Cash, bKash, Nagad, Rocket, Card, Bank, Cheque) and, if needed, the Into account.
- Type the TrxID or cheque number and a note if you have them, then click Save payment.
- Click Print money receipt to give the customer a money receipt, then Done.
You can also collect from the customer's page with the Collect button. The last 10 payments are listed under Recent collections, and the Receipt link reprints the money receipt.
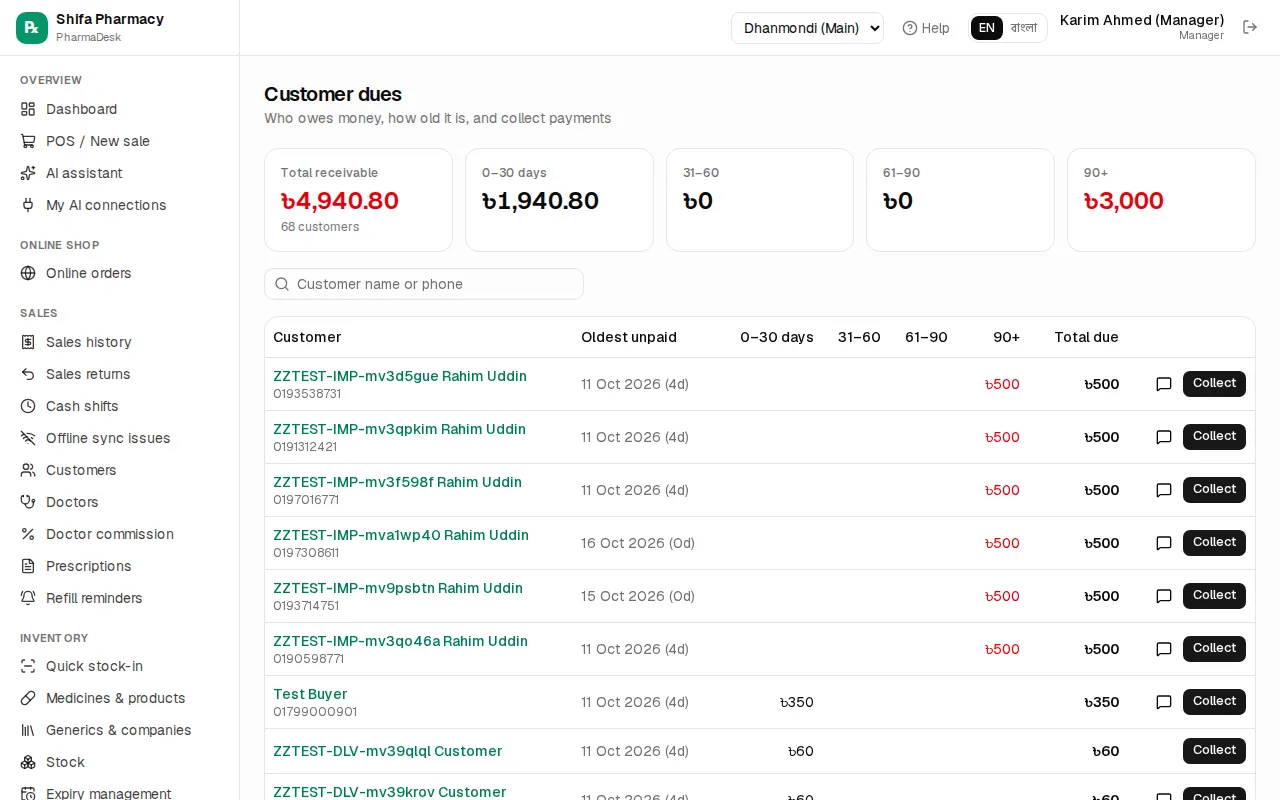
SMS reminders
On Customer dues, each customer with a phone has a message icon (Send due reminder SMS). Click it and an SMS goes out telling them how much they owe. Nothing is sent automatically. You click it each time.
SMS only works when all three of these are true:
- Send SMS (refill reminders, dues) is on in Admin › Settings.
- Support has set up the SMS gateway.
- Your plan includes SMS.
If anything is missing, you'll see SMS not sent with the reason.
Refill reminders
Patients on daily medicine (diabetes, blood pressure, thyroid) can be reminded before they run out.
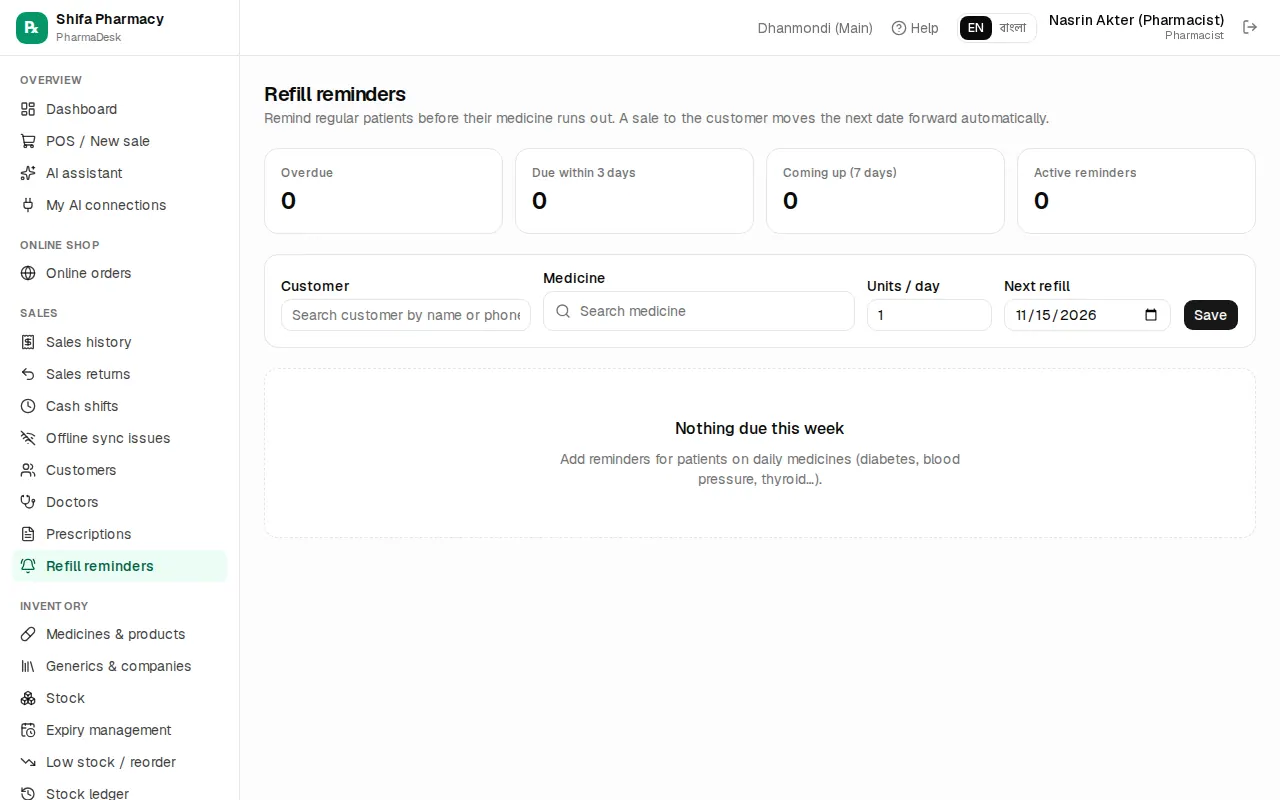
- Go to Sales › Refill reminders.
- In the form at the top, choose the Customer (they must have a phone number) and the Medicine.
- Type the Units / day, for example 2 tablets a day.
- Pick the Next refill date and click Save.
The list is grouped into Overdue, Due now and Coming up. On each row you can click SMS to send a reminder, Contacted once you've called them, or Stop to turn the reminder off.
When this customer buys the same medicine again, the next date moves forward on its own. For example, 60 tablets at 2 a day moves it 30 days on. You set how many days ahead counts as "due now" in Stock alerts & reminders in settings.
Doctors and commission
Sales › Doctors (pharmacist, manager, owner): click New doctor and enter Name, Degrees, Specialty, BMDC reg no., Phone and Chamber. If the doctor gets a referral commission, set the Referral commission (%). Then click Add doctor. Choose the doctor at the POS and the commission is counted by itself.
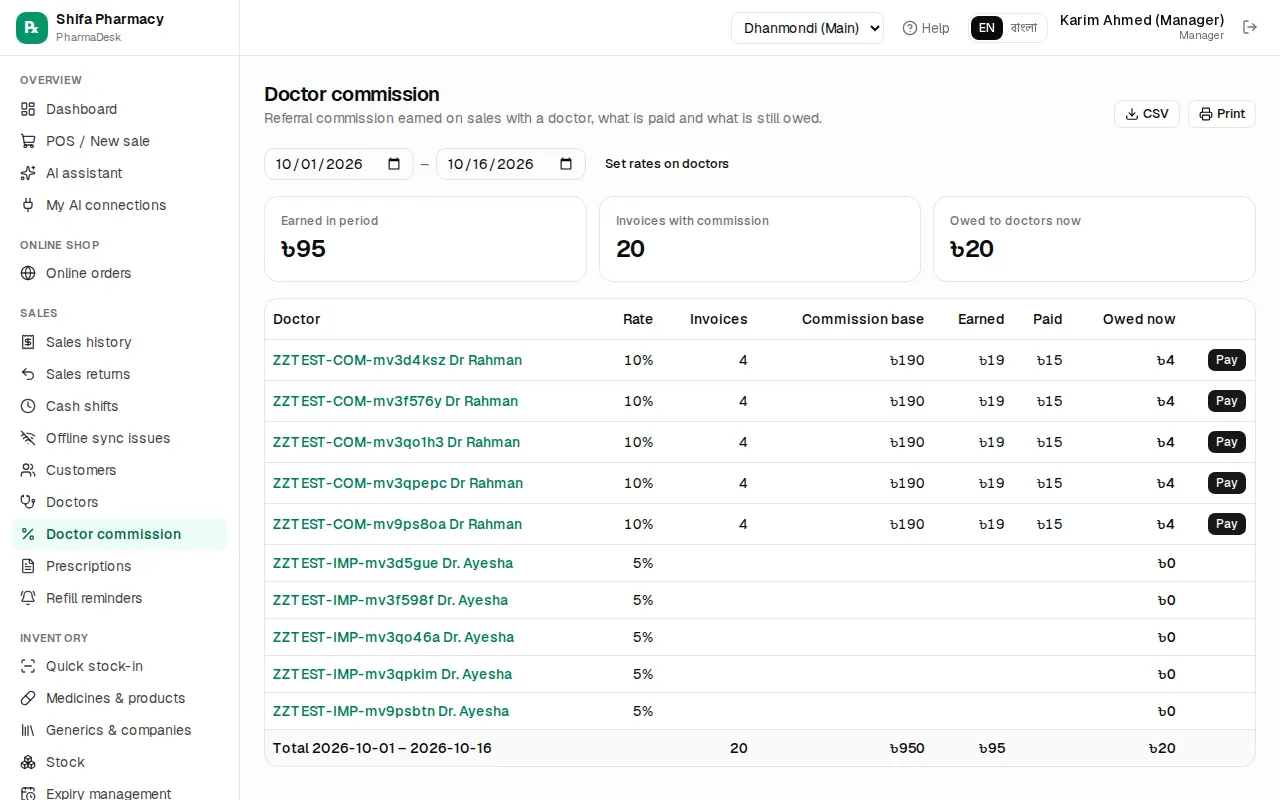
Sales › Doctor commission (manager, accountant, owner) shows, for the chosen dates, each doctor's Invoices, Commission base, Earned, Paid and Owed now. To pay a doctor, click Pay, check the Amount (৳), choose Paid from, and click Save payment. If a sale is returned or voided, the commission is reduced automatically.
Common mistakes
- Saving a customer without a mobile number, so no SMS or refill reminder can be sent.
- Leaving the credit limit at 0 and then wondering why the due won't save.
- Taking a part payment but leaving the full due in Amount (৳) in the collect window.
- Not choosing the doctor at the POS, so no commission is counted.
Chapter 11 · Money & accounts
Accounting and expenses
Record expenses, manage cash and bank accounts, and read journal vouchers, the ledger, chart of accounts, trial balance, income statement and balance sheet in plain words
Most of the bookkeeping in PharmaDesk happens on its own. You record sales, purchases, payments and expenses properly; the software builds the books, ledgers and profit-and-loss from them. This chapter shows how to record expenses, see where your money is, and what the accounting reports tell you.
Double entry in plain words
In every transaction money comes from somewhere and goes somewhere. In accounting language one side is the Debit, the other the Credit, and the two are always equal. This is double-entry bookkeeping. PharmaDesk writes these entries for you as you work:
| What you do | What the software records |
|---|---|
| Sell medicine for cash | Cash goes up, sales income is recorded, VAT payable goes up if there is VAT; stock goes down and cost of goods sold is recorded |
| Sell on credit | Instead of cash, customer dues (accounts receivable) go up |
| Collect a due | Cash goes up, customer dues go down |
| Buy stock from a supplier | Stock goes up, what you owe the supplier goes up |
| Pay a supplier | What you owe goes down, cash/bank goes down |
| Pay an expense (rent, bills) | Expense goes up, the account you paid from goes down |
| Pay salary | Salary expense goes up, cash goes down |
| Write off expired / damaged stock | Stock loss (an expense) goes up, stock goes down |
So the accountant's daily work comes down to three things: record expenses, check cash and bank balances, and read the reports at month end.
Recording expenses
Rent, electricity, transport, tea and snacks: record every running cost here. If you don't, profit will look higher than it really is.
- Open Finance › Expenses.
- Click Add expense.
- Choose the Category and enter the Amount (৳).
- Under Paid from, choose the account the money left (for example the shop cash or the bank).
- Set the Date and, if useful, a Note (for example "October shop rent").
- Click Save.
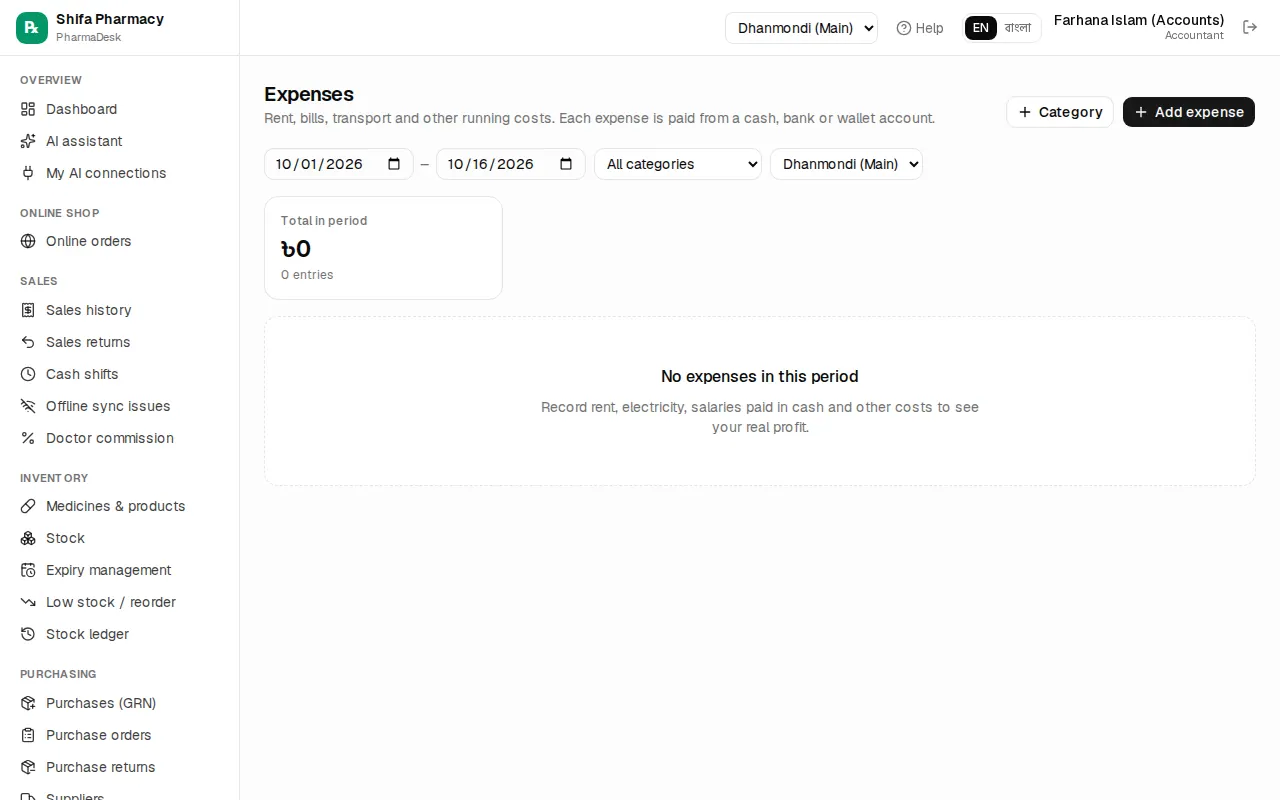
The top shows Total in period and the three biggest categories. Filter the list by date, All categories and branch.
- New category: click the Category button at the top, type a name under New category and click Add category. You can delete old categories in the same window.
- Fix a mistake: click the pencil icon at the right of the row, correct it and save.
- Delete: click the bin icon. Deleting puts the money back into that account.
Cash and bank accounts
Finance › Cash & bank lists every place your money sits: cash drawers, bank accounts and mobile wallets like bKash or Nagad. The top shows Total cash, Total in bank, Mobile wallets and All money. Balances change instantly with every sale, expense and payment.
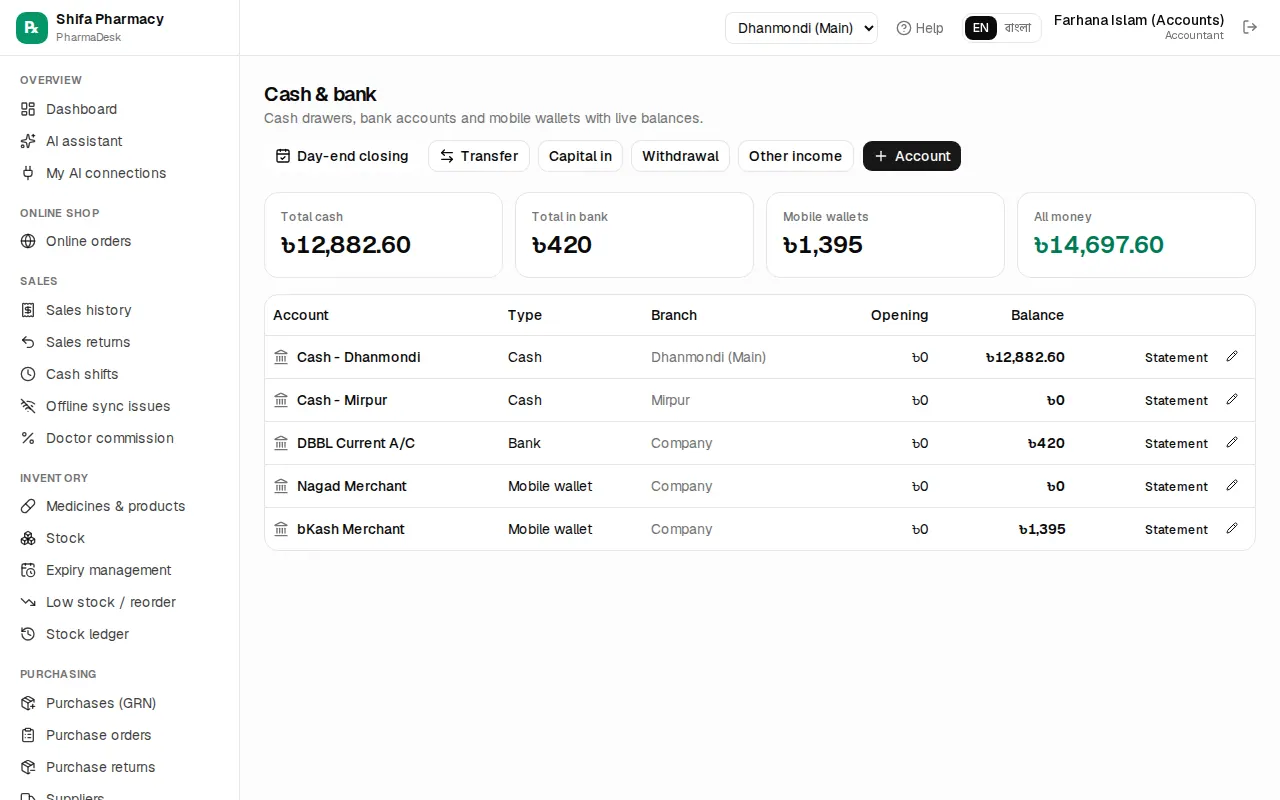
Opening a new account
- Click the Account button.
- Enter a Name (for example "City Bank A/C 1234").
- Choose the Type: Cash, Bank or Mobile wallet. Choose a Branch, or leave it as Company-level.
- In Opening balance (৳), enter how much was in the account on the day you started using the software.
- Click Save.
If an account is closed later, click the pencil and untick Active. Its history is kept.
Moving money, capital and withdrawals
- Transfer: move money from one account to another, for example depositing the day's cash in the bank. Fill in From account, To account, the amount and date.
- Capital in: the owner puts their own money into the business.
- Withdrawal: the owner takes money out for personal use. This is not an expense, so don't record it on the Expenses page.
- Other income: income other than sales, for example an incentive from a company.
Account statement
Click an account name or Statement to see a list like a bank statement: Opening, Money in, Money out, Closing, and the balance after every transaction. Change the dates to see any period, then CSV or Print. This is the best tool for matching against your real bank statement.
Journal vouchers
Accounting › Journal vouchers shows every accounting entry. Automatic entries have a grey tag with their source (for example Sale, Purchase, Expense); manual vouchers have a Manual tag. Filter by date, the All entries list and the Voucher no. or memo search box. Click a voucher number for details, and use Open source document to see the original sale or purchase.
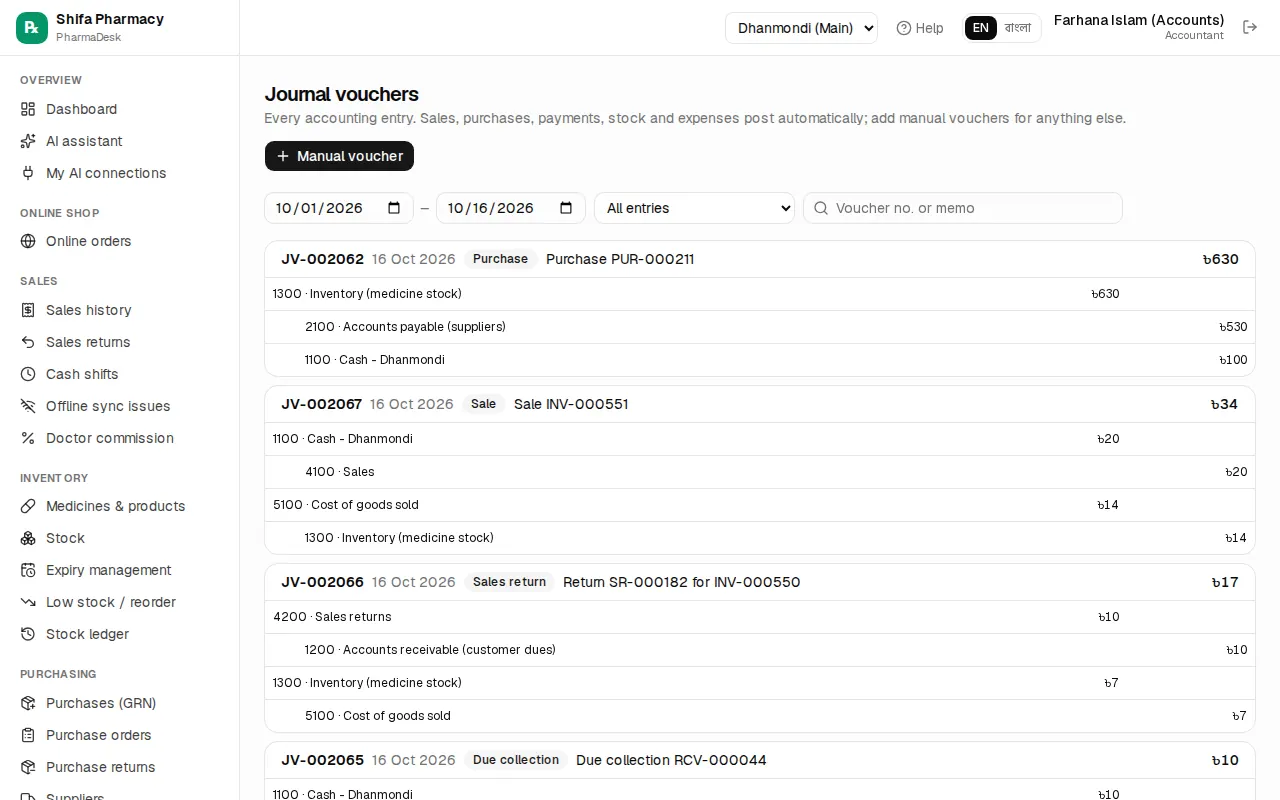
For something no other page records (for example depreciation of furniture), post a manual voucher:
- Click Manual voucher.
- Set the date and type a memo (it won't post without one).
- On each line, choose a ledger from Choose ledger… and enter either Debit ৳ or Credit ৳. Click Line for more lines.
- Adjust until the bottom says Balanced. If debits and credits differ, it shows the Difference and the button stays disabled.
- Click Post voucher.
A manual voucher cannot be deleted. Open it and click Reverse: a reversing voucher dated today is posted and cancels the original. To fix an automatic entry, correct the source document itself (the sale, expense and so on).
Ledger, chart of accounts and financial statements
- Accounting › General ledger: choose a ledger and dates to see every transaction and the running balance.
- Accounting › Chart of accounts: all ledgers in five groups, Assets, Liabilities, Equity, Income and Expenses, with today's balance. A lock icon means the ledger is Used by automatic posting; its type cannot be changed and it cannot be hidden. To add a ledger, click the Ledger button and enter Code, Name and Type. Ledgers you created and no longer need can be put away with Hide.
- Accounting › Trial balance: debit and credit of every ledger up to a date. Enter the date under As of and click Show. "✓ balanced" at the bottom means the books agree.
- Accounting › Income statement: net revenue, Gross profit, expenses and Net profit for a date range, compared with the previous period of the same length. Sales are shown without VAT; returns and discounts are deducted from revenue.
- Accounting › Balance sheet: what the pharmacy owns, owes and the owner's stake on a date. A green message confirms assets = liabilities + equity.
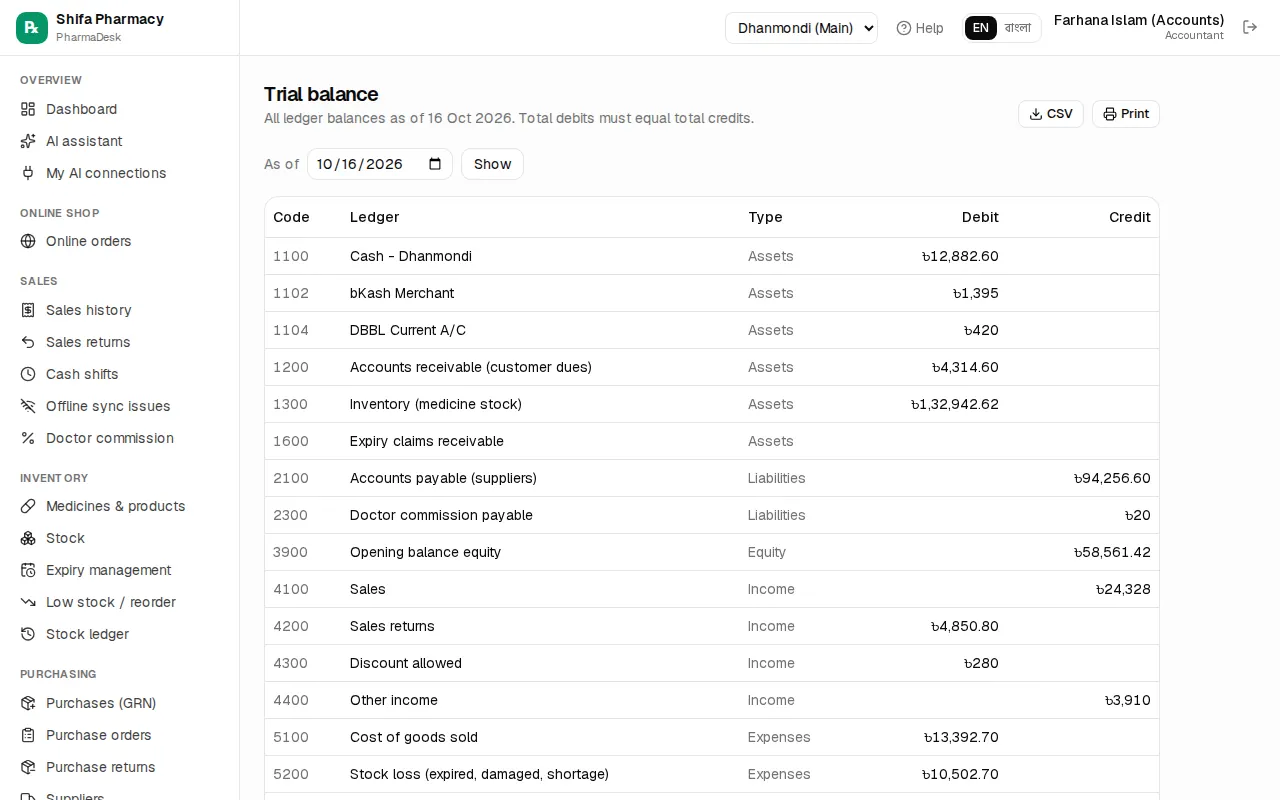
Every one of these pages has CSV and Print. Give these to your accountant or auditor at month end.
Common mistakes
Chapter 12 · Reports
Reports and dashboard
Read today's numbers on the dashboard, find which report answers which question, filter by date and branch, export to CSV or print, and prepare the monthly VAT return (Mushak)
How is the shop doing, how much profit did you make, which medicines are sitting on the shelf, who owes you money: PharmaDesk works all of this out from the sales, purchases and expenses you already enter. No separate register is needed. This chapter shows where to find each number and how to print it or take it into Excel.
Dashboard: the shop at a glance
After you log in, Overview › Dashboard opens first. The cards show:
- Today's sales and Today's gross profit (after returns)
- Cash in drawer: how much should be in the drawers of the open shifts right now
- Sold on credit today
- This month's sales, This month's gross profit, total Customer dues and Supplier payables
- Low stock products, medicines expiring soon and Expired in stock
Below that you see a Last 30 days sales chart, Payments this month (how much came in by cash, bKash, Nagad, card…), Top 10 products this month and Recent sales. Click any card to jump to the matching page; for example Low stock products opens the reorder list.
With several branches, owners and managers can pick All branches from the list at the top right to see the whole business at once.
Opening a report
- In the sidebar, click Reports › All reports.
- Reports are grouped in five sections: Sales, Inventory, Purchasing, Finance and Compliance.
- Click the card of the report you need.
- Change the filters at the top (see below). The table updates as soon as you change a filter.
- To go back, click the ‹ Reports link at the top left.
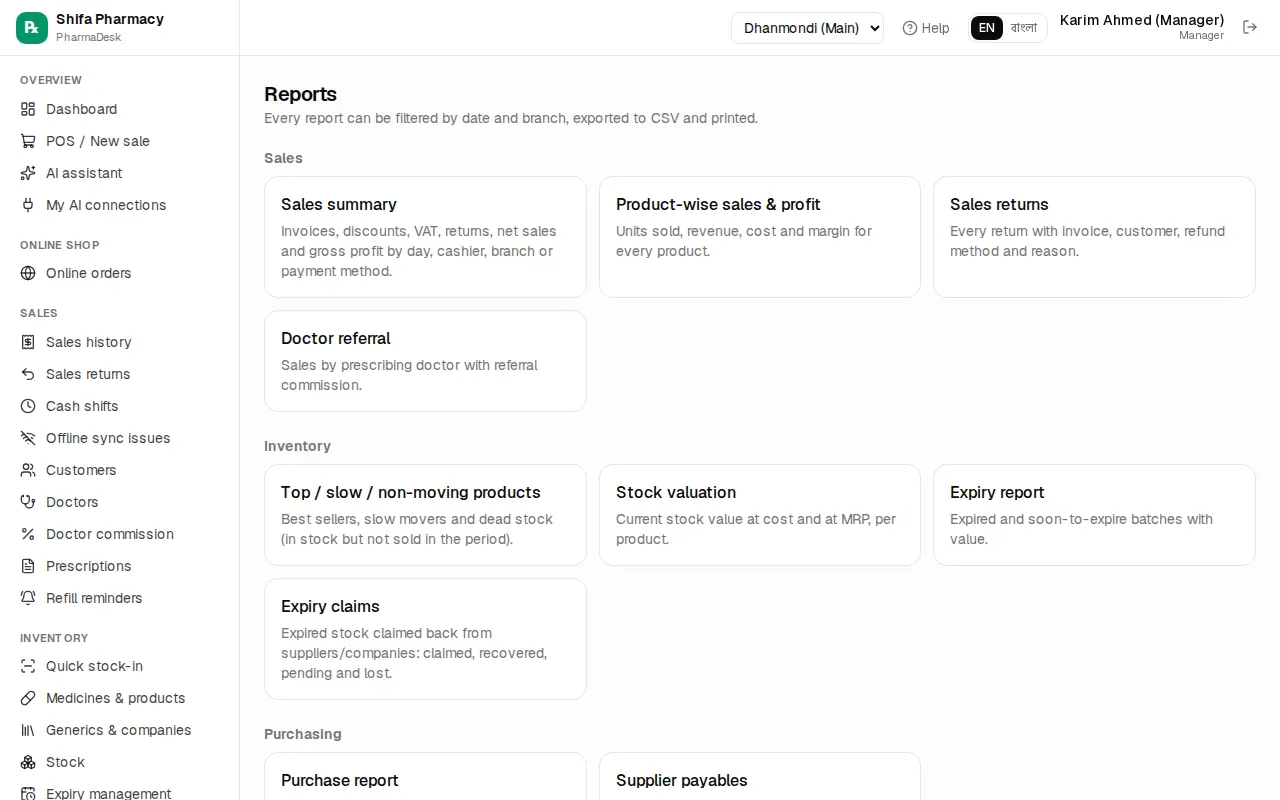
Which report answers which question
| Your question | Report |
|---|---|
| How much did I sell today / this month? How much did each cashier sell? | Sales summary |
| Which medicines make the most profit? | Product-wise sales & profit |
| What is my real profit after expenses and salaries? | Profit & loss |
| Which sales were returned, and why? | Sales returns |
| How much was sold on each doctor's prescriptions, and what commission is due? | Doctor referral |
| Which medicines sell fast, which are not moving? | Top / slow / non-moving products |
| How much stock do I have, in taka? | Stock valuation |
| Which batches have expired or are about to? | Expiry report |
| How much expired stock did companies take back? | Expiry claims |
| How much did I buy from each supplier? | Purchase report |
| How much do I owe each supplier, and for how long? | Supplier payables |
| How old are my customers' dues? | Customer dues aging |
| Where did the money go? | Expenses by category |
| What came in and went out of cash, bank and bKash each day? | Cashbook |
| How much VAT did I collect and pay this month? | VAT report |
| Who bought narcotic / psychotropic medicines (for DGDA inspection)? | Controlled drugs register |
The Finance section has two more cards: Trial balance, income statement, balance sheet (the accounting books, see Accounting and expenses) and Day-end cash closing (see Cash shifts and closing).
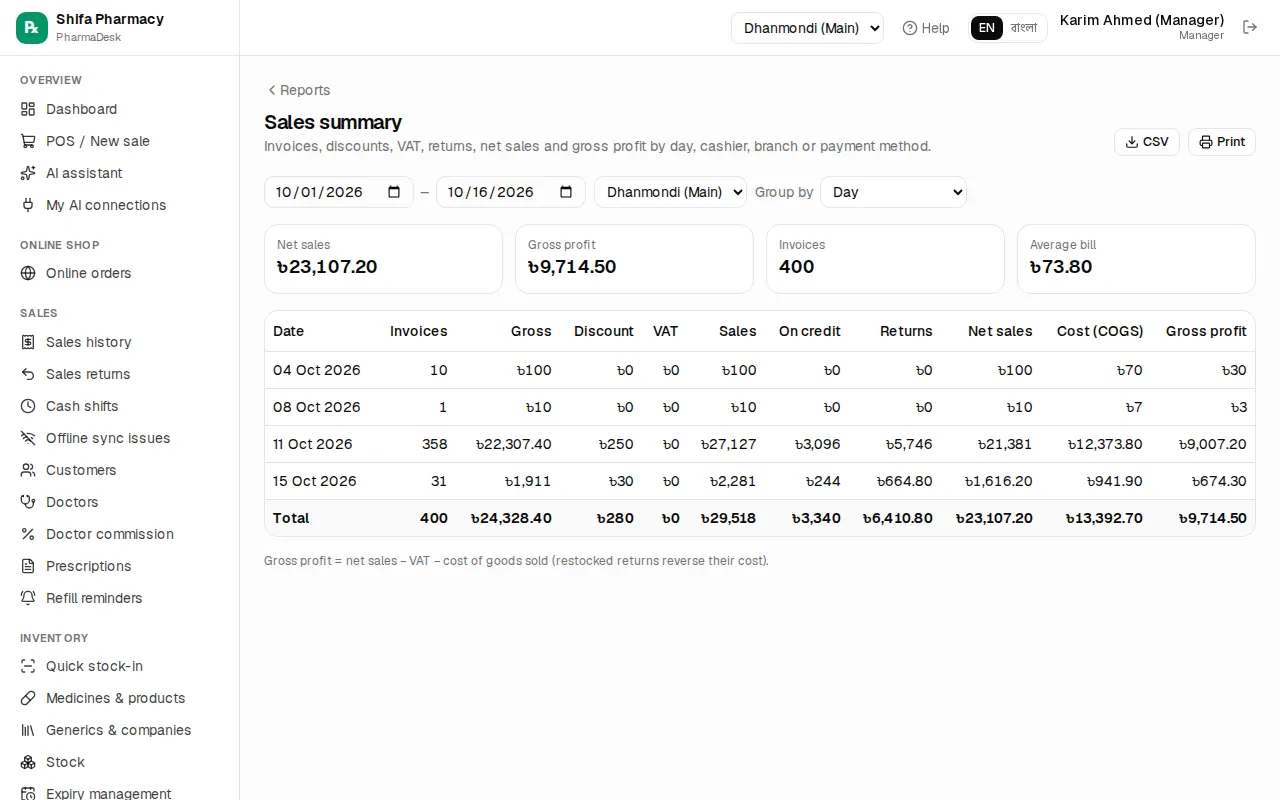
Filters: date, branch and more
- Date: two boxes, start and end date. If you change nothing, the report covers the 1st of this month to today. For today only, put today's date in both boxes.
- Branch: with several branches, choose one branch or All branches. A user tied to one branch only sees their own branch.
- Group by: for example Sales summary by Day, Cashier, Branch or Payment method.
- Sort by: Product-wise sales & profit by Revenue, Profit, Units or Margin %.
- Expiring within (days): in the Expiry report, type the number of days and press
Enter. - Account: in the Cashbook, one cash/bank account or All accounts.
Some reports have no date because they show the position right now: Stock valuation, Expiry report, Supplier payables and Customer dues aging.
CSV download and print
Every report has two buttons at the top right:
- CSV downloads the table as a file. Open it in Excel or Google Sheets to work with the numbers. The total row is included.
- Print opens the print dialog. The pharmacy name, report name, branch and dates are printed at the top automatically; filters and menus are left out.
VAT return (Mushak)
If your pharmacy has a BIN, you file a VAT return every month. The Reports › VAT return (Mushak) page prepares the working papers for it.
- Open Reports › VAT return (Mushak).
- Choose the month under Tax period (up to the last 24 months).
- With several branches, normally keep All branches, because the whole business has one BIN.
- Look through the three tabs: Summary (Mushak 9.1), Sales register (Mushak 6.2) and Purchase register (Mushak 6.1).
- CSV and Print download or print the tab that is open. The printout shows the pharmacy name, BIN and address at the top.
What the three tabs contain:
- Summary (Mushak 9.1): sales value, VAT-applicable and exempt sales, Net output VAT, Net input VAT, and finally Net VAT payable (or Net VAT credit (carry forward)).
- Sales register (Mushak 6.2): every invoice of the month.
- Purchase register (Mushak 6.1): every purchase of the month, with the supplier's invoice number.
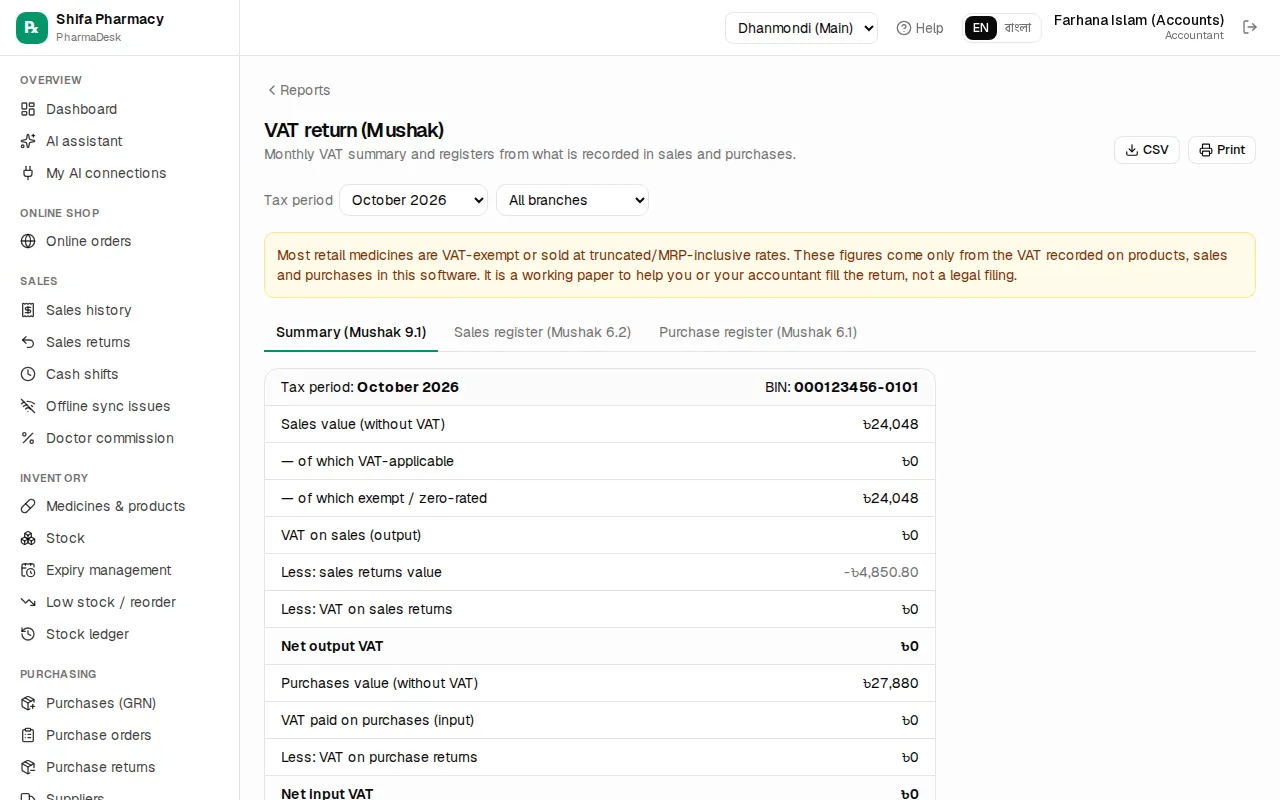
Read the yellow box carefully: most retail medicines are VAT-exempt or sold at MRP-inclusive rates, and these figures come only from the VAT recorded in the software. It is a working paper to help fill the return, not a legal filing. Have your accountant check it.
Mushak 6.3 tax invoice for one sale
When a buyer asks for a VAT invoice:
- Open the invoice from Sales › Sales history.
- Click the Mushak 6.3 button at the top. An A4 tax invoice opens in a new tab.
- Click Print at the top. Click Close when done.
Common mistakes
Chapter 13 · Help
Troubleshooting
Answers to common problems with printers, barcode scanners, licence or plan pages, forgotten passwords, access denied, offline sales and stock mismatches
If you get stuck, check this page first. Under each question you'll find what to do, step by step. If that doesn't solve it, see Contacting support at the end.
Printers and receipts
The receipt does not print
First check how receipts print at your pharmacy. The owner opens Admin › Printers & labels and looks at How to print receipts.
- Browser print dialog (any printer): after a sale, a small window with the receipt opens and the print dialog appears. If nothing opens, the browser blocked the pop-up; a message "Allow pop-ups to print the receipt" appears. Allow pop-ups for this site using the icon at the right of the address bar. In the dialog, make sure the right printer is selected.
- Direct to thermal printer (no dialog): this works only in Chrome or Edge on a computer, and each counter computer must connect its printer once. If the Printers on this computer section further down says "No printer connected on this computer":
- Switch the printer on and plug in the USB cable.
- Click Connect USB printer (or Connect serial / Bluetooth if the printer shows up as a COM port).
- Pick the printer from the browser's list.
- Click Test print. If paper comes out, you're done.
If direct printing isn't set up or the printer can't be reached, PharmaDesk opens the browser receipt page instead, so the sale is never blocked.
The receipt prints at the wrong size or is cut off
The paper size is set in Admin › Settings, in the Receipts section, under Paper size: 80 mm thermal, 58 mm thermal or A4 invoice. Choose the width of your printer roll and save. In browser-dialog mode, also check the dialog's "Paper size" and "Margins" (None), and keep scale at 100%.
Bangla receipts print blank or garbled
When Receipt language is Bangla, thermal printers print the receipt as an image, so it prints a little slower. If letters break, try Test print and check that the paper size is right. If needed, switch Receipt language to English.
The cash drawer does not open
The drawer must be plugged into the printer's RJ11 port, and Open the cash drawer when printing must be ticked. This only works in Direct to thermal printer mode.
Barcode scanner
Scanning does nothing
A scanner behaves like a keyboard: it types the code and presses Enter. So the cursor must be in the POS search box. Press F2 to put the cursor there, then scan again. To test the scanner, open Notepad and scan; if no numbers appear, check the scanner's cable or battery.
Scanning shows "No medicine found"
That medicine has no barcode saved. Open it from Inventory › Medicines & products, click Edit, click into the Barcode box and scan the pack, then click Save changes. For packs without a barcode, you can print your own barcode labels from the Labels page (see Stock control & expiry).
Licence, plan and subscription
A "licence has expired" / "licence is suspended" page appears
This page appears when the pharmacy's licence is not active: expired, suspended or revoked. The page shows the Licence status.
- All your medicines, sales, stock and accounts are saved; nothing is deleted. Everything opens again as soon as the licence is active. The online shop is paused until then.
- If you are the owner, renew using the phone, WhatsApp or email shown on the page.
- If you are staff, tell the owner.
If it says "Your licence has expired: renew soon", it is only a warning; PharmaDesk keeps working until the date shown. Click Go to dashboard to carry on, but renew in time.
A "not part of your plan" page appears
If a menu opens a page like "HR & payroll is not part of your plan", that part (for example HR, online shop, accounting or VAT return) is not switched on in your licence. It is not an error, and everything else keeps working.
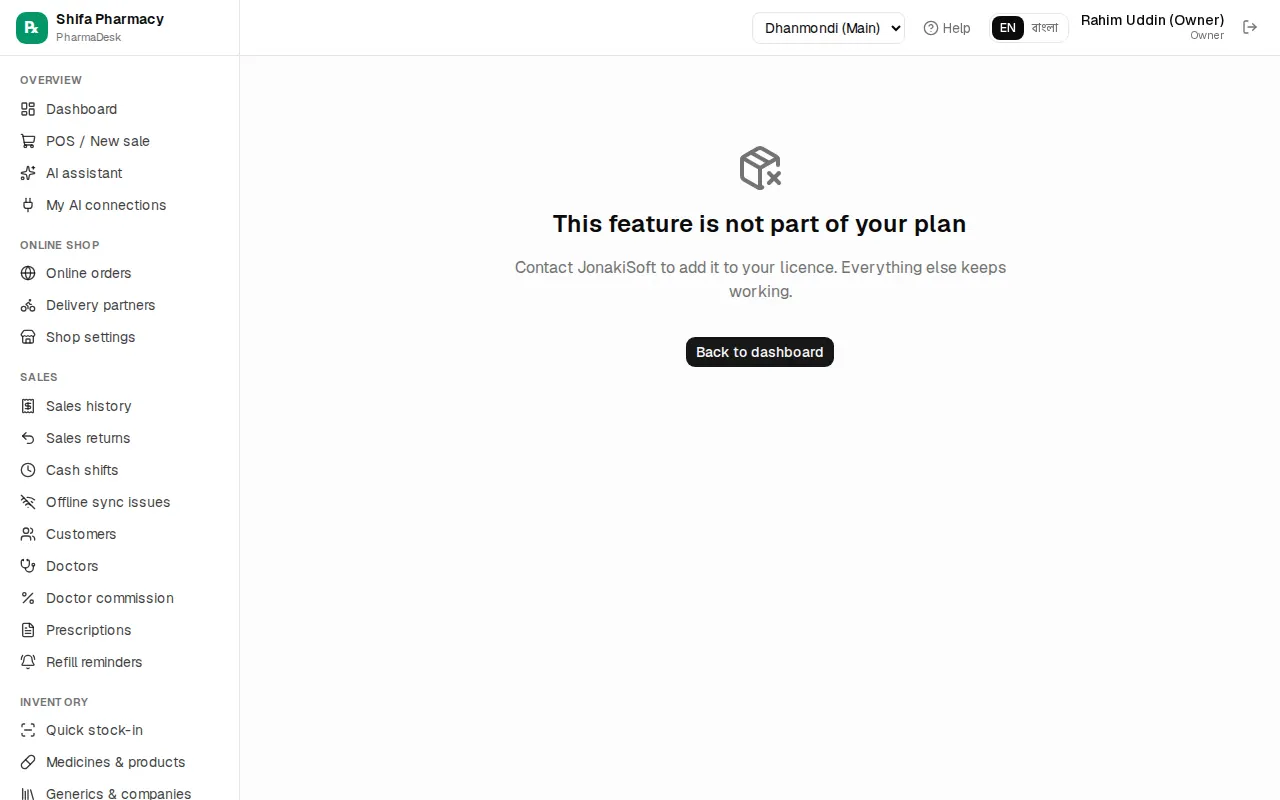
- If you are staff, ask the pharmacy owner.
- If you are the owner, contact JonakiSoft using the details on the page to add it to your licence.
- Click Back to dashboard to return to work.
The free trial or subscription has ended
If you see "Your free trial has ended" or "Your subscription has ended", the software won't open until it is renewed, but all data is kept. Sales made offline on this device are kept too and sync automatically after renewal. The owner renews using the contacts on the page; plan and payment details are in Payments, licence & AI.
Login and access
I forgot my password
There is no "forgot password" button on the login page. Here is what to do:
- Staff (manager, cashier and so on): ask the owner. The owner opens Admin › Users & roles, clicks the key icon on your row, types a New password (at least 6 characters) and clicks Set password. You are then signed out on every device; sign in again with the new password.
- The owner: contact JonakiSoft support; after checking who you are, they set a new owner password.
A "No access" page appears
"Your role doesn't allow this page" means your role (for example cashier) is not meant for this page. For example, cashiers cannot open reports or accounting pages. Click Go to POS to get back to work. If you really need the page for your job, ask the owner; they can change your role in Admin › Users & roles. More about users and roles is in Owner setup.
Offline sales
I sold without internet and it hasn't synced
The POS keeps selling without internet; the sale is stored on that device and sent to the server automatically when the internet is back. A yellow or red bar at the top of the POS shows how many sales are waiting to sync.
- Check that the internet is working.
- Click Sync now on the bar at the top of the POS.
- If sales are still waiting, click Details. The Offline sales on this device list shows each sale, how many times it was tried and any error in red.
- If you were signed out, sign in again; syncing then continues.
A sale appears under "Offline sync issues"
When an offline sale syncs with more than the stock, an old price, an expired batch or a discount over the limit, the sale is still recorded but listed under Sales › Offline sync issues. A manager or the owner checks each one (for example, counting stock when it went short) and then clicks Mark resolved. Issue names such as "Stock went below zero" or "Device clock was wrong" explain what happened.
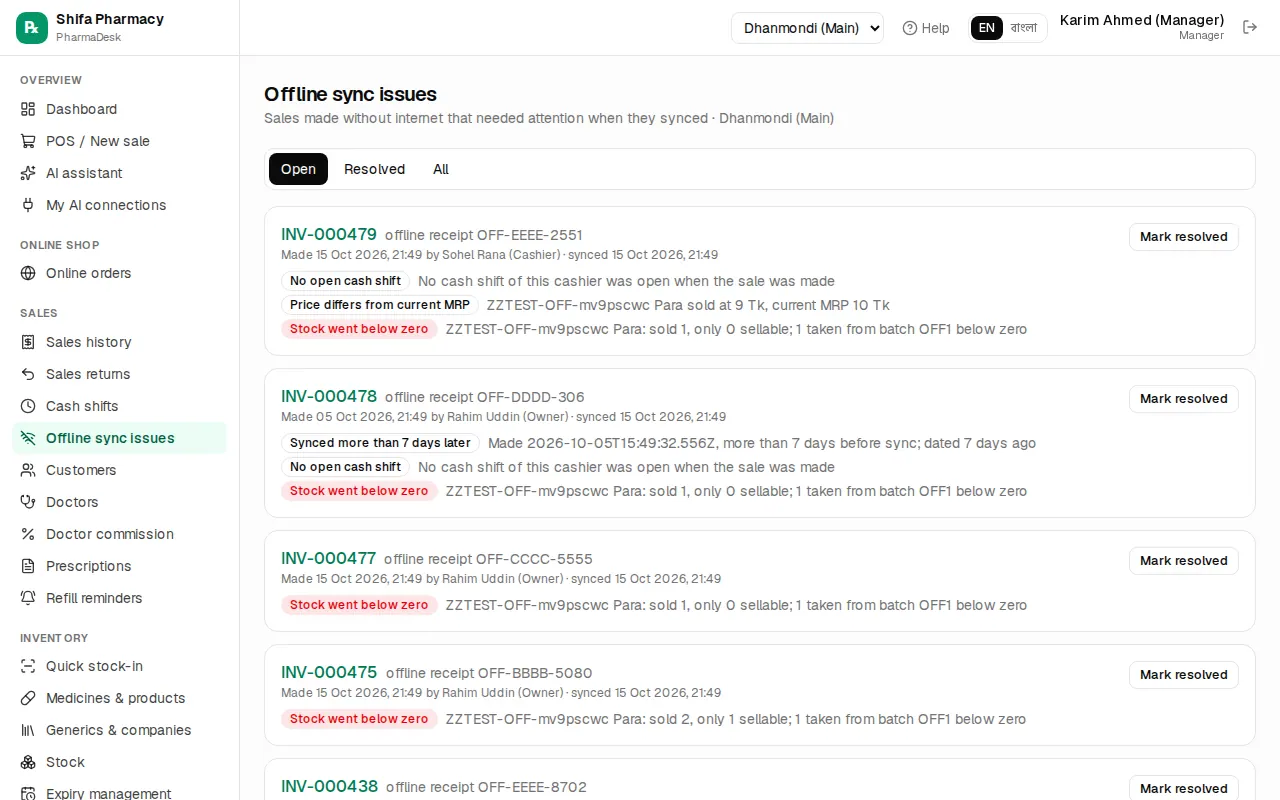
Stock looks wrong
- Open Inventory › Stock ledger and look at every movement of that medicine: purchases, sales, returns, transfers, adjustments.
- Common causes: mixing up boxes/strips and pieces when entering a purchase, sales or transfers at another branch, offline sales not yet synced.
- If a purchase was wrong, fix the purchase. To set the real shelf count, use Inventory › Stock count or Inventory › Adjustments. Details in Stock control & expiry.
Contacting support
If this page didn't solve it:
- First tell the pharmacy owner or manager; many things (passwords, roles, printer settings) they can fix themselves.
- The owner contacts JonakiSoft support. Phone, WhatsApp and email are shown on the "not part of your plan", licence and subscription pages. If a reseller set up your software, their contacts appear there instead.
- When you get in touch, give: the pharmacy name, which page you were on and what you were doing, what the screen said (a screenshot is best), and the invoice number if there is one.
Chapter 14 · Help
Glossary
Plain meanings of the words used in PharmaDesk and pharmacy bookkeeping: FEFO, batch, MRP, GRN, due, shift, Mushak, BIN, ledger, trial balance and more
If a word in the software or in this guide is unfamiliar, look it up here. Terms are grouped by topic. The Bangla term used in the app is given in brackets, because many staff know the Bangla word better.
Medicines and stock
| Term | Meaning |
|---|---|
| Generic (জেনেরিক) | The name of the active ingredient, for example paracetamol. One generic is sold under many brands. You can search the POS by generic, which makes it easy to find an alternative brand. |
| Brand | The market name given by the company, for example Napa or Ace. |
| Batch (ব্যাচ) | One lot made at the same time. Each batch has its own batch number, expiry date and purchase price. PharmaDesk tracks stock by batch. |
| Expiry (মেয়াদ) | The date after which the medicine must not be sold. Expired batches are listed in Inventory › Expiry management. |
| FEFO | First Expiry, First Out: the batch that expires first is sold first. If the batch on the POS is left at Auto (FEFO), the software picks that batch for you. |
| MRP | Maximum Retail Price: the highest retail price printed on the pack. You may not charge the customer more. |
| TP / purchase price | Trade Price: the price at which the company or supplier sells to the pharmacy. In PharmaDesk this is the purchase price or Unit cost. The gap between MRP and purchase price is your profit. |
| Unit / strip / box | The measures used to count medicine. For example 1 box = 10 strips, 1 strip = 10 tablets (Pack size 10x10). Stock is always kept in the smallest unit. |
| Reorder level | When stock falls to this number, it's time to order again. Below it, the medicine appears in Low stock / reorder. |
| Stock count | Counting what is really on the shelf and matching it with the software's number. |
| Adjustment | Increasing or decreasing stock by hand for damage, loss or a wrong count, with a reason. |
| Stock ledger | The record of every movement of one medicine: purchases, sales, returns, transfers. |
| Branch transfer | Sending stock from one branch to another. |
| Expiry claim | Returning expired stock to the company or supplier and claiming cash, a credit note or replacement goods. |
| Controlled drug | A narcotic or psychotropic medicine whose sales must be kept in a separate register and shown at DGDA inspections. |
| DGDA | Directorate General of Drug Administration, which licenses and inspects pharmacies. |
Purchasing and suppliers
| Term | Meaning |
|---|---|
| Supplier (সরবরাহকারী) | Who you buy from: a company depot or a wholesaler. |
| Purchase order (PO) | An order sent to the supplier before the goods arrive. It does not add stock. |
| GRN | Goods Received Note: the purchase entry you make when the goods arrive, with batch, expiry and price. It adds stock. In the menu: Purchases (GRN). |
| Purchase return | Sending purchased goods back to the supplier. |
| Supplier payable | What the supplier is owed by you, in other words your debt to them. |
Sales and money
| Term | Meaning |
|---|---|
| POS | Point of Sale: the counter sales screen where you search or scan medicines and make the bill. |
| Invoice (ইনভয়েস) | The bill for one sale, with its own number. |
| Due / baki (বাকি) | Money the customer will pay later. To sell on credit you must choose a customer. |
| Credit limit (বাকির সীমা) | The most a customer is allowed to owe. |
| Walk-in (সাধারণ ক্রেতা) | A customer whose name was not recorded. Walk-in customers cannot be given credit. |
| Hold (হোল্ড) | Parking a half-made bill to serve another customer, then reopening it later. |
| Void (বাতিল) | Cancelling a wrong sale completely. This is a manager's job. |
| Sales return | A customer returns medicine; you refund the money or adjust it against their due. |
| Shift (শিফট) | One cashier's turn on a cash drawer, from opening to closing. A shift must be open before selling. |
| Float / opening cash (শুরুর ক্যাশ) | The change put in the drawer when the shift starts. PharmaDesk calls it Opening cash. |
| Day-end closing | At the end of the day, what came in, went out and remains in every cash, bank and wallet account. |
| Loyalty points | Points regular customers earn on purchases and can later use instead of money. |
Accounting
| Term | Meaning |
|---|---|
| Double entry | Every transaction is recorded on two sides, debit and credit, which are always equal. PharmaDesk does this for you. |
| Debit / Credit | The two sides of an entry. Roughly: assets or expenses going up are debits; liabilities, income or owner's capital going up are credits. |
| Journal (জাবেদা) | The book of all transactions in date order. Each entry is a voucher. |
| Ledger (খতিয়ান) | All transactions and the balance of one account (for example cash, sales, rent) in one place. |
| Chart of accounts | The list of all ledgers: assets, liabilities, equity, income, expenses. |
| Trial balance (রেওয়ামিল) | Totals of debits and credits across all ledgers. If they are equal, the books agree. |
| Income statement (আয় বিবরণী) | For a period, income minus expenses: your profit or loss. |
| Balance sheet (উদ্বৃত্তপত্র) | On a date, what the business owns (assets), owes (liabilities) and the owner's stake. |
| COGS | Cost of goods sold: what the medicines you sold cost you to buy. |
| Gross profit | Sales minus cost of goods sold. |
| Net profit | Gross profit minus all running costs such as rent, salaries and bills: the real profit. |
| Capital / Drawings | Money the owner puts into the business is capital; money taken out for personal use is drawings. Neither is income or expense. |
VAT and legal
| Term | Meaning |
|---|---|
| VAT | Value added tax. Most retail medicines are VAT-exempt or sold at MRP-inclusive rates. |
| Mushak (মূসক) | The Bangla short form for VAT; NBR's VAT forms are also called Mushak: Mushak 6.3 (tax invoice), Mushak 6.1 (purchase register), Mushak 6.2 (sales register), Mushak 9.1 (monthly return). |
| BIN | Business Identification Number: your VAT registration number from NBR. Enter it in Admin › Settings under VAT registration (BIN). |
| Output / input VAT | VAT collected on sales is output VAT; VAT paid on purchases is input VAT. The difference is paid to the government. |
Software
| Term | Meaning |
|---|---|
| Role | A user's job: owner, manager, pharmacist, cashier, store keeper or accountant. The menu and permissions change with the role. |
| Branch | One outlet of the pharmacy. Stock, shifts and sales are per branch. |
| Offline / sync | Without internet, sales are stored on the device; sending them to the server when the internet returns is called syncing. |
| Licence / subscription | Permission to use the software and its validity period. It also decides which parts are switched on. |
| CSV | A simple table file that opens in Excel or Google Sheets. Every report can be downloaded as CSV. |
For more, see the Reports, Accounting and expenses or Troubleshooting chapters.