Stock & purchasing
Products, purchases & suppliers
Add medicines to your list, receive supplier goods into stock (including invoice scan), purchase orders, returns and paying supplier dues
For:Store keeperManagerOwnerAccountant
On this page
Entering supplier goods correctly keeps stock, expiry dates and supplier dues right automatically. This chapter covers adding medicines, receiving goods, orders, returns and paying suppliers.
Adding medicines and products
Inventory › Medicines & products lists your medicines with stock and MRP. There are three ways to add medicines.
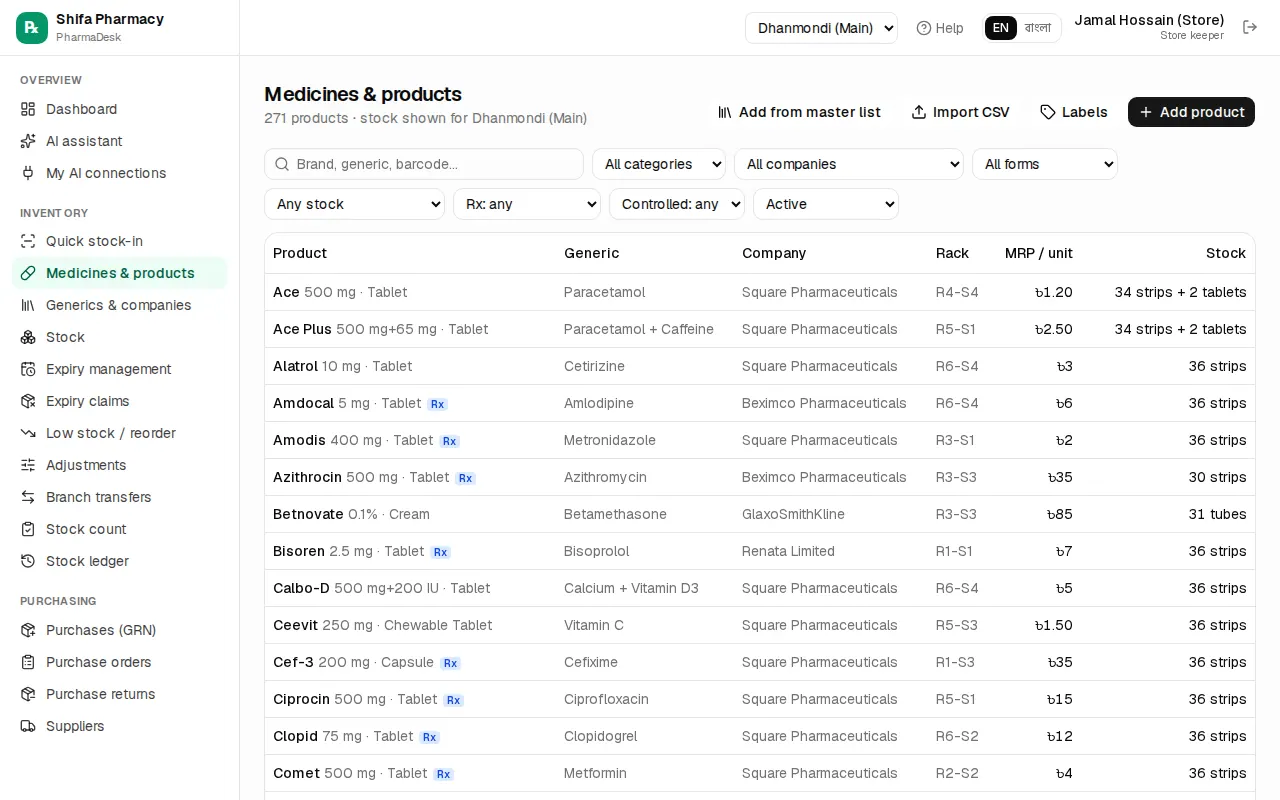
1. From the master list (fastest)
- Press Add from master list (or Inventory › Generics & companies › Master medicine list tab).
- Type at least 2 letters of a brand, generic or company.
- Tick the ones you need and choose the category.
- Press Add … selected (e.g. "Add 3 selected").
MRP is copied and cost is set to 88% of MRP; edit it later to the real cost.
2. One by one
- Press Add product.
- Enter the brand name, generic, strength and company. New generics and companies are created automatically.
- Under Pack & price, set the base unit (e.g. tablet), units per strip and strips per box.
- Enter MRP and cost per base unit (one tablet). If you know the strip price, type it in Set from strip MRP (৳) and the per-tablet price is worked out for you.
- Under Stock control, add the barcode, Rack / shelf and Reorder level. Tick Prescription required, Controlled drug or VAT applicable where they apply.
- Press Add product.
3. Many at once with CSV
- Press Import CSV, then Download template.
- Fill one row per product (or per batch). Prices are per base unit, expiry as
YYYY-MM. Batch, expiry and qty add opening stock too. - Press Choose CSV file. A preview appears first; problem rows are shown in red.
- When everything is fine, press Import … rows.
Quick stock-in (with invoice scan)
The easiest daily way to receive goods is Inventory › Quick stock-in. It has two cards: Scan supplier invoice and Quick entry. Work saves itself as a draft; resume it with Continue under Unfinished stock-ins.
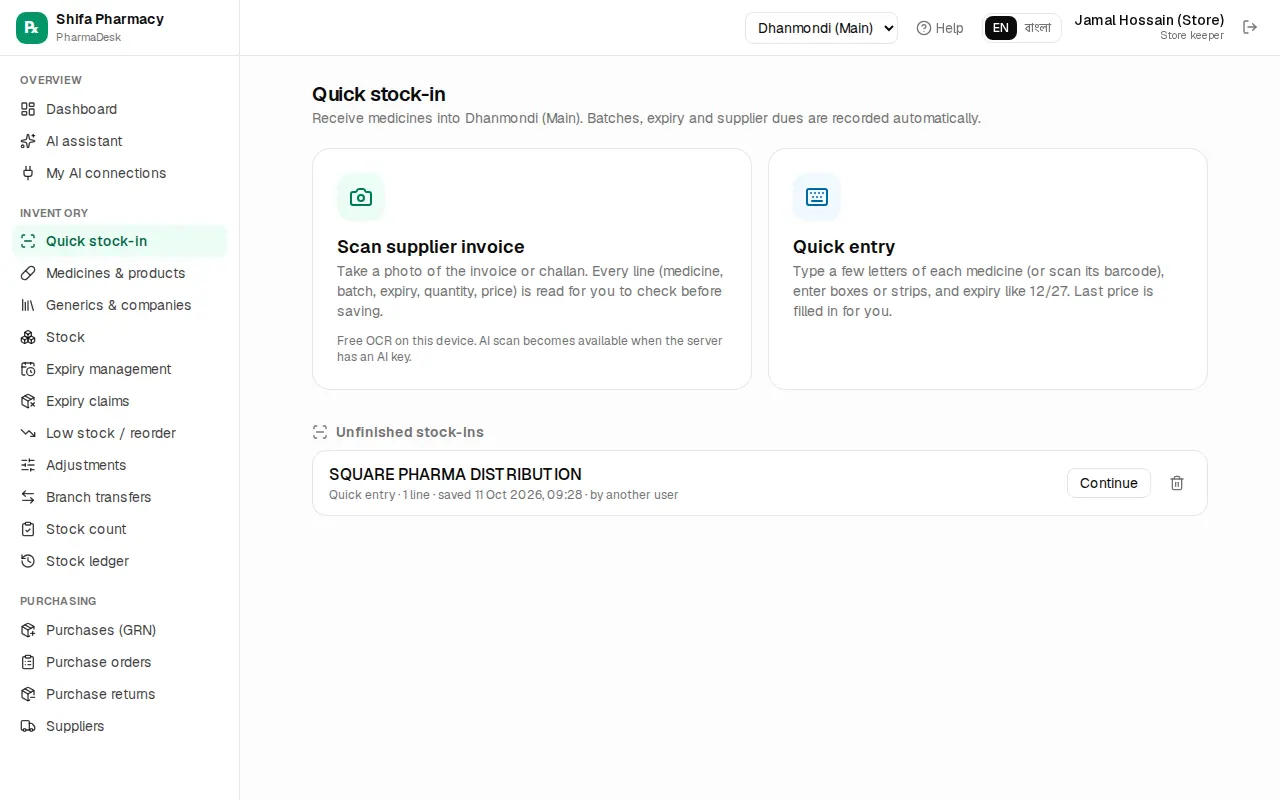
By photographing the invoice
- Press Scan supplier invoice.
- Pick how to read it: Free OCR (on this device) for clear printed invoices, at no cost. AI scan (more accurate) also reads handwriting and messy layouts (when AI is set up on the server).
- Press Take photo (on a phone) or Choose photos. For long invoices use Add page, up to 6 pages.
- Press Read … page(s). The Check scanned invoice page opens with the photo beside the lines.
- Compare every line with the photo. If a medicine was not recognised, search it in Find the right medicine… and pick it. Doubtful cells are highlighted.
- The rest is the same as Quick entry below.
By typing (Quick entry)
- Press Quick entry.
- Choose the Supplier. If it is not listed, press New, enter the name and phone and press Add.
- Enter the Invoice / challan no and date.
- Type a few letters of the medicine or scan its barcode. If it is missing, use Add new medicine.
- Enter the batch and expiry. Expiry can be typed like
12/27. - Enter the quantity and pick box / strip / unit next to it. Bonus goods go in Free.
- Check Cost and MRP; the last price is filled in for you.
- At the bottom, enter any Bill discount, VAT and Other charges. When the Invoice total matches you see a green ✓.
- In Payment now, enter what you paid (or press Paid in full) and pick the method. Anything unpaid is added to the supplier's due.
- Press Save & add to stock (or
Ctrl+Enter).
After saving you can Print shelf labels or start a New stock-in.
Purchases (GRN) with the full form
The classic full form is Purchasing › Purchases (GRN) › New purchase. It also records the manufacturing date (Mfg).
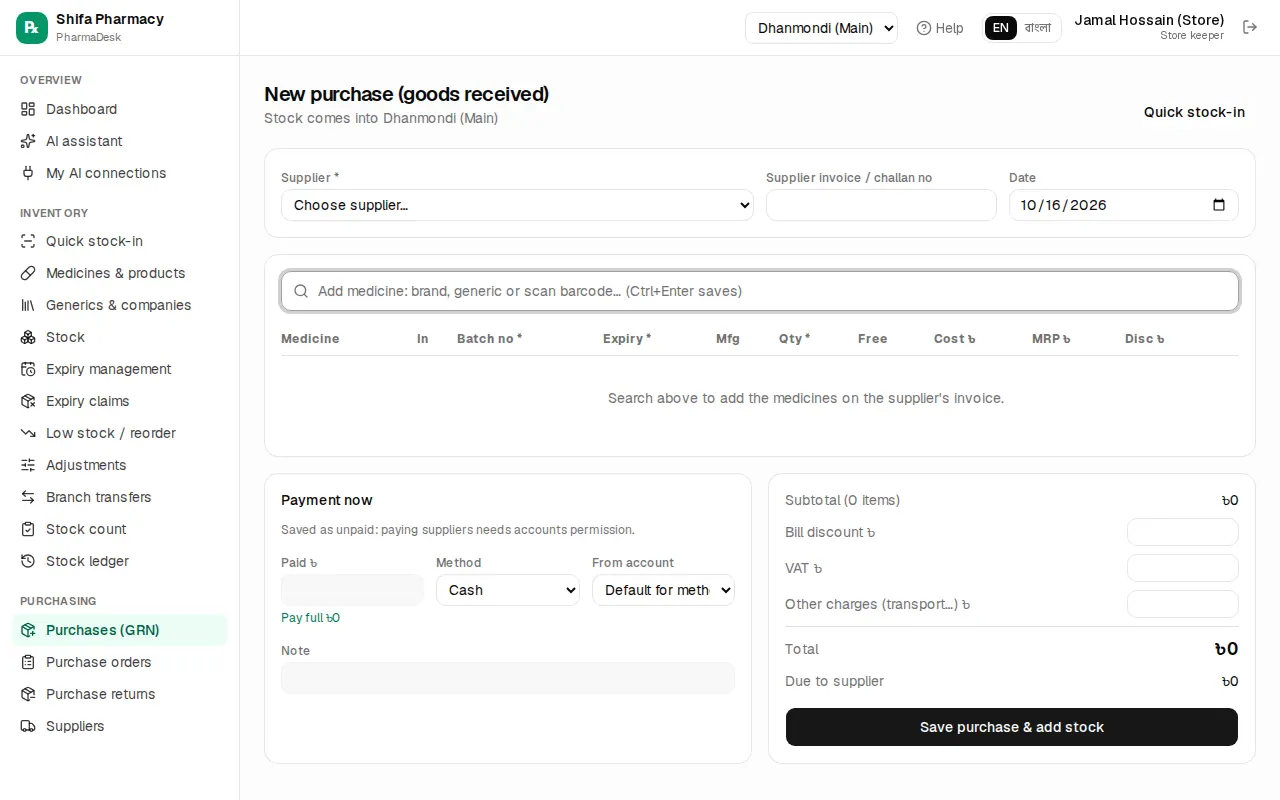
- Choose the Supplier, enter the Supplier invoice / challan no and date.
- Search and add medicines in the box at the top.
- On each line choose strip or unit under In, then enter Batch no, Expiry (MM/YYYY), Qty, Free (bonus), Cost ৳, MRP ৳ and Disc ৳.
- Watch the yellow warnings: "Expires within 6 months", "MRP below cost" or "MRP differs from current".
- On the right, fill Paid ৳, Method and From account. Due to supplier shows what is left.
- Press Save purchase & add stock.
A purchase page has Print, Print labels and Return items. A manager or the owner can Cancel purchase with a reason, unless some of its stock was already sold or returned.
Purchase orders and WhatsApp
- Go to Purchasing › Purchase orders › New order.
- Choose the supplier and Expected delivery date, add medicines and quantities.
- Press Save as draft.
- On the order page press Send on WhatsApp. The order text appears; edit if needed and press Open WhatsApp. A draft order is marked as sent automatically.
- When the goods arrive, press Receive goods on the order. A new purchase opens pre-filled with the outstanding quantities; add batch and expiry and save.
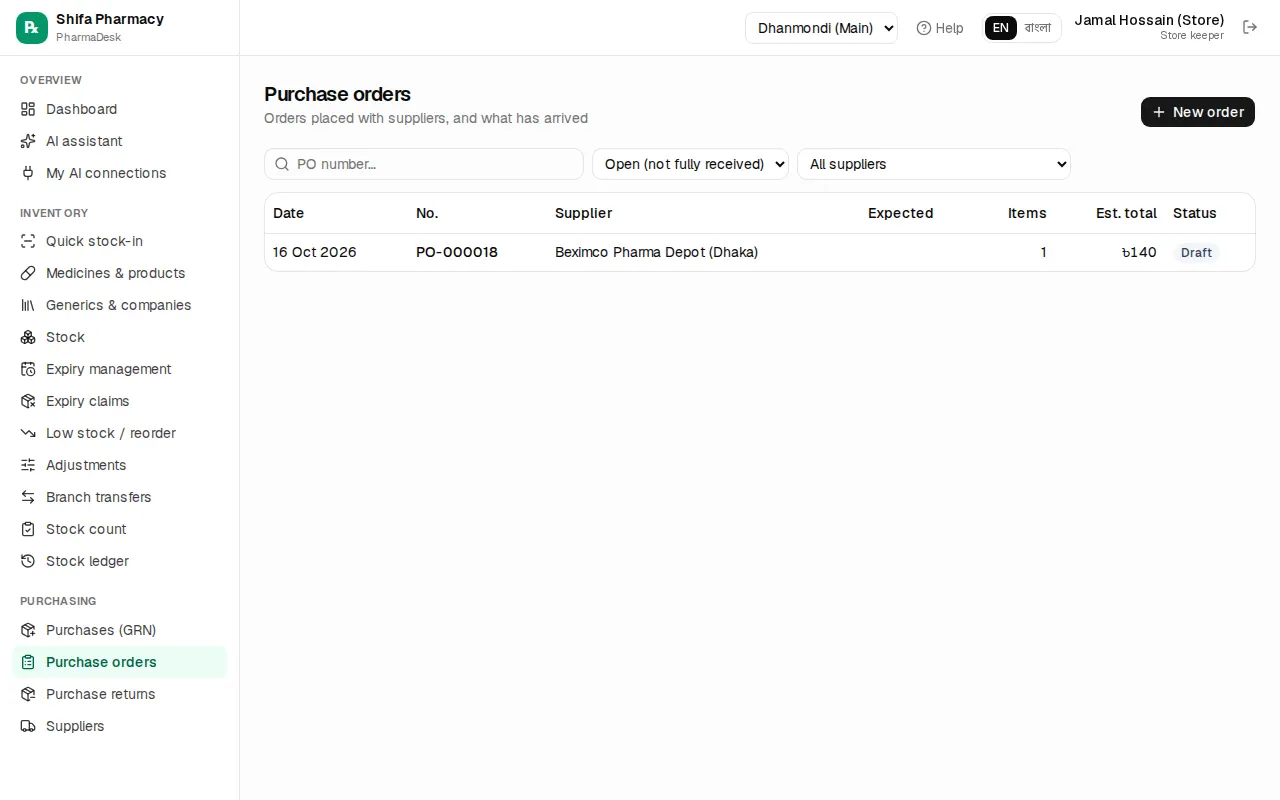
Order statuses: Draft, Sent, Partial, Received, Cancelled. If the rest of a partial order will not come, press Close order.
Returning goods to a supplier
Returning damaged, wrong or short-dated goods reduces your stock and what you owe the supplier.
- Go to Purchasing › Purchase returns › New return (or Return items from a purchase).
- Choose the supplier and type the Reason.
- Search in Find the medicine to return… and pick the batch.
- Enter the quantity (no more than Can return). The value is taken at purchase cost.
- Press Save return & remove stock.
Expiry claims to companies are separate; see Expiry claims.
Suppliers and paying dues
Purchasing › Suppliers shows every supplier with phone and Payable (what you owe them).
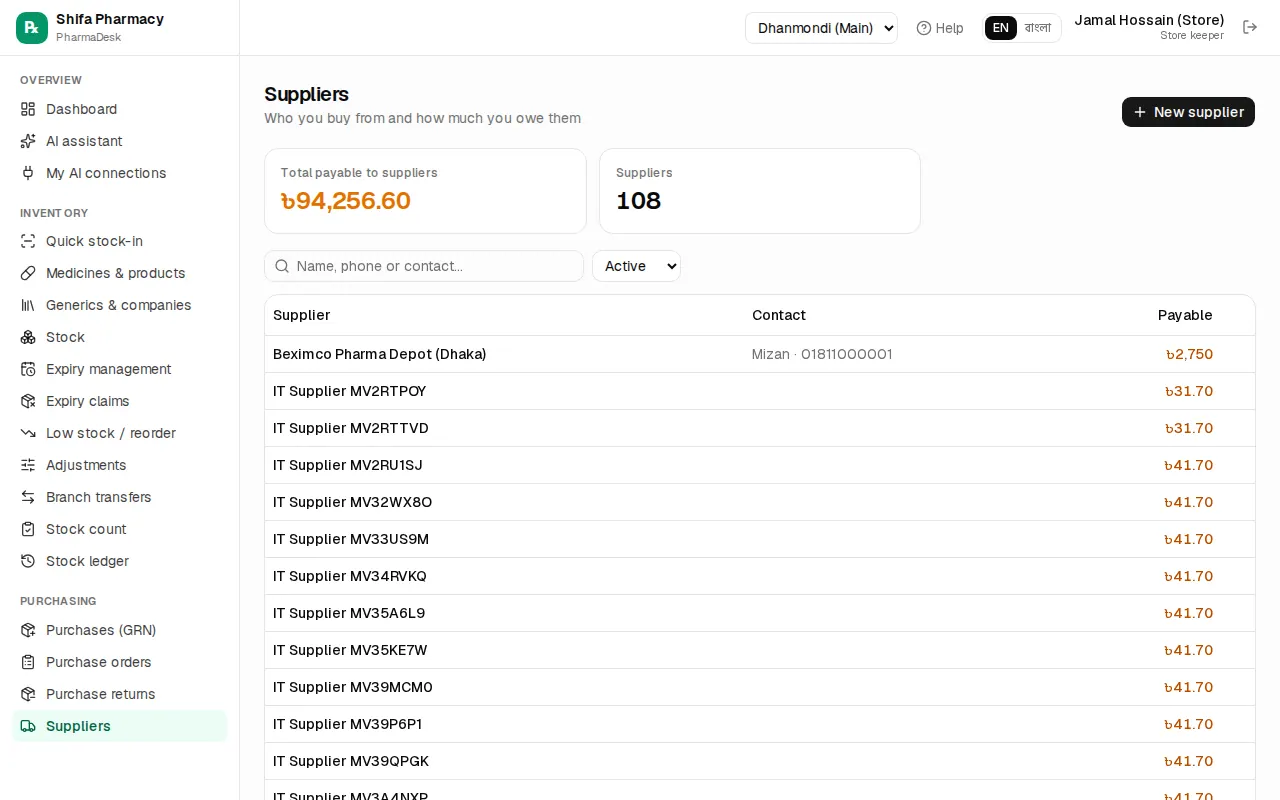
Adding a supplier:
- Press New supplier.
- Enter the name, Contact person (sales rep), phone and WhatsApp.
- If you already owed them money at the start, enter it in Opening balance (a negative amount for an advance). Only a manager or accountant can change this.
- Press Save supplier.
Click a supplier to open the Supplier statement (purchases, payments, returns, balance); Print statement to reconcile.
Paying a due:
- Press Pay next to the supplier, or go to Finance › Supplier payments › Pay supplier.
- After you pick the supplier, "You owe …" appears. Press Pay all … to pay everything, or type an amount.
- Choose the Method (cash, bKash, bank, cheque…) and Paid from account.
- For bKash or cheque, fill Reference (trx id / cheque no).
- Press Save payment. On the next page, Print voucher and get it signed.
If you pay more than you owe, the extra is kept as an advance.